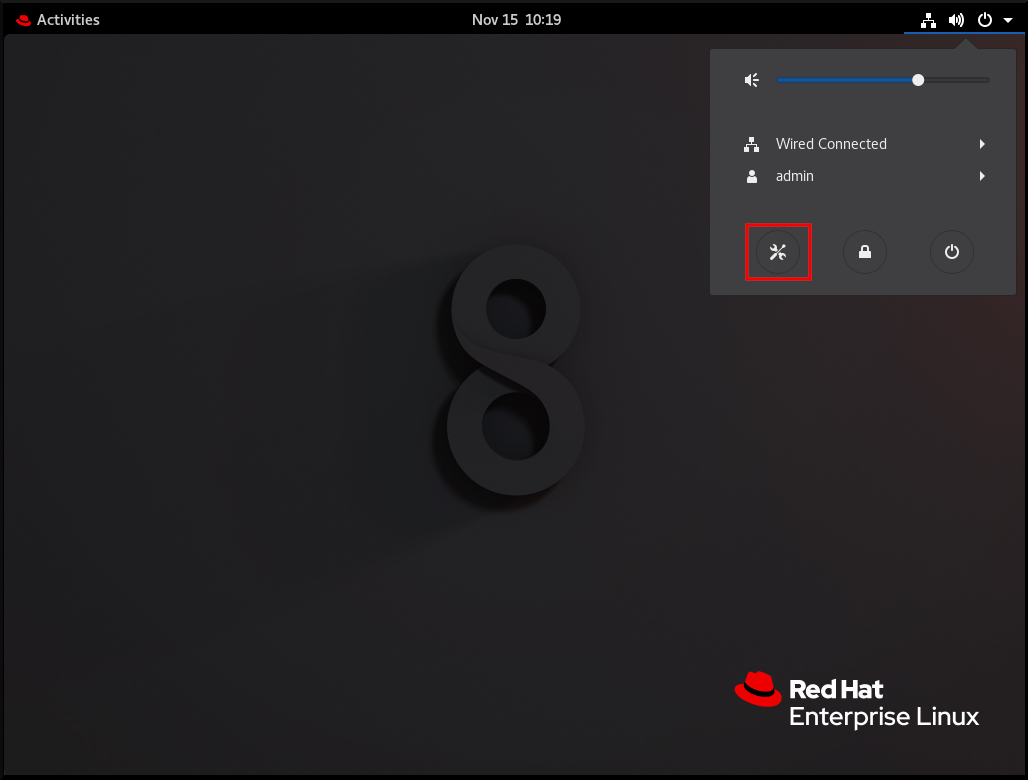
Mẹo Which Windows 10 feature provides an automated diagnosis and repair of boot problems plus a centralized platform for advanced recovery tool?
Thủ Thuật về Which Windows 10 feature provides an automated diagnosis and repair of boot problems plus a centralized platform for advanced recovery tool? Mới Nhất
Gan Feng Du đang tìm kiếm từ khóa Which Windows 10 feature provides an automated diagnosis and repair of boot problems plus a centralized platform for advanced recovery tool? được Cập Nhật vào lúc : 2022-08-20 08:56:02 . Với phương châm chia sẻ Bí kíp về trong nội dung bài viết một cách Chi Tiết 2022. Nếu sau khi Read Post vẫn ko hiểu thì hoàn toàn có thể lại Comment ở cuối bài để Ad lý giải và hướng dẫn lại nha.Red Hat Enterprise Linux 8
Nội dung chính- A guide to configuring basic system settings in Red Hat Enterprise Linux 8Making open source more inclusiveProviding feedback on Red Hat
documentationChapter 1. Getting started with RHEL System Roles1.1. Introduction
to RHEL System Roles1.2. RHEL System Roles terminology1.3. Applying a role1.4. Additional resourcesChapter 2. Changing basic environment settings2.1. Configuring the date and time2.1.1. Displaying the current date and time2.2. Configuring the system locale2.3. Configuring the keyboard layout2.4. Changing the language using desktop GUI2.5. Additional resourcesChapter 3. Configuring and managing network access3.1. Configuring the network and host name in
the graphical installation mode3.2. Configuring a static
Ethernet connection using nmcli3.3. Adding
a connection profile using nmtui3.4. Managing networking in the RHEL web console3.5. Managing networking using RHEL System Roles3.6. Additional resourcesChapter 4. Registering
the system and managing subscriptions4.1. Registering the system after the installation4.2. Registering
subscriptions with credentials in the web console4.3. Registering a system using Red Hat account on GNOME4.4. Registering a system using an activation key on GNOME4.5. Registering RHEL 8.4 using the installer GUIChapter 5. Making systemd services start boot time5.1. Enabling or disabling the services5.2. Managing services in the RHEL web consoleChapter 6. Configuring system security6.1. Enabling
the firewalld service6.2. Managing firewall in the rhel 8 web console6.3. Managing basic SELinux settings6.4. Ensuring the required state of selinux6.5. Switching SELinux modes in the RHEL 8 web console6.6. Additional resourcesChapter 7. Getting started with managing user accounts7.1. Managing accounts and groups using command line tools7.2. System user
accounts managed in the web console7.3. Adding new accounts using the web consoleChapter 8. Dumping a crashed kernel for later analysis8.1. What is kdump8.2. Configuring kdump memory usage and target location in web console8.3. kdump using RHEL System Roles8.4. Additional resourcesChapter 9. Recovering and restoring a system9.1. Setting up ReaR9.2. Using a ReaR rescue image on the 64-bit IBM Z architectureChapter 10. Troubleshooting problems using log files10.1. Services handling syslog messages10.2. Subdirectories storing syslog messages10.3. Inspecting log files using the web console10.4. Viewing logs using the command line10.5. Additional resourcesChapter 11. Accessing the Red Hat support11.1. Obtaining Red Hat support through Red Hat Customer Portal11.2. Troubleshooting problems using sosreportChapter 12. Managing software packages12.1. Software management tools in RHEL 812.2. Application streams12.3. Searching for software packages12.3.1. Searching packages with YUM12.3.2. Listing packages with YUM12.3.3. Listing repositories with YUM12.3.4. Displaying package information with YUM12.3.5. Listing package groups with YUM12.3.6. Specifying global
expressions in YUM input12.4. Installing software packages12.4.1. Installing packages with YUM12.4.2. Installing a package
group with YUM12.4.3. Specifying a package name in YUM input12.5. Updating software packages12.5.1. Checking for updates with YUM12.5.2. Updating a single package with YUM12.5.3. Updating a package group with YUM12.5.4. Updating all packages and their dependencies with YUM12.5.6. Automating software updates12.6. Uninstalling software packages12.6.1. Removing packages with YUM12.6.2. Removing a package group with YUM12.6.3. Specifying a package name in YUM input12.7. Managing software package groups12.7.1. Listing
package groups with YUM12.7.2. Installing a package
group with YUM12.7.3. Removing a package group with YUM12.7.4. Specifying global expressions in YUM input12.8. Handling package management history12.8.1. Listing transactions with YUM12.8.2. Reverting transactions with YUM12.8.3. Repeating transactions with YUM12.8.4. Specifying global expressions in YUM input12.9. Managing software repositories12.9.1. Setting YUM repository options12.9.2. Adding a YUM repository12.9.3. Enabling a YUM repository12.9.4. Disabling a YUM repository12.10. Configuring YUM12.10.1. Viewing the current YUM configurations12.10.2. Setting YUM main options12.10.3. Using YUM plug-insChapter 13. Introduction to systemd13.1. systemd unit types13.2. systemd main features13.3. Compatibility
changes13.4. Additional resourcesChapter 14. Managing system services with systemctl14.1. Service unit management with systemctl14.2. Comparison of a service utility with
systemctl14.3. Listing system services14.4. Displaying system service
status14.5. Positive and negative service dependencies14.6. Starting a system service14.7. Stopping a system service14.8. Restarting a system service14.9. Enabling a system
service14.10. Disabling a system serviceChapter 15. Working with systemd targets15.1. Difference between SysV runlevels and systemd targets15.2. Viewing the default target15.2.1. Changing the default target15.2.2. Changing the default target using symbolic link15.2.3. Changing the current targetChapter 16. Shutting down, suspending, and hibernating the system16.1. System shutdown16.2. Shutting down the system using the shutdown command16.3. Shutting down the
system using the systemctl command16.4. Restarting the system16.5. Suspending the system16.6. Hibernating the system16.7. Overview of the power management commands with
systemctlChapter 17. Working with systemd unit files17.1. Introduction to unit files17.2. Unit file structure17.3. Important [Unit] section options17.4. Important [Service] section options17.5. Important [Install] section options17.6. Creating custom unit files17.7. Creating a custom unit file by using the second instance of the sshd service17.8. Converting SysV init scripts to
unit files17.9. Finding the systemd service description17.10. Finding the systemd service dependencies17.11. Finding default targets of the service17.12. Finding files used by the service17.13. Modifying existing unit files17.14. Extending the default unit configuration17.15. Overriding the default unit configuration17.16. Changing the timeout limit17.17. Monitoring overridden units17.18. Working with instantiated units17.19. Important unit specifiers17.20. Additional resourcesChapter 18. Optimizing systemd to shorten the boot time18.1. Examining system boot performance18.2. A guide to selecting services that can be safely disabled18.3. Additional resourcesChapter 19. Introduction to managing user and group accounts19.1. Introduction to users and groups19.2. Configuring reserved user and group IDs19.3. User private groupsChapter 20. Managing user accounts in the web console20.1. System user accounts managed in the web console20.2. Adding new accounts using the web console20.3. Enforcing password expiration in the web console20.4. Terminating user sessions in the web consoleChapter 21. Managing users from the command line21.1. Adding
a new user from the command line21.2. Adding a new group from the command line21.3. Adding a user to a supplementary group from the command line21.4. Creating a group directoryChapter 22. Editing user groups using the command line22.1. Primary and supplementary user groups22.2. Listing the primary and supplementary groups of a user22.3. Changing the primary group of a user22.4. Adding a user to a supplementary group from the command line22.5. Removing a user from a supplementary group22.6. Changing all of the supplementary groups of a userChapter 23. Managing sudo access23.1. User authorizations in sudoers23.2. Granting sudo access to a user23.3. Enabling unprivileged users to run certain commands23.4. Additional
resourcesChapter 24. Changing and resetting the root password24.1. Changing the root password as the root user24.2. Changing or resetting the forgotten root password as a non-root user24.3. Resetting the root password on bootChapter 25. Managing
file permissions25.1. Base file permissions25.2. User file-creation mode mask25.3. Default file permissions25.4. Changing file permissions using symbolic values25.5. Changing file permissions using octal valuesChapter 26. Managing the umask26.1. Displaying the current value of the umask26.2. Displaying the default bash umask26.3. Setting the umask using symbolic values26.4. Setting the umask using octal values26.5. Changing the default umask for the non-login shell26.6. Changing the default umask for the login shell26.7. Changing
the default umask for a specific user26.8. Setting default permissions
for newly created home directoriesChapter 27. Using
dnstap in RHEL27.1. Recording DNS queries using dnstap in RHELChapter 28. Managing the Access Control List28.1. Displaying the current Access Control List28.2. Setting the Access Control ListChapter 29. Using the Chrony suite to configure NTP29.1. Introduction to chrony suite29.2. Using chronyc to control chronyd29.3. Migrating to chrony29.3.1. Migration scriptChapter 30. Using Chrony30.1. Managing chrony30.2. Checking if chrony is synchronized30.3. Manually adjusting the System Clock30.4. Setting up chrony for a system in an isolated network30.5. Configuring remote monitoring access30.6. Managing
time synchronization using RHEL System Roles30.7. Additional resourcesChapter 31. Chrony with HW timestamping31.1. Verifying support for hardware
timestamping31.2. Enabling hardware timestamping31.3. Configuring
client polling interval31.4. Enabling interleaved mode31.5. Configuring server for large number of clients31.6. Verifying hardware timestamping31.7. Configuring PTP-NTP bridgeChapter 32. Achieving some settings previously supported by NTP in chrony32.1. Monitoring by ntpq and ntpdc32.2. Using authentication mechanism based on public key cryptography32.3. Using ephemeral symmetric associations32.4. multicast/broadcast clientChapter 33. Overview of Network Time Security (NTS) in chrony33.1. Enabling Network Time Security (NTS) in the client configuration file33.2. Enabling Network Time Security (NTS) on the serverChapter 34. Using secure communications between two systems with OpenSSH34.1. SSH and OpenSSH34.2. Configuring and starting an OpenSSH server34.3. Setting an OpenSSH server for key-based authentication34.4. Generating SSH key pairs34.5. Using SSH keys stored on a smart card34.6. Making OpenSSH more secure34.7. Connecting to a remote server using an SSH jump host34.8. Connecting to remote machines with SSH keys using ssh-agent34.9. Additional resourcesChapter 35. Configuring a remote logging
solution35.1. The Rsyslog logging service35.2. Installing
Rsyslog documentation35.3. Configuring a server for remote logging over TCP35.4. Configuring remote logging to a server over TCP35.5. Configuring TLS-encrypted remote logging35.6. Configuring
a server for receiving remote logging information over UDP35.7. Configuring remote logging to a server over UDP35.8. Load balancing helper in Rsyslog35.9. Configuring reliable remote logging35.10. Supported Rsyslog modules35.11. Additional resourcesChapter 36. Using the Logging
System Role36.1. The Logging System Role36.2. Logging System Role parameters36.3. Applying a local Logging System Role36.4. Filtering logs in a local Logging System Role36.5. Applying a remote logging solution using the Logging System Role36.6. Using the Logging System Role with TLS36.6.1. Configuring client logging with TLS36.6.2. Configuring server logging with TLS36.7. Using the Logging System Roles with RELP36.7.1. Configuring
client logging with RELP36.7.2. Configuring server logging with
RELP36.8. Additional resourcesChapter 37. Introduction to Python37.1. Python versionsChapter 38. Installing and using Python38.1. Installing Python 338.2. Installing additional Python 3 packages38.3. Installing additional Python 3 tools for developers38.4. Installing Python 238.5. Migrating from Python 2 to Python 338.6. Using PythonChapter 39. Configuring the unversioned Python39.1. Configuring the unversioned python command directly39.2. Configuring the unversioned python command to the required Python version interactively39.3. Additional resourcesChapter 40. Packaging
Python 3 RPMs40.1. SPEC file description for a Python package40.2. Common macros for Python 3 RPMs40.3. Automatic provides for Python RPMsChapter 41. Handling interpreter directives in Python scripts41.1. Modifying interpreter directives in Python scripts41.2. Changing /usr/bin/python3 interpreter directives in your custom packagesChapter 42. Using the PHP scripting language42.1. Installing the PHP scripting language42.2. Using the PHP scripting language with a web server42.2.1. Using PHP with the Apache HTTP Server42.2.2. Using PHP with the nginx web server42.3. Running a PHP script using the command-line interface42.4. Additional resourcesChapter 43. Using langpacks43.1. Checking languages that provide langpacks43.2. Working with RPM weak dependency-based langpacks43.2.1. Listing already installed language support43.2.2. Checking the availability of language support43.2.3. Listing packages installed for a language43.2.4. Installing language
support43.2.5. Removing language support43.3. Saving disk space by using glibc-langpack-
A guide to configuring basic system settings in Red Hat Enterprise Linux 8
Abstract
This document describes basics of system administration on Red Hat Enterprise Linux 8. The title focuses on: basic tasks that a system administrator needs to do just after the operating system has been successfully installed, installing software with yum, using systemd for service management, managing users, groups and file permissions, using chrony to configure NTP, working with Python 3 and others.
Making open source more inclusive
Red Hat is committed to replacing problematic language in our code, documentation, and web properties. We are beginning with these four terms: master, slave, blacklist, and whitelist. Because of the enormity of this endeavor, these changes will be implemented gradually over several upcoming releases. For more details, see our CTO Chris Wright’s message.
Providing feedback on Red Hat documentation
We appreciate your input on our documentation. Please let us know how we could make it better.
For simple comments on specific passages:
Make sure you are viewing the documentation in the Multi-page HTML format. In addition, ensure you see the Feedback button in the upper right corner of the document. Use your mouse cursor to highlight the part of text that you want to comment on. Click the Add Feedback pop-up that appears below the highlighted text. Follow the displayed instructions.For submitting feedback via Bugzilla, create a new ticket:
Go to the Bugzilla website. As the Component, use Documentation. Fill in the Description field with your suggestion for improvement. Include a link to the relevant part(s) of documentation. Click Submit Bug.Chapter 1. Getting started with RHEL System Roles
This section explains what RHEL System Roles are. Additionally, it describes how to apply a particular role through an Ansible playbook to perform various system administration tasks.
1.1. Introduction to RHEL System Roles
RHEL System Roles is a collection of Ansible roles and modules. RHEL System Roles provide a configuration interface to remotely manage multiple RHEL systems. The interface enables managing system configurations across multiple versions of RHEL, as well as adopting new major releases.
On Red Hat Enterprise Linux 8, the interface currently consists of the following roles:
-
Certificate Issuance and Renewal Cockpit Firewalld HA Cluster Kernel Dumps Kernel Settings Logging Metrics (PCP) Microsoft SQL Server Networking Network Bound Disk Encryption client and Network Bound Disk Encryption server Postfix SELinux SSH client SSH server Storage Terminal Session Recording Time Synchronization VPN
All these roles are provided by the rhel-system-roles package available in the AppStream repository.
1.2. RHEL System Roles terminology
You can find the following terms across this documentation:
Ansible playbook Playbooks are Ansible’s configuration, deployment, and orchestration language. They can describe a policy you want your remote systems to enforce, or a set of steps in a general IT process. Control node Any machine with Ansible installed. You can run commands and playbooks, invoking /usr/bin/ansible or /usr/bin/ansible-playbook, from any control node. You can use any computer that has Python installed on it as a control node - laptops, shared desktops, and servers can all run Ansible. However, you cannot use a Windows machine as a control node. You can have multiple control nodes. Inventory A list of managed nodes. An inventory file is also sometimes called a “hostfile”. Your inventory can specify information like IP address for each managed node. An inventory can also organize managed nodes, creating and nesting groups for easier scaling. To learn more about inventory, see the Working with Inventory section. Managed nodes The network devices, servers, or both that you manage with Ansible. Managed nodes are also sometimes called “hosts”. Ansible is not installed on managed nodes.
1.3. Applying a role
The following procedure describes how to apply a particular role.
Prerequisites
Ensure that the rhel-system-roles package is installed on the system that you want to use as a control node:
# yum install rhel-system-rolesInstall the Ansible Core package:
# yum install ansible-coreThe Ansible Core package provides the ansible-playbook CLI, the Ansible Vault functionality, and the basic modules and filters required by RHEL Ansible content.
Ensure that you are able to create an Ansible inventory.
Inventories represent the hosts, host groups, and some of the configuration parameters used by the Ansible playbooks.
Playbooks are typically human-readable, and are defined in ini, yaml, json, and other file formats.
Ensure that you are able to create an Ansible playbook.
Playbooks represent Ansible’s configuration, deployment, and orchestration language. By using playbooks, you can declare and manage configurations of remote machines, deploy multiple remote machines or orchestrate steps of any manual ordered process.
A playbook is a list of one or more plays. Every play can include Ansible variables, tasks, or roles.
Playbooks are human-readable, and are defined in the yaml format.
Procedure
Create the required Ansible inventory containing the hosts and groups that you want to manage. Here is an example using a file called inventory.ini of a group of hosts called webservers:
[webservers] host1 host2 host3Create an Ansible playbook including the required role. The following example shows how to use roles through the roles: option for a playbook:
The following example shows how to use roles through the roles: option for a given play:
--- - hosts: webservers roles: - rhel-system-roles.network - rhel-system-roles.timesyncEvery role includes a README file, which documents how to use the role and supported parameter values. You can also find an example playbook for a particular role under the documentation directory of the role. Such documentation directory is provided by default with the rhel-system-roles package, and can be found in the following location:
/usr/share/doc/rhel-system-roles/SUBSYSTEM/Replace SUBSYSTEM with the name of the required role, such as selinux, kdump, network, timesync, or storage.
To execute the playbook on specific hosts, you must perform one of the following:
Edit the playbook to use hosts: host1[,host2,…], or hosts: all, and execute the command:
# ansible-playbook name.of.the.playbookEdit the inventory to ensure that the hosts you want to use are defined in a group, and execute the command:
# ansible-playbook -i name.of.the.inventory name.of.the.playbookSpecify all hosts when executing the ansible-playbook command:
# ansible-playbook -i host1,host2,... name.of.the.playbookBe aware that the -i flag specifies the inventory of all hosts that are available. If you have multiple targeted hosts, but want to select a host against which you want to run the playbook, you can add a variable in the playbook to be able to select a host. For example:
Ansible Playbook | example-playbook.yml: - hosts: " target_host " roles: - rhel-system-roles.network - rhel-system-roles.timesyncPlaybook execution command:
# ansible-playbook -i host1,..hostn -e target_host=host5 example-playbook.yml1.4. Additional resources
- Red Hat Enterprise Linux (RHEL) System Roles Managing local storage using RHEL System Roles
Deploying the same SELinux configuration on multiple systems using RHEL System Roles
Chapter 2. Changing basic environment settings
Configuration of basic environment settings is a part of the installation process. The following sections guide you when you change them later. The basic configuration of the environment includes:
- Date and time System locales Keyboard layout Language
2.1. Configuring the date and time
Accurate timekeeping is important for a number of reasons. In Red Hat Enterprise Linux, timekeeping is ensured by the NTP protocol, which is implemented by a daemon running in user space. The user-space daemon updates the system clock running in the kernel. The system clock can keep time by using various clock sources.
Red Hat Enterprise Linux 8 uses the chronyd daemon to implement NTP. chronyd is available from the chrony package. For more information, see Using the chrony suite to configure NTP.
2.1.1. Displaying the current date and time
To display the current date and time, use either of these steps.
Procedure
Enter the date command:
$ date Mon Mar 30 16:02:59 CEST 2022To see more details, use the timedatectl command:
$ timedatectl Local time: Mon 2022-03-30 16:04:42 CEST Universal time: Mon 2022-03-30 14:04:42 UTC RTC time: Mon 2022-03-30 14:04:41 Time zone: Europe/Prague (CEST, +0200) System clock synchronized: yes NTP service: active RTC in local TZ: no2.2. Configuring the system locale
System-wide locale settings are stored in the /etc/locale.conf file, which is read early boot by the systemd daemon. Every service or user inherits the locale settings configured in /etc/locale.conf, unless individual programs or individual users override them.
This section describes how to manage system locale.
Procedure
To list available system locale settings:
$ localectl list-locales C.utf8 aa_DJ aa_DJ.iso88591 aa_DJ.utf8 ...To display the current status of the system locales settings:
$ localectl statusTo set or change the default system locale settings, use a localectl set-locale sub-command as the root user. For example:
# localectl set-locale LANG=en_USAdditional resources
- man localectl(1), man locale(7), and man locale.conf(5)
2.3. Configuring the keyboard layout
The keyboard layout settings control the layout used on the text console and graphical user interfaces.
Procedure
To list available keymaps:
$ localectl list-keymaps ANSI-dvorak al al-plisi amiga-de amiga-us ...To display the current status of keymaps settings:
$ localectl status ... VC Keymap: us ...To set or change the default system keymap. For example:
# localectl set-keymap usAdditional resources
- man localectl(1), man locale(7), and man locale.conf(5)
2.4. Changing the language using desktop GUI
This section describes how to change the system language using the desktop GUI.
Prerequisites
- Required language packages are installed on your system
Procedure
Open the GNOME Control Center from the System menu by clicking on its icon.
Click the Language menu.
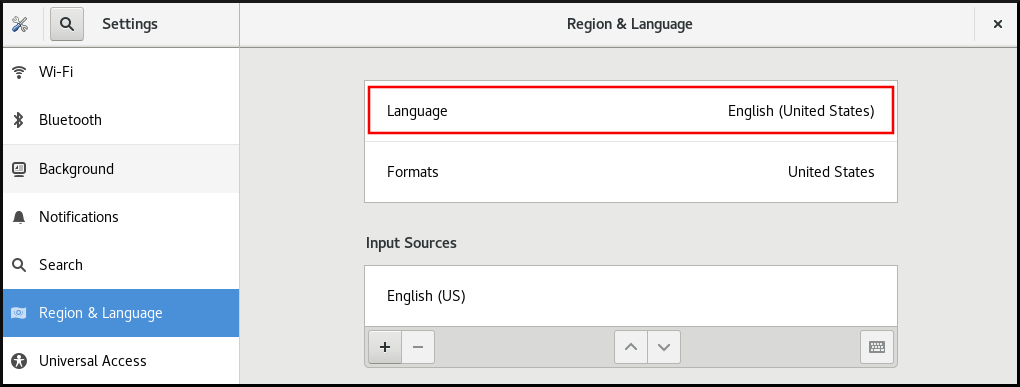
Select the required region and language from the menu.
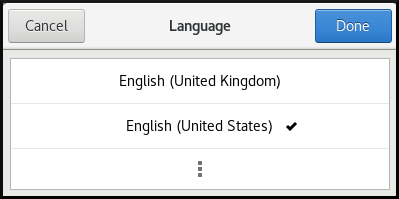
If your region and language are not listed, scroll down, and click More to select from available regions and languages.

Click Restart for changes to take effect.
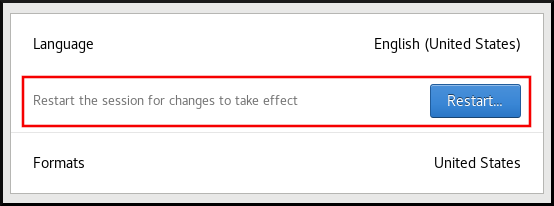
Some applications do not support certain languages. The text of an application that cannot be translated into the selected language remains in US English.
2.5. Additional resources
- Performing a standard RHEL 8 installation
Chapter 3. Configuring and managing network access
This section describes different options on how to add Ethernet connections in Red Hat Enterprise Linux.
3.1. Configuring the network and host name in the graphical installation mode
Follow the steps in this procedure to configure your network and host name.
Procedure
From the Installation Summary window, click Network and Host Name.From the list in the left-hand pane, select an interface. The details are displayed in the right-hand pane.
- There are several types of network device naming
standards used to identify network devices with persistent names, for example, em1 and wl3sp0. For information about these standards, see the Configuring and managing networking document.
Toggle the ON/OFF switch to enable or disable the selected interface.
The installation program automatically detects locally accessible interfaces, and you cannot add or remove them manually.
Click + to add a virtual network interface, which can be either: Team, Bond, Bridge, or VLAN. Click - to remove a virtual interface. Click Configure to change settings such as IP addresses, DNS servers, or routing configuration for an existing interface (both virtual and physical).Type a host name for your system in the Host Name field.
- The host name can be either a fully-qualified domain name (FQDN) in the format hostname.domainname, or a short host name with no domain name. Many networks have a Dynamic Host Configuration Protocol (DHCP) service that automatically supplies connected systems with a domain name. To allow the DHCP service to assign the domain name to this machine, specify only
the short host name. The value localhost means that no specific static host name for the target system is configured, and the actual host name of the installed system is configured during the processing of the network configuration, for example, by NetworkManager using DHCP or DNS. Host names can only contain alpha-numeric characters and - or .. Host names cannot start or end with - and ..
3.2. Configuring a static Ethernet connection using nmcli
This procedure describes adding an Ethernet connection with the following settings using the nmcli utility:
- A static IPv4 address - 192.0.2.1 with a /24 subnet mask A static IPv6 address - 2001:db8:1::1 with a /64 subnet mask An IPv4 default gateway - 192.0.2.254 An IPv6 default gateway - 2001:db8:1::fffe An IPv4 DNS server - 192.0.2.200 An IPv6 DNS server - 2001:db8:1::ffbb
A DNS search domain - example.com
Procedure
Add a new NetworkManager connection profile for the Ethernet connection:
# nmcli connection add con-name Example-Connection ifname enp7s0 type ethernetThe further steps modify the Example-Connection connection profile you created.
Set the IPv4 address:
# nmcli connection modify Example-Connection ipv4.addresses 192.0.2.1/24Set the IPv6 address:
# nmcli connection modify Example-Connection ipv6.addresses 2001:db8:1::1/64Set the IPv4 and IPv6 connection method to manual:
# nmcli connection modify Example-Connection ipv4.method manual # nmcli connection modify Example-Connection ipv6.method manualSet the IPv4 and IPv6 default gateways:
# nmcli connection modify Example-Connection ipv4.gateway 192.0.2.254 # nmcli connection modify Example-Connection ipv6.gateway 2001:db8:1::fffeSet the IPv4 and IPv6 DNS server addresses:
# nmcli connection modify Example-Connection ipv4.dns "192.0.2.200" # nmcli connection modify Example-Connection ipv6.dns "2001:db8:1::ffbb"To set multiple DNS servers, specify them space-separated and enclosed in quotes.
Set the DNS search domain for the IPv4 and IPv6 connection:
# nmcli connection modify Example-Connection ipv4.dns-search example.com # nmcli connection modify Example-Connection ipv6.dns-search example.comActivate the connection profile:
# nmcli connection up Example-Connection Connection successfully activated (D-Bus active path: /org/freedesktop/NetworkManager/ActiveConnection/13)Verification steps
Display the status of the devices and connections:
# nmcli device status DEVICE TYPE STATE CONNECTION enp7s0 ethernet connected Example-ConnectionTo display all settings of the connection profile:
# nmcli connection show Example-Connection connection.id: Example-Connection connection.uuid: b6cdfa1c-e4ad-46e5-af8b-a75f06b79f76 connection.stable-id: -- connection.type: 802-3-ethernet connection.interface-name: enp7s0 ...Use the ping utility to verify that this host can send packets to other hosts.
Ping an IP address in the same subnet.
For IPv4:
# ping 192.0.2.3For IPv6:
# ping 2001:db8:1::2If the command fails, verify the IP and subnet settings.
Ping an IP address in a remote subnet.
For IPv4:
# ping 198.162.3.1For IPv6:
# ping 2001:db8:2::1If the command fails, ping the default gateway to verify settings.
For IPv4:
# ping 192.0.2.254For IPv6:
# ping 2001:db8:1::fff3Use the host utility to verify that name resolution works. For example:
# host client.example.comIf the command returns any error, such as connection timed out or no servers could be reached, verify your DNS settings.
Troubleshooting steps
If the connection fails or if the network interface switches between an up and down status:
- Make sure that the network cable is plugged-in to the host and a switch. Check whether the link failure exists only on this host or also on other hosts connected to the same switch the server is connected to. Verify that the network cable and the network interface are working as expected. Perform hardware diagnosis steps and replace defect cables and network interface cards. If the configuration on the disk does not match the configuration on the device,
starting or restarting NetworkManager creates an in-memory connection that reflects the configuration of the device. For further details and how to avoid this problem, see NetworkManager duplicates a connection after restart of NetworkManager service
3.3. Adding a connection profile using nmtui
The nmtui application provides a text user interface to NetworkManager. This procedure describes how to add a new connection profile.
Prerequisites
- The NetworkManager-tui package is installed.
Procedure
Start the NetworkManager text user interface utility:
# nmtui Select the Edit a connection menu entry, and press Enter. Select the Add button, and press Enter. Select Ethernet, and press Enter.Fill the fields with the connection details.
 Select OK to save the changes. Select Back to return to the main menu. Select Activate a connection, and press Enter. Select the new connection entry, and press Enter to activate the connection. Select Back to return to the main menu. Select Quit.
 Verification steps
Display the status of the devices and connections:
# nmcli device status DEVICE TYPE STATE CONNECTION enp1s0 ethernet connected Example-ConnectionTo display all settings of the connection profile:
# nmcli connection show Example-Connection connection.id: Example-Connection connection.uuid: b6cdfa1c-e4ad-46e5-af8b-a75f06b79f76 connection.stable-id: -- connection.type: 802-3-ethernet connection.interface-name: enp1s0 ...If the configuration on the disk does not match the configuration on the device, starting or restarting NetworkManager creates an in-memory connection that reflects the configuration of the device. For further details and how to avoid this problem, see NetworkManager duplicates a connection after restart of NetworkManager service.
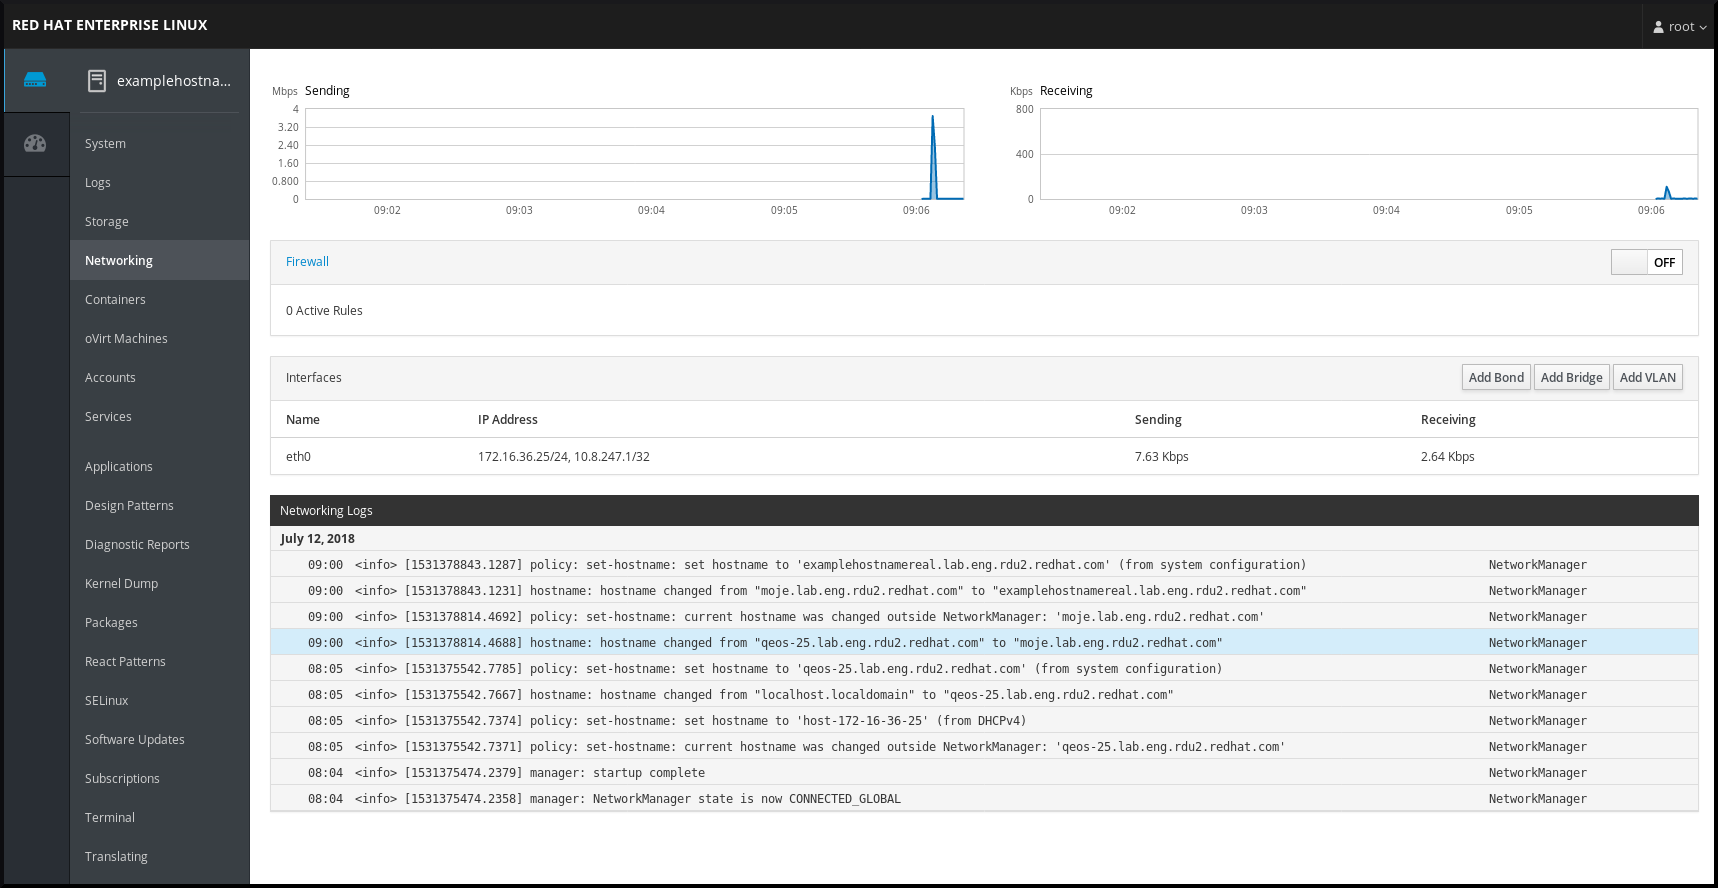
3.4. Managing networking in the RHEL web console
In the web console, the Networking menu enables you:
- To display currently received and sent packets To display the most important characteristics of available network interfaces
To display content of the networking logs. To add various types of network interfaces (bond, team, bridge, VLAN)
Figure 3.1. Managing Networking in the RHEL web console
3.5. Managing networking using RHEL System Roles
You can configure the networking connections on multiple target machines using the network role.
The network role allows to configure the following types of interfaces:
- Ethernet Bridge Bonded VLAN MacVLAN Infiniband
The required networking connections for each host are provided as a list within the network_connections variable.
The network role updates or creates all connection profiles on the target system exactly as specified in the network_connections variable. Therefore, the network role removes options from the specified profiles if the options are only present on the system but not in the network_connections variable.
The following example shows how to apply the network role to ensure that an Ethernet connection with the required parameters exists:
An example playbook applying the network role to set up an Ethernet connection with the required parameters
# SPDX-License-Identifier: BSD-3-Clause --- - hosts: network-test vars: network_connections: # Create one ethernet profile and activate it. # The profile uses automatic IP addressing # and is tied to the interface by MAC address. - name: prod1 state: up type: ethernet autoconnect: yes mac: "00:00:5e:00:53:00" mtu: 1450 roles: - rhel-system-roles.network3.6. Additional resources
- Configuring and managing networking
Chapter 4. Registering the system and managing subscriptions
Subscriptions cover products installed on Red Hat Enterprise Linux, including the operating system itself.
You can use a subscription to Red Hat Content Delivery Network to track:
- Registered systems Products installed on your systems Subscriptions attached to the installed products
4.1. Registering the system after the installation
Use the following procedure to register your system if you have not registered it during the installation process already.
Prerequisites
- A valid user account in the Red Hat Customer Portal. See the
Create a Red Hat Login page. An active subscription for the RHEL system. For more information about the installation process, see Performing a standard RHEL 8 installation.
Procedure
Register and automatically subscribe your system in one step:
# subscription-manager register --usernameThe command prompts you to enter your Red Hat Customer Portal user name and password.
If the registration process fails, you can register your system with a specific pool. For guidance on how to do it, proceed with the following steps:
Determine the pool ID of a subscription that you require:
# subscription-manager list --availableThis command displays all available subscriptions for your Red Hat account. For every subscription, various characteristics are displayed, including the pool ID.
Attach the appropriate subscription to your system by replacing pool_id with the pool ID determined in the previous step:
# subscription-manager attach --pool=pool_id4.2. Registering subscriptions with credentials in the web console
Use the following steps to register a newly installed Red Hat Enterprise Linux with account credentials using the RHEL web console.
Prerequisites
A valid user account on the Red Hat Customer Portal.
See the Create a Red Hat Login page.
Active subscription for your RHEL system.Procedure
Log in to the RHEL web console. For details, see Logging in to the web console.In the Health filed in the Overview page, click the Not registered warning, or click Subscriptions in the main menu to move to page with your subscription information.
 .
.
In the Overview filed, click Register.

In the Register system dialog box, select that you want to register using your account credentials.
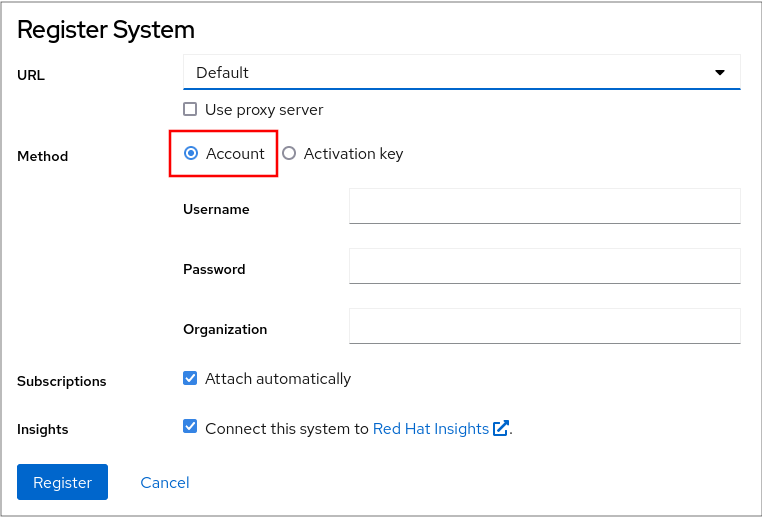
Optionally, enter your organization’s name or ID.
If your account belongs to more than one organization on the Red Hat Customer Portal, you have to add the organization name or organization ID. To get the org ID, go to your Red Hat contact point.
- If you do not want to connect your system to Red Hat Insights, uncheck the Insights check box.
At this point, your Red Hat Enterprise Linux system has been successfully registered.
4.3. Registering a system using Red Hat account on GNOME
Follow the steps in this procedure to enroll your system with your Red Hat account.
Prerequisites
A valid account on Red Hat customer portal.
See the Create a Red Hat Login page for new user registration.
Procedure
Go to the system menu, which is accessible from the top-right screen corner and click the Settings icon. In the → section, click Register. Select Registration Server. If you are not using the Red Hat server, enter the server address in the URL field. In the Registration Type menu, select Red Hat Account.Under Registration Details:
- Enter your Red Hat account user name in the Login field. Enter your Red Hat account password in the
Password field. Enter the name of your organization in the Organization field.
4.4. Registering a system using an activation key on GNOME
Follow the steps in this procedure to register your system with an activation key. You can get the activation key from your organization administrator.
Prerequisites
Activation key or keys.
See the Activation Keys page for creating new activation keys.
Procedure
Go to the system menu, which is accessible from the top-right screen corner and click the Settings icon. In the → section, click Register. Select Registration Server. Enter URL to the customized server, if you are not using the Red Hat server. In the Registration Type menu, select Activation Keys.Under Registration Details:
Enter Activation Keys.
Separate multiple keys by a comma (,).
Enter the name or ID of your organization in the Organization field.4.5. Registering RHEL 8.4 using the installer GUI
Use the following steps to register a newly installed Red Hat Enterprise Linux 8.4 using the RHEL installer GUI.
Prerequisites
A valid user account on the Red Hat Customer Portal. See the Create a Red Hat Login page.
If the user account has appropriate entitlements (or the account operates in Simple Content Access mode) they can register using username and password only, without presenting an activation key.
A valid Activation Key and Organization idProcedure
Authenticate your Red Hat account using the Account or Activation Key option.
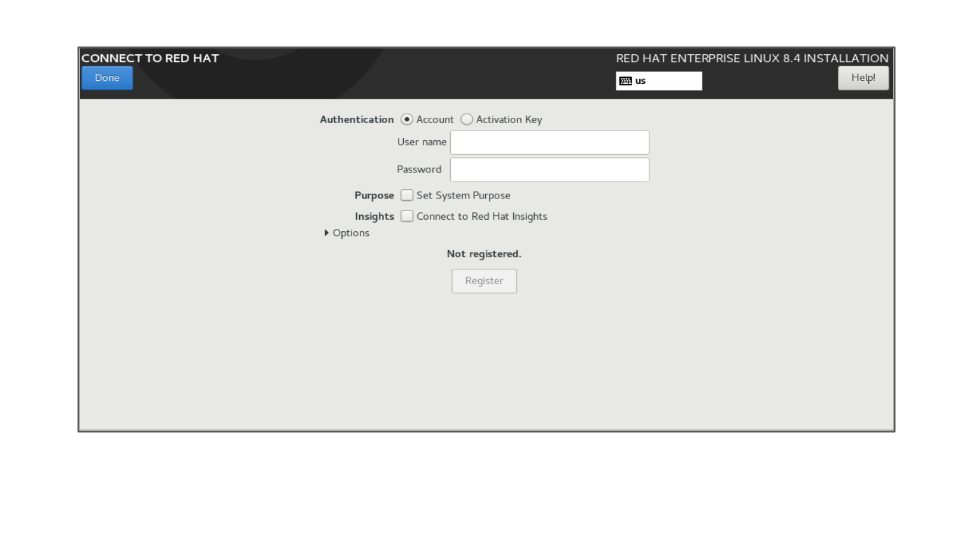
Select the Set System Purpose field and from the drop-down menu select the Role, SLA, and Usage for the RHEL 8.4 installation.

At this point, your Red Hat Enterprise Linux 8.4 system has been successfully registered.
Chapter 5. Making systemd services start boot time
systemd is a system and service manager for Linux operating systems that introduces the concept of systemd units.
This section provides information on how to ensure that a service is enabled or disabled boot time. It also explains how to manage the services through the web console.
5.1. Enabling or disabling the services
You can determine which services are enabled or disabled boot time already during the installation process. You can also enable or disable a service on an installed operating system.
This section describes the steps for enabling or disabling those services on an already installed operating system:
Prerequisites
- You must have root access to the system.
Procedure
To enable a service, use the enable option:
# systemctl enable service_nameReplace service_name with the service you want to enable.
You can also enable and start a service in a single command:
# systemctl enable --now service_nameTo disable a service, use the disable option:
# systemctl disable service_nameReplace service_name with the service you want to disable.
You cannot enable a service that has been previously masked. You have to unmask it first:
# systemctl unmask service_name5.2. Managing services in the RHEL web console
This section describes how you can also enable or disable a service using the web console. You can manage systemd targets, services, sockets, timers, and paths. You can also check the service status, start or stop services, enable or disable them.
Prerequisites
- You must have root access to the system.
Procedure
Open localhost:9090 in a web browser of your preference. Log in to the web console with your root credentials on the system.To display the web console panel, click the Host icon, which is in the upper-left corner of the window.
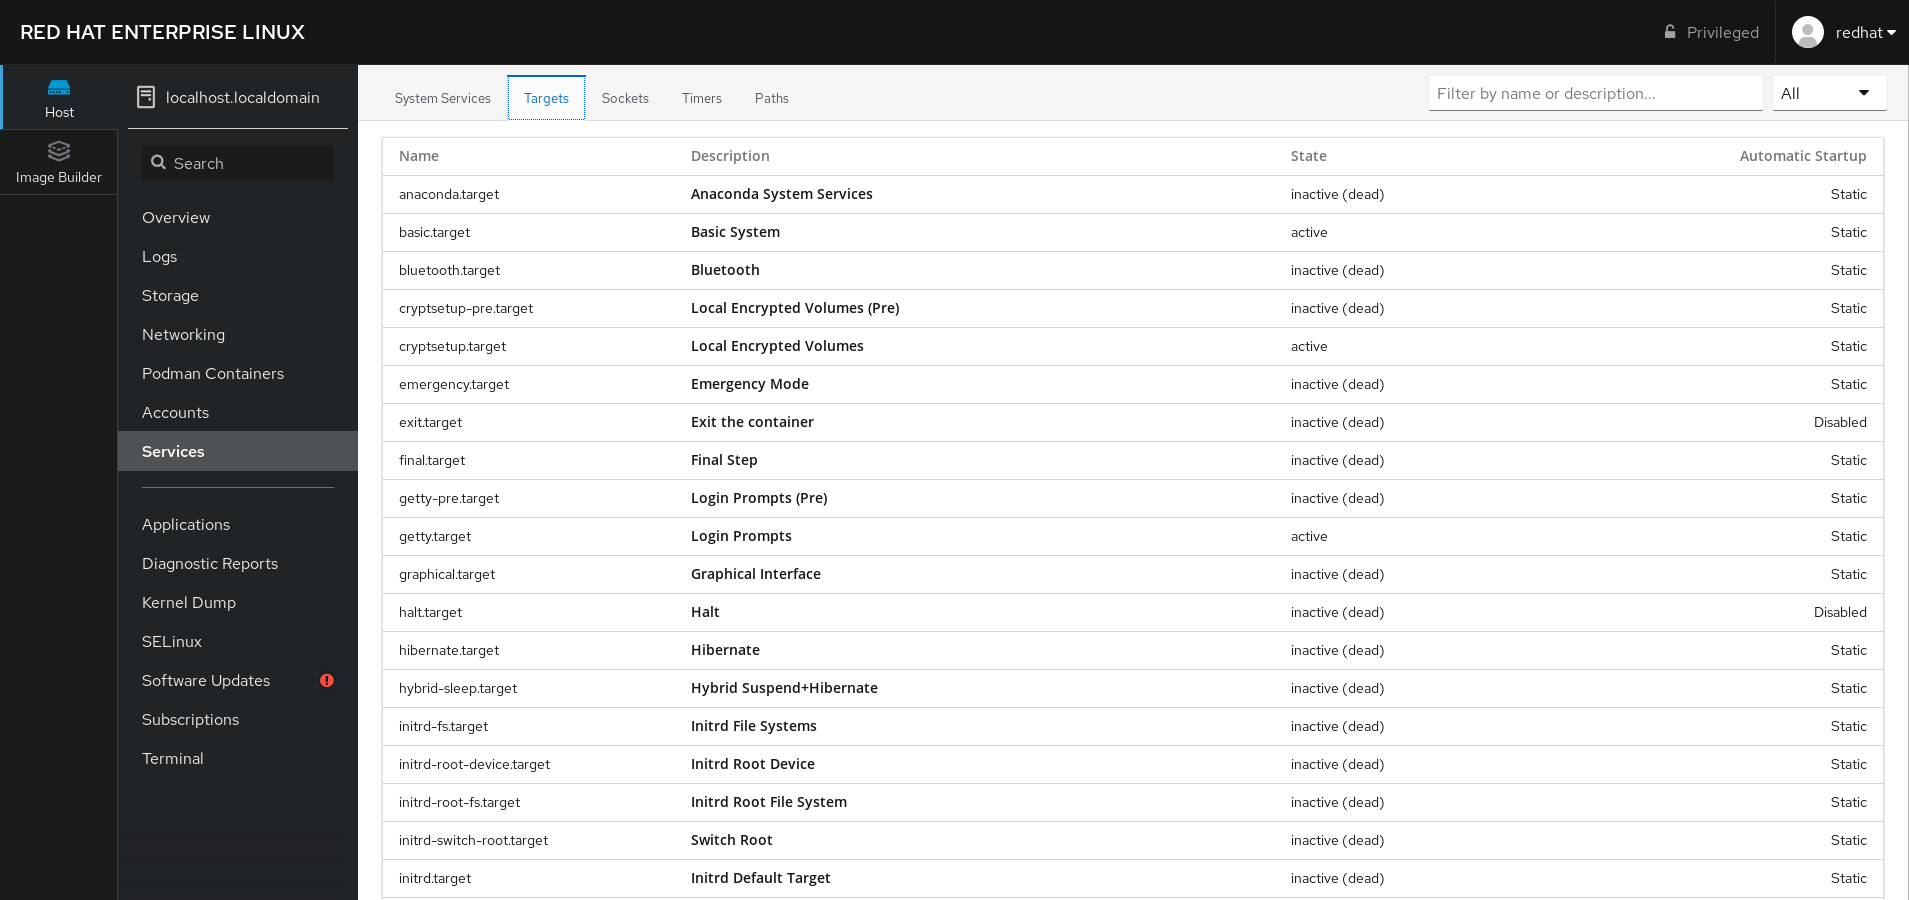
On the menu, click Services.
You can manage systemd targets, services, sockets, timers, and paths.
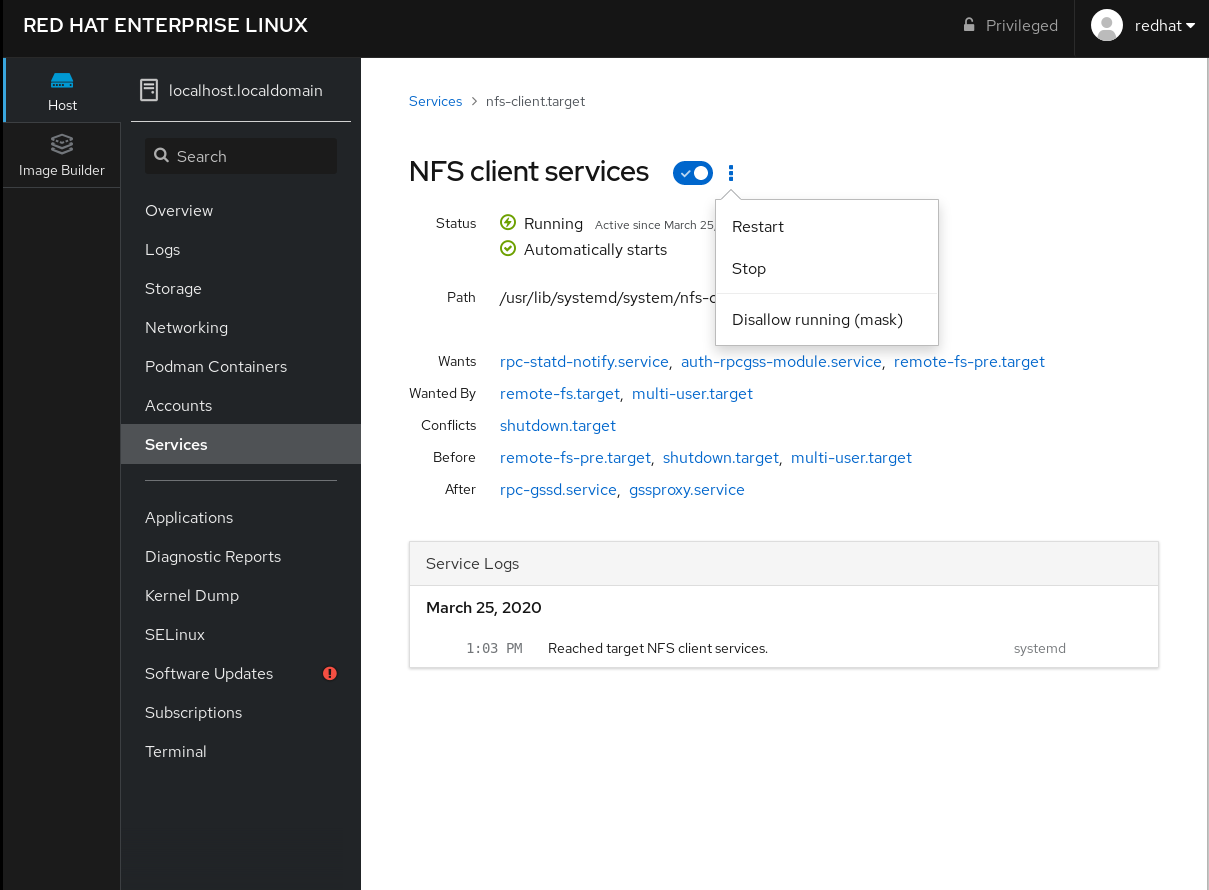
For example, to manage the service NFS client services:
Click Targets. Select the service NFS client services. To enable or disable the service, click the Toogle button.To stop the service, click the ⫶ button and choose the option Stop.
Chapter 6. Configuring system security
Computer security is the protection of computer systems and their hardware, software, information, and services from theft, damage, disruption, and misdirection. Ensuring computer security is an essential task, in particular in enterprises that process sensitive data and handle business transactions.
This section covers only the basic security features that you can configure after installation of the operating system.
6.1. Enabling the firewalld service
A firewall is a network security system that monitors and controls incoming and outgoing network traffic according to configured security rules. A firewall typically establishes a barrier between a trusted secure internal network and another outside network.
The firewalld service, which provides a firewall in Red Hat Enterprise Linux, is automatically enabled during installation.
To enable the firewalld service, follow this procedure.
Procedure
Display the current status of firewalld:
$ systemctl status firewalld ● firewalld.service - firewalld - dynamic firewall daemon Loaded: loaded (/usr/lib/systemd/system/firewalld.service; disabled; vendor preset: enabled) Active: inactive (dead) ...If firewalld is not enabled and running, switch to the root user, and start the firewalld service and enable to start it automatically after the system restarts:
# systemctl enable --now firewalldVerification steps
Check that firewalld is running and enabled:
$ systemctl status firewalld ● firewalld.service - firewalld - dynamic firewall daemon Loaded: loaded (/usr/lib/systemd/system/firewalld.service; enabled; vendor preset: enabled) Active: active (running) ...6.2. Managing firewall in the rhel 8 web console
To configure the firewalld service in the web console, navigate to → .
By default, the firewalld service is enabled.
Procedure
To enable or disable firewalld in the web console, switch the Firewall toggle button.
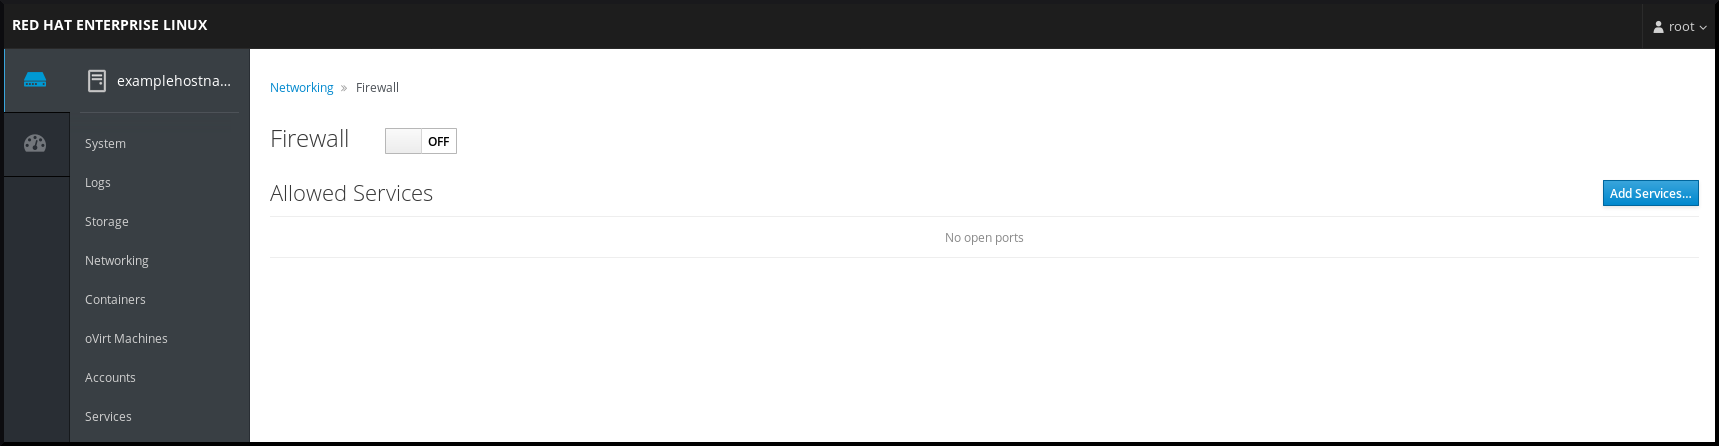
Additionally, you can define more fine-grained access through the firewall to a service using the Add services… button.
6.3. Managing basic SELinux settings
Security-Enhanced Linux (SELinux) is an additional layer of system security that determines which processes can access which files, directories, and ports. These permissions are defined in SELinux policies. A policy is a set of rules that guide the SELinux security engine.
SELinux has two possible states:
- Disabled Enabled
When SELinux is enabled, it runs in one of the following modes:
Enabled
- Enforcing Permissive
In enforcing mode, SELinux enforces the loaded policies. SELinux denies access based on SELinux policy rules and enables only the interactions that are explicitly allowed. Enforcing mode is the safest SELinux mode and is the default mode after installation.
In permissive mode, SELinux does not enforce the loaded policies. SELinux does not deny access, but reports actions that break the rules to the /var/log/audit/audit.log log. Permissive mode is the default mode during installation. Permissive mode is also useful in some specific cases, for example when troubleshooting problems.
6.4. Ensuring the required state of selinux
By default, SELinux operates in enforcing mode. However, in specific scenarios, you can set SELinux to permissive mode or even disable it.
Red Hat recommends to keep your system in enforcing mode. For debugging purposes, you can set SELinux to permissive mode.
Follow this procedure to change the state and mode of SELinux on your system.
Procedure
Display the current SELinux mode:
$ getenforceTo temporarily set SELinux:
To Enforcing mode:
# setenforce EnforcingTo Permissive mode:
# setenforce PermissiveAfter reboot, SELinux mode is set to the value specified in the /etc/selinux/config configuration file.
To set SELinux mode to persist across reboots, modify the SELINUX variable in the /etc/selinux/config configuration file.
For example, to switch SELinux to enforcing mode:
# This file controls the state of SELinux on the system. # SELINUX= can take one of these three values: # enforcing - SELinux security policy is enforced. # permissive - SELinux prints warnings instead of enforcing. # disabled - No SELinux policy is loaded. SELINUX=enforcing ...Disabling SELinux reduces your system security. Avoid disabling SELinux using the SELINUX=disabled option in the /etc/selinux/config file because this can result in memory leaks and race conditions causing kernel panics. Instead, disable SELinux by adding the selinux=0 parameter to the kernel command line. For more information, see Changing SELinux modes boot time.
6.5. Switching SELinux modes in the RHEL 8 web console
You can set SELinux mode through the RHEL 8 web console in the SELinux menu item.
By default, SELinux enforcing policy in the web console is on, and SELinux operates in enforcing mode. By turning it off, you switch SELinux to permissive mode. Note that this selection is automatically reverted on the next boot to the configuration defined in the /etc/sysconfig/selinux file.
Procedure
In the web console, use the Enforce policy toggle button in the SELinux menu item to turn SELinux enforcing policy on or off.

6.6. Additional resources
- Generating SSH key pairs
Setting an OpenSSH server for key-based authentication
Security hardening Using SELinux Securing networks
Deploying the same SELinux configuration on multiple systems
Chapter 7. Getting started with managing user accounts
Red Hat Enterprise Linux is a multi-user operating system, which enables multiple users on different computers to access a single system installed on one machine. Every user operates under its own account, and managing user accounts thus represents a core element of Red Hat Enterprise Linux system administration.
The following are the different types of user accounts:
Normal user accounts:
Normal accounts are created for users of a particular system. Such accounts can be added, removed, and modified during normal system administration.
System user accounts:
System user accounts represent a particular applications identifier on a system. Such accounts are generally added or manipulated only software installation time, and they are not modified later.
System accounts are presumed to be available locally on a system. If these accounts are configured and provided remotely, such as in the instance of an LDAP configuration, system breakage and service start failures can occur.
For system accounts, user IDs below 1000 are reserved. For normal accounts, you can use IDs starting 1000. However, the recommended practice is to assign IDs starting 5000. For assigning IDs, see the /etc/login.defs file.
Group:
A group is an entity which ties together multiple user accounts for a common purpose, such as granting access to particular files.
7.1. Managing accounts and groups using command line tools
This section describes basic command-line tools to manage user accounts and groups.
To display user and group IDs:
$ id uid=1000(example.user) gid=1000(example.user) groups=1000(example.user),10(wheel) context=unconfined_u:unconfined_r:unconfined_t:s0-s0:c0.c1023To create a new user account:
# useradd example.userTo assign a new password to a user account belonging to example.user:
# passwd example.userTo add a user to a group:
# usermod -a -G example.group example.userAdditional resources
- man useradd(8), man passwd(1), and man usermod(8)
7.2. System user accounts managed in the web console
With user accounts displayed in the RHEL web console you can:
- Authenticate users when accessing the system. Set the access rights to the system.
The RHEL web console displays all user accounts located in the system. Therefore, you can see least one user account just after the first login to the web console.
After logging into the RHEL web console, you can perform the following operations:
- Create new users accounts. Change their parameters. Lock accounts. Terminate user sessions.
7.3. Adding new accounts using the web console
Use the following steps for adding user accounts to the system and setting administration rights to the accounts through the RHEL web console.
Procedure
Log in to the RHEL web console. Click Accounts. Click Create New Account.In the Full Name field, enter the full name of the user.
The RHEL web console automatically suggests a user name from the full name and fills it in the User Name field. If you do not want to use the original naming convention consisting of the first letter of the first name and the whole surname, update the suggestion.
In the Password/Confirm fields, enter the password and retype it for verification that your password is correct.
The color bar placed below the fields shows you security level of the entered password, which does not allow you to create a user with a weak password.
Click Create to save the settings and close the dialog box. Select the newly created account.Select Server Administrator in the Roles item.
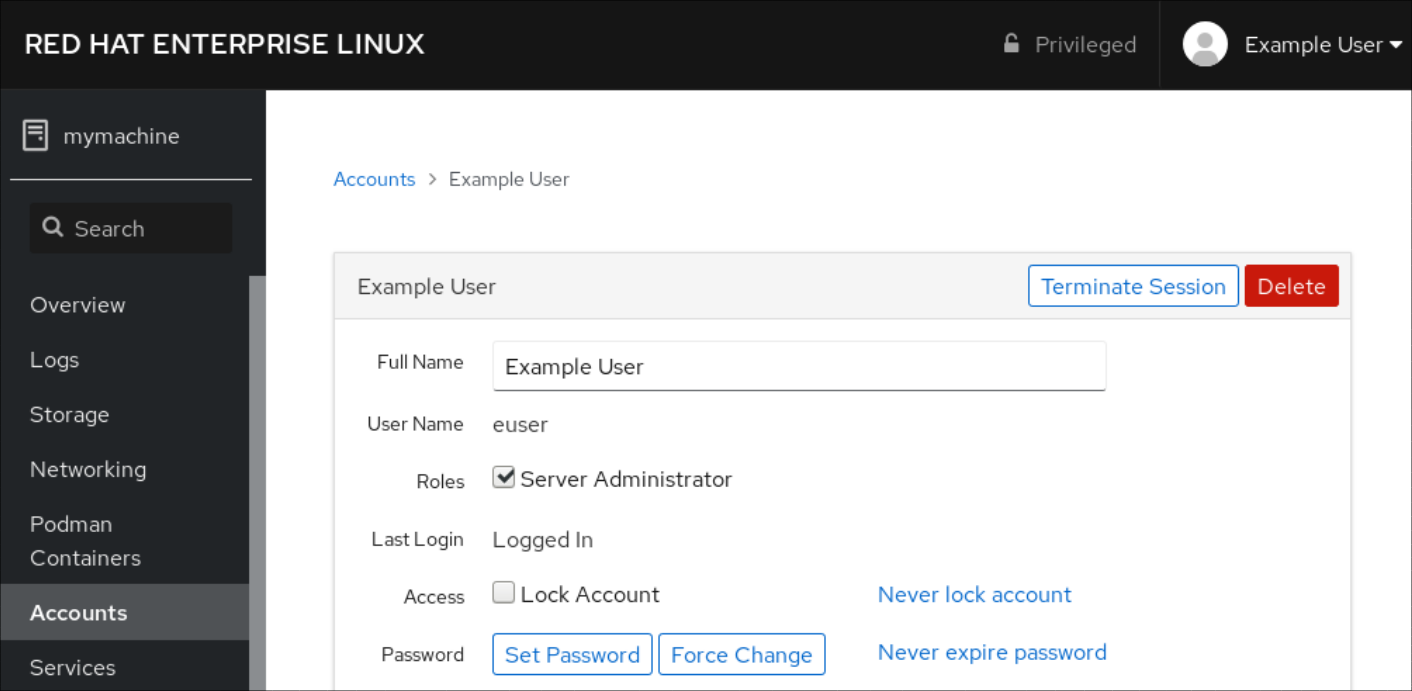
Now you can see the new account in the Accounts settings and you can use the credentials to connect to the system.
Chapter 8. Dumping a crashed kernel for later analysis
To analyze why a system crashed, you can use the kdump service to save the contents of the system’s memory for later analysis. This section provides a brief introduction to kdump, and information about configuring kdump using the RHEL web console or using the corresponding RHEL system role.
8.1. What is kdump
kdump is a service which provides a crash dumping mechanism. The service enables you to save the contents of the system memory for analysis. kdump uses the kexec system call to boot into the second kernel (a capture kernel) without rebooting; and then captures the contents of the crashed kernel’s memory (a crash dump or a vmcore) and saves it into a file. The second kernel resides in a reserved part of the system memory.
A kernel crash dump can be the only information available in the sự kiện of a system failure (a critical bug). Therefore, operational kdump is important in mission-critical environments. Red Hat advise that system administrators regularly update and test kexec-tools in your normal kernel update cycle. This is especially important when new kernel features are implemented.
You can enable kdump for all installed kernels on a machine or only for specified kernels. This is useful when there are multiple kernels used on a machine, some of which are stable enough that there is no concern that they could crash.
When kdump is installed, a default /etc/kdump.conf file is created. The file includes the default minimum kdump configuration. You can edit this file to customize the kdump configuration, but it is not required.
8.2. Configuring kdump memory usage and target location in web console
The procedure below shows you how to use the Kernel Dump tab in the RHEL web console interface to configure the amount of memory that is reserved for the kdump kernel. The procedure also describes how to specify the target location of the vmcore dump file and how to test your configuration.
Procedure
Open the Kernel Dump tab and start the kdump service. Configure the kdump memory usage using the command line.Click the link next to the Crash dump location option.
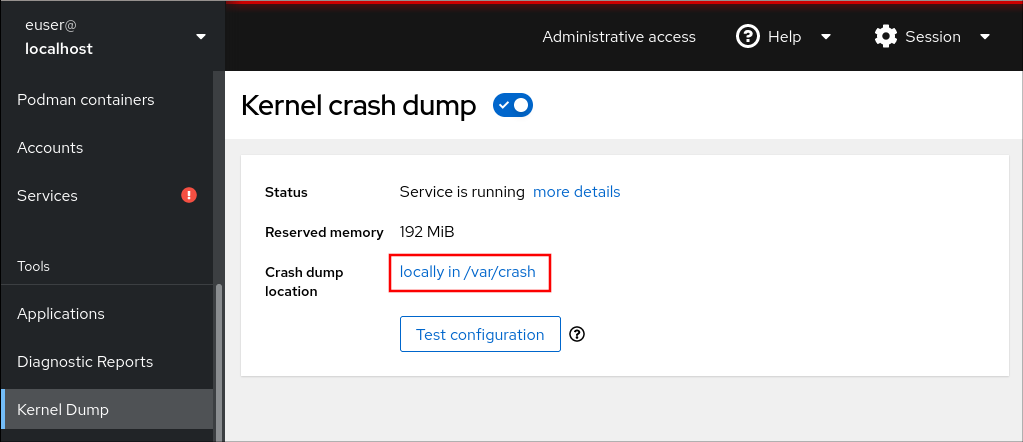
Select the Local Filesystem option from the drop-down and specify the directory you want to save the dump in.
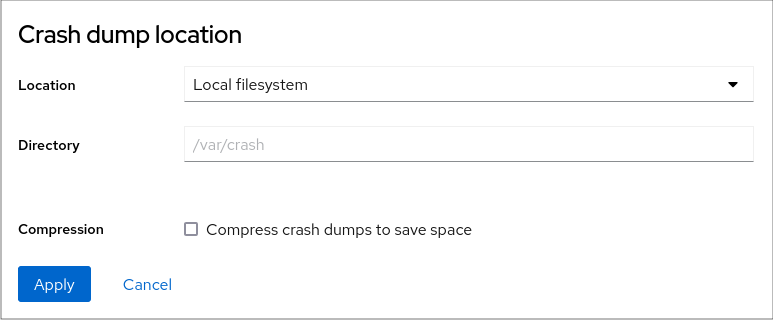
Alternatively, select the Remote over SSH option from the drop-down to send the vmcore to a remote machine using the SSH protocol.
Fill the Server, ssh key, and Directory fields with the remote machine address, ssh key location, and a target directory.
Another choice is to select the Remote over NFS option from the drop-down and fill the Mount field to send the vmcore to a remote machine using the NFS protocol.
Tick the Compression check box to reduce the size of the vmcore file.
Test your configuration by crashing the kernel.
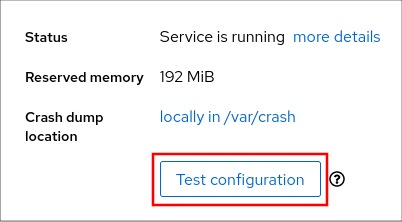 Click Test configuration.
 In the Test kdump settings field, click Crash system.
This step disrupts execution of the kernel and results in a system crash and loss of data.
8.3. kdump using RHEL System Roles
RHEL System Roles is a collection of Ansible roles and modules that provide a consistent configuration interface to remotely manage multiple RHEL systems. The kdump role enables you to set basic kernel dump parameters on multiple systems.
The kdump role replaces the kdump configuration of the managed hosts entirely by replacing the /etc/kdump.conf file. Additionally, if the kdump role is applied, all previous kdump settings are also replaced, even if they are not specified by the role variables, by replacing the /etc/sysconfig/kdump file.
The following example playbook shows how to apply the kdump system role to set the location of the crash dump files:
--- - hosts: kdump-test vars: kdump_path: /var/crash roles: - rhel-system-roles.kdumpFor a detailed reference on kdump role variables, install the rhel-system-roles package, and see the README.md or README.html files in the /usr/share/doc/rhel-system-roles/kdump directory.
8.4. Additional resources
- Installing kdump
Configuring kdump on the command line
Configuring kdump in the web console
Chapter 9. Recovering and restoring a system
To recover and restore a system using an existing backup, Red Hat Enterprise Linux provides the Relax-and-Recover (ReaR) utility.
You can use the utility as a disaster recovery solution and also for system migration.
The utility enables you to perform the following tasks:
- Produce a bootable image and restore the system from an existing backup, using the image. Replicate the original storage layout. Restore user and system files.
Restore the system to a different hardware.
Additionally, for disaster recovery, you can also integrate certain backup software with ReaR.
Setting up ReaR involves the following high-level steps:
Install ReaR. Modify ReaR configuration file, to add backup method details. Create rescue system. Generate backup files.9.1. Setting up ReaR
Use the following steps to install the package for using the Relax-and-Recover (ReaR) utility, create a rescue system, configure and generate a backup.
Prerequisites
Necessary configurations as per the backup restore plan are ready.
Note that you can use the NETFS backup method, a fully-integrated and built-in method with ReaR.
Procedure
Install the ReaR utility by running the following command:
# yum install rearModify the ReaR configuration file in an editor of your choice, for example:
# vi /etc/rear/local.confAdd the backup setting details to /etc/rear/local.conf. For example, in the case of the NETFS backup method, add the following lines:
BACKUP=NETFS BACKUP_URL=backup.locationReplace backup.location by the URL of your backup location.
To configure ReaR to keep the previous backup archive when the new one is created, also add the following line to the configuration file:
NETFS_KEEP_OLD_BACKUP_COPY=yTo make the backups incremental, meaning that only the changed files are backed up on each run, add the following line:
BACKUP_TYPE=incrementalCreate a rescue system:
# rear mkrescueTake a backup as per the restore plan. For example, in the case of the NETFS backup method, run the following command:
# rear mkbackuponlyAlternatively, you can create the rescue system and the backup in a single step by running the following command:
# rear mkbackupThis command combines the functionality of the rear mkrescue and rear mkbackuponly commands.
9.2. Using a ReaR rescue image on the 64-bit IBM Z architecture
Basic Relax and Recover (ReaR) functionality is now available on the 64-bit IBM Z architecture as a Technology Preview. You can create a ReaR rescue image on IBM Z only in the z/VM environment. Backing up and recovering logical partitions (LPARs) has not been tested.
ReaR on the 64-bit IBM Z architecture is a Technology Preview feature only. Technology Preview features are not supported with Red Hat production service level agreements (SLAs) and might not be functionally complete. Red Hat does not recommend using them in production. These features provide early access to upcoming product features, enabling customers to test functionality and provide feedback during the development process. For more information about the support scope of Red Hat Technology Preview features, see https://access.redhat.com/support/offerings/techpreview.
The only output method currently available is Initial Program Load (IPL). IPL produces a kernel and an initial ramdisk (initrd) that can be used with the zIPL bootloader.
Prerequisites
ReaR is installed.
- To install ReaR, run the yum install rear command
Procedure
Add the following variables to the /etc/rear/local.conf to configure ReaR for producing a rescue image on the 64-bit IBM Z architecture:
To configure the IPL output method, add OUTPUT=IPL.
To configure the backup method and destination, add BACKUP and BACKUP_URL variables. For example:
BACKUP=NETFS BACKUP_URL=nfs://The local backup storage is currently not supported on the 64-bit IBM Z architecture.
Optionally, you can also configure the OUTPUT_URL variable to save the kernel and initrd files. By default, the OUTPUT_URL is aligned with BACKUP_URL.To perform backup and rescue image creation:
rear mkbackup This creates the kernel and initrd files the location specified by the BACKUP_URL or OUTPUT_URL (if set) variable, and a backup using the specified backup method. To recover the system, use the ReaR kernel and initrd files created in step 3, and boot from a Direct Attached Storage Device (DASD) or a Fibre Channel Protocol (FCP)-attached SCSI device prepared with the zipl boot loader, kernel, and initrd. For more information, see Using a Prepared DASD. When the rescue kernel and initrd get booted, it starts the ReaR rescue environment. Proceed with system recovery.Currently, the rescue process reformats all the DASDs (Direct Attached Storage Devices) connected to the system. Do not attempt a system recovery if there is any valuable data present on the system storage devices. This also includes the device prepared with the zipl bootloader, ReaR kernel, and initrd that were used to boot into the rescue environment. Ensure to keep a copy.
Chapter 10. Troubleshooting problems using log files
Log files contain messages about the system, including the kernel, services, and applications running on it. These contain information that helps troubleshoot issues or monitor system functions. The logging system in Red Hat Enterprise Linux is based on the built-in syslog protocol. Particular programs use this system to record events and organize them into log files, which are useful when auditing the operating system and troubleshooting various problems.
10.1. Services handling syslog messages
The following two services handle syslog messages:
- The systemd-journald daemon The Rsyslog service
The systemd-journald daemon collects messages from various sources and forwards them to Rsyslog for further processing. The systemd-journald daemon collects messages from the following sources:
- Kernel Early stages of the boot process Standard and error output of daemons as they start up and run Syslog
The Rsyslog service sorts the syslog messages by type and priority and writes them to the files in the /var/log directory. The /var/log directory persistently stores the log messages.
10.2. Subdirectories storing syslog messages
The following subdirectories under the /var/log directory store syslog messages.
- /var/log/messages - all syslog messages except the following /var/log/secure - security and authentication-related messages and errors /var/log/maillog - mail server-related messages and errors
/var/log/cron - log files related to periodically executed tasks /var/log/boot.log - log files related to system startup
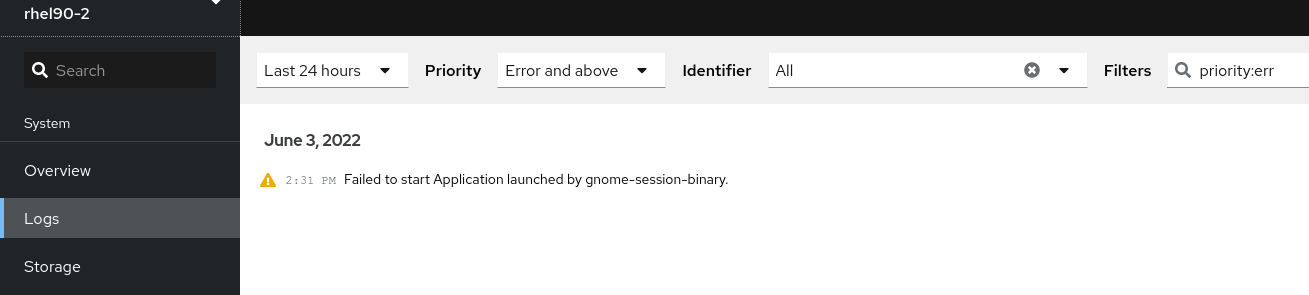
10.3. Inspecting log files using the web console
Follow the steps in this procedure to inspect the log files using the RHEL web console.
Figure 10.1. Inspecting the log files in the RHEL 8 web console
10.4. Viewing logs using the command line
The Journal is a component of systemd that helps to view and manage log files. It addresses problems connected with traditional logging, closely integrated with the rest of the system, and supports various logging technologies and access management for the log files.
You can use the journalctl command to view messages in the system journal using the command line, for example:
$ journalctl -b | grep kvm May 15 11:31:41 localhost.localdomain kernel: kvm-clock: Using msrs 4b564d01 and 4b564d00 May 15 11:31:41 localhost.localdomain kernel: kvm-clock: cpu 0, msr 76401001, primary cpu clock ...Table 10.1. Viewing system information
CommandDescription
journalctl
Shows all collected journal entries.
journalctl FILEPATH
Shows logs related to a specific file. For example, the journalctl /dev/sda command displays logs related to the /dev/sda file system.
journalctl -b
Shows logs for the current boot.
journalctl -k -b -1
Shows kernel logs for the current boot.
Table 10.2. Viewing information on specific services
CommandDescription
journalctl -b _SYSTEMD_UNIT=foo
Filters log to see ones matching the "foo" systemd service.
journalctl -b _SYSTEMD_UNIT=foo _PID=number
Combines matches. For example, this command shows logs for systemd-units that match foo and the PID number.
journalctl -b _SYSTEMD_UNIT=foo _PID=number + _SYSTEMD_UNIT=foo1
The separator “+” combines two expressions in a logical OR. For example, this command shows all messages from the foo service process with the PID plus all messages from the foo1 service (from any of its processes).
journalctl -b _SYSTEMD_UNIT=foo _SYSTEMD_UNIT=foo1
This command shows all entries matching either expression, referring to the same field. Here, this command shows logs matching a systemd-unit foo or a systemd-unit foo1.
Table 10.3. Viewing logs related to specific boots
CommandDescription
journalctl --list-boots
Shows a tabular list of boot numbers, their IDs, and the timestamps of the first and last message pertaining to the boot. You can use the ID in the next command to view detailed information.
journalctl --boot=ID _SYSTEMD_UNIT=foo
Shows information about the specified boot ID.
10.5. Additional resources
- man journalctl(1) Configuring a remote logging solution
Chapter 11. Accessing the Red Hat support
This section describes how to effectively troubleshoot your problems using Red Hat support and sosreport.
To obtain support from Red Hat, use the Red Hat Customer Portal, which provides access to everything available with your subscription.
11.1. Obtaining Red Hat support through Red Hat Customer Portal
The following section describes how to use the Red Hat Customer Portal to get help.
Prerequisites
- A valid user account on the Red Hat Customer Portal. See
Create a Red Hat Login. An active subscription for the RHEL system.
Procedure
Access Red Hat support:
Open a new support case. Initiate a live chat with a Red Hat expert. Contact a Red Hat expert by making a call or sending an email.11.2. Troubleshooting problems using sosreport
The sosreport command collects configuration details, system information and diagnostic information from a Red Hat Enterprise Linux system.
The following section describes how to use the sosreport command to produce reports for your support cases.
Prerequisites
- A valid user account on the Red Hat Customer Portal. See Create a Red Hat Login. An active subscription for the RHEL system. A support-case number.
Procedure
Install the sos package:
# yum install sosThe default minimal installation of Red Hat Enterprise Linux does not include the sos package, which provides the sosreport command.
Generate a report:
# sosreportAttach the report to your support case.
See the How can I attach a file to a Red Hat support case? Red Hat Knowledgebase article for more information.
Note that when attaching the report, you are prompted to enter the number of the relevant support case.
Chapter 12. Managing software packages
12.1. Software management tools in RHEL 8
In RHEL 8, software installation is enabled by the new version of the YUM tool (YUM v4), which is based on the DNF technology.
Upstream documentation identifies the technology as DNF and the tool is referred to as DNF in the upstream. As a result, some output returned by the new YUM tool in RHEL 8 mentions DNF.
Although YUM v4 used in RHEL 8 is based on DNF, it is compatible with YUM v3 used in RHEL 7. For software installation, the yum command and most of its options work the same way in RHEL 8 as they did in RHEL 7.
Selected yum plug-ins and utilities have been ported to the new DNF back end, and can be installed under the same names as in RHEL 7. Packages also provide compatibility symlinks, so the binaries, configuration files, and directories can be found in usual locations.
Note that the legacy Python API provided by YUM v3 is no longer available. You can migrate your plug-ins and scripts to the new API provided by YUM v4 (DNF Python API), which is stable and fully supported. See DNF API Reference for more information.
12.2. Application streams
RHEL 8 introduces the concept of Application Streams. Multiple versions of user space components are now delivered and updated more frequently than the core operating system packages. This provides greater flexibility to customize Red Hat Enterprise Linux without impacting the underlying stability of the platform or specific deployments.
Components made available as Application Streams can be packaged as modules or RPM packages, and are delivered through the AppStream repository in RHEL 8. Each Application Stream has a given life cycle, either the same as RHEL 8 or shorter, more suitable to the particular application. Application Streams with a shorter life cycle are listed in the Red Hat Enterprise Linux 8 Application Streams Life Cycle page.
Modules are collections of packages representing a logical unit: an application, a language stack, a database, or a set of tools. These packages are built, tested, and released together.
Module streams represent versions of the Application Stream components. For example, two streams (versions) of the PostgreSQL database server are available in the postgresql module: PostgreSQL 10 (the default stream) and PostgreSQL 9.6. Only one module stream can be installed on the system. Different versions can be used in separate containers.
Detailed module commands are described in the Installing, managing, and removing user-space components document. For a list of modules available in AppStream, see the Package manifest.
12.3. Searching for software packages
yum allows you to perform a complete set of operations with software packages.
The following section describes how to use yum to:
- Search for packages. List packages. List repositories. Display information about the packages. List package groups. Specify global expressions in yum input.
12.3.1. Searching packages with YUM
Use the following procedure to find a package providing a particular application or other content.
Procedure
To search for a package, use:
# yum search termReplace term with a term related to the package.
Note that yum search command returns term matches within the name and summary of the packages. This makes the search faster and enables you to search for packages you do not know the name of, but for which you know a related term.
To include term matches within package descriptions, use:
# yum search --all termReplace term with a term you want to search for in a package name, summary, or description.
Note that yum search --all enables a more exhaustive but slower search.
12.3.2. Listing packages with YUM
Use the following procedure to list installed and available packages.
Procedure
To list information on all installed and available packages, use:
# yum list --allTo list all packages installed on your system, use:
# yum list --installedTo list all packages in all enabled repositories that are available to install, use:
# yum list --availableNote that you can filter the results by appending global expressions as arguments. See Specifying global expressions in yum input for more details.
12.3.3. Listing repositories with YUM
Use the following procedure to list enabled and disabled repositories.
Procedure
To list all enabled repositories on your system, use:
# yum repolistTo list all disabled repositories on your system, use:
# yum repolist --disabledTo list both enabled and disabled repositories, use:
# yum repolist --allTo list additional information about the repositories, use:
# yum repoinfoNote that you can filter the results by passing the ID or name of repositories as arguments or by appending global expressions. See Specifying global expressions in yum input for more details.
12.3.4. Displaying package information with YUM
You can display various types of information about a package using YUM, for example version, release, size, loaded plugins, and more.
Procedure
To display information about one or more packages, use:
# yum info package-nameReplace package-name with the name of the package.
Note that you can filter the results by appending global expressions as arguments. See Specifying global expressions in yum input for more details.
12.3.5. Listing package groups with YUM
Use yum to view installed package groups and filter the listing results.
Procedure
To view the number of installed and available groups, use:
# yum group summaryTo list all installed and available groups, use:
# yum group listNote that you can filter the results by appending command line options for the yum group list command (--hidden, --available). For more available options see the man pages.
To list mandatory and optional packages contained in a particular group, use:
# yum group info group-nameReplace group-name with the name of the group.
Note that you can filter the results by appending global expressions as arguments. See Specifying global expressions in yum input for more details.
12.3.6. Specifying global expressions in YUM input
yum commands allow you to filter the results by appending one or more glob expressions as arguments. You have to escape global expressions when passing them as arguments to the yum command.
Procedure
To ensure global expressions are passed to yum as intended, use one of the following methods:
Double-quote or single-quote the entire global expression.
# yum provides "*/file-name"Replace file-name with the name of the file.
Escape the wildcard characters by preceding them with a backslash () character.
# yum provides */file-nameReplace file-name with the name of the file.
12.4. Installing software packages
The following section describes how to use yum to:
- Install packages. Install a package group. Specify a package name in yum input.
12.4.1. Installing packages with YUM
To install a package and all the package dependencies, use:
# yum install package-nameReplace package-name with the name of the package.
To install multiple packages and their dependencies simultaneously, use:
# yum install package-name-1 package-name-2Replace package-name-1 and package-name-2 with the names of the packages.
When installing packages on a multilib system (AMD64, Intel 64 machine), you can specify the architecture of the package by appending it to the package name:
# yum install package-name.archReplace package-name.arch with the name and architecture of the package.
If you know the name of the binary you want to install, but not the package name, you can use the path to the binary as an argument:
# yum install /usr/sbin/binary-fileReplace /usr/sbin/binary-file with a path to the binary file.
yum searches through the package lists, finds the package which provides /usr/sbin/binary-file, and prompts you as to whether you want to install it.
To install a previously-downloaded package from a local directory, use:
# yum install /path/Replace /path/ with the path to the package.
Note that you can optimize the package search by explicitly defining how to parse the argument. See Section 12.4.3, “Specifying a package name in YUM input” for more details.
12.4.2. Installing a package group with YUM
The following procedure describes how to install a package group by a group name or by a groupID using yum.
Procedure
To install a package group by a group name, use:
# yum group install group-nameOr
# yum install @group-nameReplace group-name with the full name of the group or environmental group.
To install a package group by the groupID, use:
# yum group install groupIDReplace groupID with the ID of the group.
12.4.3. Specifying a package name in YUM input
To optimize the installation and removal process, you can append -n, -na, or -nerva suffixes to yum install and yum remove commands to explicitly define how to parse an argument:
To install a package using its exact name, use:
# yum install-n nameReplace name with the exact name of the package.
To install a package using its exact name and architecture, use:
# yum install-na name.architectureReplace name and architecture with the exact name and architecture of the package.
To install a package using its exact name, epoch, version, release, and architecture, use:
# yum install-nevra name-epoch:version-release.architectureReplace name, epoch, version, release, and architecture with the exact name, epoch, version, release, and architecture of the package.
12.5. Updating software packages
yum allows you to check if your system has any pending updates. You can list packages that need updating and choose to update a single package, multiple packages, or all packages once. If any of the packages you choose to update have dependencies, they are updated as well.
The following section describes how to use yum to:
- Check for updates. Update a single package. Update a package group. Update all packages and their dependencies. Apply security
updates. Automate software updates.
12.5.1. Checking for updates with YUM
The following procedure describes how to check the available updates for packages installed on your system using yum.
Procedure
To see which packages installed on your system have available updates, use:
# yum check-updateThe output returns the list of packages and their dependencies that have an update available.
12.5.2. Updating a single package with YUM
Use the following procedure to update a single package and its dependencies using yum.
To update a package, use:
# yum update package-nameReplace package-name with the name of the package.
When applying updates to kernel, yum always installs a new kernel regardless of whether you are using the yum update or yum install command.
12.5.3. Updating a package group with YUM
Use the following procedure to update a group of packages and their dependencies using yum.
Procedure
To update a package group, use:
# yum group update group-nameReplace group-name with the name of the package group.
12.5.4. Updating all packages and their dependencies with YUM
Use the following procedure to update all packages and their dependencies using yum.
Procedure
To update all packages and their dependencies, use:
# yum update12.5.6. Automating software updates
To check and tải về package updates automatically and regularly, you can use the DNF Automatic tool that is provided by the dnf-automatic package.
DNF Automatic is an alternative command-line interface to yum that is suited for automatic and regular execution using systemd timers, cron jobs and other such tools.
DNF Automatic synchronizes package metadata as needed and then checks for updates available. After, the tool can perform one of the following actions depending on how you configure it:
- Exit Download updated packages Download and apply the updates
The outcome of the operation is then reported by a selected mechanism, such as the standard output or email.
12.5.6.1. Installing DNF AutomaticThe following procedure describes how to install the DNF Automatic tool.
Procedure
To install the dnf-automatic package, use:
# yum install dnf-automaticVerification steps
To verify the successful installation, confirm the presence of the dnf-automatic package by running the following command:
# rpm -qi dnf-automaticBy default, DNF Automatic uses /etc/dnf/automatic.conf as its configuration file to define its behavior.
The configuration file is separated into the following topical sections:
[commands] section
Sets the mode of operation of DNF Automatic.
[emitters] section
Defines how the results of DNF Automatic are reported.
[command_email] section
Provides the email emitter configuration for an external command used to send email.
[email] section
Provides the email emitter configuration.
[base] section
Overrides settings from the main configuration file of yum.
With the default settings of the /etc/dnf/automatic.conf file, DNF Automatic checks for available updates, downloads them, and reports the results as standard output.
Settings of the operation mode from the [commands] section are overridden by settings used by a systemd timer unit for all timer units except dnf-automatic.timer.
Additional resources
- For more details on particular sections, see DNF Automatic documentation. For more details on systemd timer units, see the man dnf-automatic
manual pages. For the overview of the systemd timer units included in the dnf-automatic package, see Section Overview of the systemd timer units included in
the dnf-automatic package link:https://access.redhat.com/documentation/en-us/red_hat_enterprise_linux/8/html/configuring_basic_system_settings/managing-software-packages_configuring-basic-system-settings#overview-of-the-systemd-timer-units-included-in-the-dnf-automatic-package_automating-software-updates
To run DNF Automatic, you always need to enable and start a specific systemd timer unit. You can use one of the timer units provided in the dnf-automatic package, or you can write your own timer unit depending on your needs.
The following section describes how to enable DNF Automatic.
Prerequisites
- You specified the behavior of DNF Automatic by modifying the /etc/dnf/automatic.conf configuration file.
For more information on DNF Automatic configuration file, see Section 2.5.6.2, “DNF Automatic configuration file”.
Procedure
Select, enable and start a systemd timer unit that fits your needs:
# systemctl enable --now where
- dnf-automatic-tải về.timer dnf-automatic-install.timer dnf-automatic-notifyonly.timer dnf-automatic.timer
For downloading available updates, use:
# systemctl enable dnf-automatic-tải về.timer# systemctl start dnf-automatic-tải về.timerFor downloading and installing available updates, use:
# systemctl enable dnf-automatic-install.timer# systemctl start dnf-automatic-install.timerFor reporting about available updates, use:
# systemctl enable dnf-automatic-notifyonly.timer# systemctl start dnf-automatic-notifyonly.timerOptionally, you can use:
# systemctl enable dnf-automatic.timer# systemctl start dnf-automatic.timerIn terms of downloading and applying updates, this timer unit behaves according to settings in the /etc/dnf/automatic.conf configuration file. The default behavior is similar to dnf-automatic-tải về.timer: it downloads the updated packages, but it does not install them.
Alternatively, you can also run DNF Automatic by executing the /usr/bin/dnf-automatic file directly from the command line or from a custom script.
Verification steps
To verify that the timer is enabled, run the following command:
# systemctl statusAdditional resources
- For
more information on the dnf-automatic timers, see the man dnf-automatic manual pages. For the overview of the systemd timer units included in the dnf-automatic package, see Section Overview of the systemd timer units included in the dnf-automatic package
The systemd timer units take precedence and override the settings in the /etc/dnf/automatic.conf configuration file concerning downloading and applying updates.
For example if you set the following option in the /etc/dnf/automatic.conf configuration file, but you have activated the dnf-automatic-notifyonly.timer unit, the packages will not be downloaded:
download_updates = yesThe dnf-automatic package includes the following systemd timer units:
Timer unitFunctionOverrides settings in the /etc/dnf/automatic.conf file?
dnf-automatic-tải về.timer
Downloads packages to cache and makes them available for updating.
Note: This timer unit does not install the updated packages. To perform the installation, you have to execute the dnf update command.
Yes
dnf-automatic-install.timer
Downloads and installs updated packages.
Yes
dnf-automatic-notifyonly.timer
Downloads only repository data to keep repository cache up-to-date and notifies you about available updates.
Note: This timer unit does not tải về or install the updated packages
Yes
dnf-automatic.timer
The behavior of this timer concerning downloading and applying updates is specified by the settings in the /etc/dnf/automatic.conf configuration file.
Default behavior is the same as for the dnf-automatic-tải về.timer unit: it only downloads packages, but does not install them.
No
Additional resources
- For more information on the dnf-automatic timers, see the man dnf-automatic manual pages. For more information on the /etc/dnf/automatic.conf configuration file, see Section DNF Automatic configuration file
12.6. Uninstalling software packages
The following section describes how to use yum to:
- Remove packages. Remove a package group. Specify a package name in yum input.
12.6.1. Removing packages with YUM
Use the following procedure to remove a package either by the group name or the groupID.
Procedure
To remove a particular package and all dependent packages, use:
# yum remove package-nameReplace package-name with the name of the package.
To remove multiple packages and their dependencies simultaneously, use:
# yum remove package-name-1 package-name-2Replace package-name-1 and package-name-2 with the names of the packages.
yum is not able to remove a package without removing depending packages.
Note that you can optimize the package search by explicitly defining how to parse the argument. See Specifying a package name in yum input for more details.
12.6.2. Removing a package group with YUM
Use the following procedure to remove a package either by the group name or the groupID.
Procedure
To remove a package group by the group name, use:
# yum group remove group-nameOr
# yum remove @group-nameReplace group-name with the full name of the group.
To remove a package group by the groupID, use:
# yum group remove groupIDReplace groupID with the ID of the group.
12.6.3. Specifying a package name in YUM input
To optimize the installation and removal process, you can append -n, -na, or -nerva suffixes to yum install and yum remove commands to explicitly define how to parse an argument:
To install a package using its exact name, use:
# yum install-n nameReplace name with the exact name of the package.
To install a package using its exact name and architecture, use:
# yum install-na name.architectureReplace name and architecture with the exact name and architecture of the package.
To install a package using its exact name, epoch, version, release, and architecture, use:
# yum install-nevra name-epoch:version-release.architectureReplace name, epoch, version, release, and architecture with the exact name, epoch, version, release, and architecture of the package.
12.7. Managing software package groups
A package group is a collection of packages that serve a common purpose (System Tools, Sound and Video). Installing a package group pulls a set of dependent packages, which saves time considerably.
The following section describes how to use yum to:
- List package groups. Install a package group. Remove a package group. Specify global expressions in yum input.
12.7.1. Listing package groups with YUM
Use yum to view installed package groups and filter the listing results.
Procedure
To view the number of installed and available groups, use:
# yum group summaryTo list all installed and available groups, use:
# yum group listNote that you can filter the results by appending command line options for the yum group list command (--hidden, --available). For more available options see the man pages.
To list mandatory and optional packages contained in a particular group, use:
# yum group info group-nameReplace group-name with the name of the group.
Note that you can filter the results by appending global expressions as arguments. See Specifying global expressions in yum input for more details.
12.7.2. Installing a package group with YUM
The following procedure describes how to install a package group by a group name or by a groupID using yum.
Procedure
To install a package group by a group name, use:
# yum group install group-nameOr
# yum install @group-nameReplace group-name with the full name of the group or environmental group.
To install a package group by the groupID, use:
# yum group install groupIDReplace groupID with the ID of the group.
12.7.3. Removing a package group with YUM
Use the following procedure to remove a package either by the group name or the groupID.
Procedure
To remove a package group by the group name, use:
# yum group remove group-nameOr
# yum remove @group-nameReplace group-name with the full name of the group.
To remove a package group by the groupID, use:
# yum group remove groupIDReplace groupID with the ID of the group.
12.7.4. Specifying global expressions in YUM input
yum commands allow you to filter the results by appending one or more glob expressions as arguments. You have to escape global expressions when passing them as arguments to the yum command.
Procedure
To ensure global expressions are passed to yum as intended, use one of the following methods:
Double-quote or single-quote the entire global expression.
# yum provides "*/file-name"Replace file-name with the name of the file.
Escape the wildcard characters by preceding them with a backslash () character.
# yum provides */file-nameReplace file-name with the name of the file.
12.8. Handling package management history
The yum history command allows you to review information about the timeline of yum transactions, dates and times they occurred, the number of packages affected, whether these transactions succeeded or were aborted, and if the RPM database was changed between transactions. yum history command can also be used to undo or redo the transactions.
The following section describes how to use yum to:
- List transactions. Revert transactions. Repeat transactions. Specify global expressions in yum input.
12.8.1. Listing transactions with YUM
Use the following procedure to list the latest transactions, the latest operations for a selected package, and details of a particular transaction.
Procedure
To display a list of all the latest yum transactions, use:
# yum historyTo display a list of all the latest operations for a selected package, use:
# yum history list package-nameReplace package-name with the name of the package. You can filter the command output by appending global expressions. See Specifying global expressions in yum input for more details.
To examine a particular transaction, use:
# yum history info transactionIDReplace transactionID with the ID of the transaction.
12.8.2. Reverting transactions with YUM
The following procedure describes how to revert a selected transaction or the last transaction using yum.
Procedure
To revert a particular transaction, use:
# yum history undo transactionIDReplace transactionID with the ID of the transaction.
To revert the last transaction, use:
# yum history undo lastNote that the yum history undo command only reverts the steps that were performed during the transaction. If the transaction installed a new package, the yum history undo command uninstalls it. If the transaction uninstalled a package, the yum history undo command reinstalls it. yum history undo also attempts to downgrade all updated packages to their previous versions, if the older packages are still available.
12.8.3. Repeating transactions with YUM
Use the following procedure to repeat a selected transaction or the last transaction using yum.
Procedure
To repeat a particular transaction, use:
# yum history redo transactionIDReplace transactionID with the ID of the transaction.
To repeat the last transaction, use:
# yum history redo lastNote that the yum history redo command only repeats the steps that were performed during the transaction.
12.8.4. Specifying global expressions in YUM input
yum commands allow you to filter the results by appending one or more glob expressions as arguments. You have to escape global expressions when passing them as arguments to the yum command.
Procedure
To ensure global expressions are passed to yum as intended, use one of the following methods:
Double-quote or single-quote the entire global expression.
# yum provides "*/file-name"Replace file-name with the name of the file.
Escape the wildcard characters by preceding them with a backslash () character.
# yum provides */file-nameReplace file-name with the name of the file.
12.9. Managing software repositories
The configuration information for yum and related utilities are stored in the /etc/yum.conf file. This file contains one or more [repository] sections, which allow you to set repository-specific options.
It is recommended to define individual repositories in new or existing .repo files in the /etc/yum.repos.d/ directory.
Note that the values you define in individual [repository] sections of the /etc/yum.conf file override values set in the [main] section.
The following section describes how to:
- Set [repository] options. Add a yum repository. Enable a
yum repository. Disable a yum repository.
12.9.1. Setting YUM repository options
The /etc/yum.conf configuration file contains the [repository] sections, where repository is a unique repository ID. The [repository] sections allows you to define individual yum repositories.
Do not give custom repositories names used by the Red Hat repositories to avoid conflicts.
For a complete list of available [repository] options, see the [repository] OPTIONS section of the yum.conf(5) manual page.
12.9.2. Adding a YUM repository
Procedure
To define a new repository, you can:
- Add a [repository] section to the /etc/yum.conf file.
Add a [repository] section to a .repo file in the /etc/yum.repos.d/ directory.
+
yum repositories commonly provide their own .repo file.
It is recommended to define your repositories in a .repo file instead of /etc/yum.conf as all files with the .repo file extension in this directory are read by yum.
To add a repository to your system and enable it, use:
# yum-config-manager --add-repo repository_URLReplace repository_url with URL pointing to the repository.
Obtaining and installing software packages from unverified or untrusted sources other than Red Hat certificate-based Content Delivery Network (CDN) constitutes a potential security risk, and could lead to security, stability, compatibility, and maintainability issues.
12.9.3. Enabling a YUM repository
Once you added a `yum`repository to your system, enable it to ensure installation and updates.
Procedure
To enable a repository, use:
# yum-config-manager --enable repositoryIDReplace repositoryID with the unique repository ID.
To list available repository IDs, see Listing packages with yum.
12.9.4. Disabling a YUM repository
Disable a specific YUM repository to prevent particular packages from installation or update.
Procedure
To disable a yum repository, use:
# yum-config-manager --disable repositoryIDReplace repositoryID with the unique repository ID.
To list available repository IDs, see Listing packages with yum.
12.10. Configuring YUM
The configuration information for yum and related utilities are stored in the /etc/yum.conf file. This file contains one mandatory [main] section, which enables you to set yum options that have global effect.
The following section describes how to:
- View the current yum configurations. Set yum [main] options. Use
yum plug-ins.
12.10.1. Viewing the current YUM configurations
Use the following procedure to view the current yum configurations.
Procedure
To display the current values of global yum options specified in the [main] section of the /etc/yum.conf file, use:
# yum config-manager --dump12.10.2. Setting YUM main options
The /etc/yum.conf configuration file contains one [main] section. The key-value pairs in this section affect how yum operates and treats repositories.
You can add additional options under the [main] section heading in /etc/yum.conf.
For a complete list of available [main] options, see the [main] OPTIONS section of the yum.conf(5) manual page.
12.10.3. Using YUM plug-ins
yum provides plug-ins that extend and enhance its operations. Certain plug-ins are installed by default.
The following section describes how to enable, configure, and disable yum plug-ins.
12.10.3.1. Managing YUM plug-insProcedure
The plug-in configuration files always contain a [main] section where the enabled= option controls whether the plug-in is enabled when you run yum commands. If this option is missing, you can add it manually to the file.
Every installed plug-in has its own configuration file in the /etc/dnf/plugins/ directory. You can enable or disable plug-in specific options in these files.
12.10.3.2. Enabling YUM plug-insThe following procedure describes how to disable or enable all YUM plug-ins, disable all plug-ins for a particular command, or certain YUM plug-ins for a single command.
+
Procedure
To enable all yum plug-ins:
Ensure a line beginning with plugins= is present in the [main] section of the /etc/yum.conf file.Set the value of plugins= to 1.
plugins=1To disable all yum plug-ins:
Ensure a line beginning with plugins= is present in the [main] section of the /etc/yum.conf file.Set the value of plugins= to 0.
plugins=0Disabling all plug-ins is not advised. Certain plug-ins provide important yum services. In particular, the product-id and subscription-manager plug-ins provide support for the certificate-based Content Delivery Network (CDN). Disabling plug-ins globally is provided as a convenience option, and is advisable only when diagnosing a potential problem with yum.
To disable all yum plug-ins for a particular command, append --noplugins option to the command.
# yum --noplugins updateTo disable certain yum plug-ins for a single command, append --disableplugin=plugin-name option to the command.
# yum update --disableplugin=plugin-nameReplace plugin-name with the name of the plug-in.
Chapter 13. Introduction to systemd
systemd is a system and service manager for Linux operating systems. It is designed to be backwards compatible with SysV init scripts, and provides a number of features such as parallel startup of system services boot time, on-demand activation of daemons, or dependency-based service control logic. Starting with Red Hat Enterprise Linux 7, systemd replaced Upstart as the default init system.
systemd introduces the concept of systemd units. These units are represented by unit configuration files located in one of the directories listed in the following table:
Table 13.1. systemd unit files locations
DirectoryDescription
/usr/lib/systemd/system/
systemd unit files distributed with installed RPM packages.
/run/systemd/system/
systemd unit files created run time. This directory takes precedence over the directory with installed service unit files.
/etc/systemd/system/
systemd unit files created by systemctl enable as well as unit files added for extending a service. This directory takes precedence over the directory with runtime unit files.
The units encapsulate information about:
- System services Listening sockets Other objects that are relevant to the init system
The default configuration of systemd is defined during the compilation and it can be found in the systemd configuration file /etc/systemd/system.conf. Use this file if you want to deviate from those defaults and override selected default values for systemd units globally.
For example, to override the default value of the timeout limit, which is set to 90 seconds, use the DefaultTimeoutStartSec parameter to input the required value in seconds.
DefaultTimeoutStartSec=pass:_required value_13.1. systemd unit types
For a complete list of available systemd unit types, see the following table:
Table 13.2. Available systemd unit types
Unit TypeFile ExtensionDescription
Service unit
.service
A system service.
Target unit
.target
A group of systemd units.
Automount unit
.automount
A file system automount point.
Device unit
.device
A device file recognized by the kernel.
Mount unit
.mount
A file system mount point.
Path unit
.path
A file or directory in a file system.
Scope unit
.scope
An externally created process.
Slice unit
.slice
A group of hierarchically organized units that manage system processes.
Socket unit
.socket
An inter-process communication socket.
Swap unit
.swap
A swap device or a swap file.
Timer unit
.timer
A systemd timer.
13.2. systemd main features
The systemd system and service manager provides the following main features:
Socket-based activation — At boot time, systemd creates listening sockets for all system services that support this type of activation, and passes the sockets to these services as soon as they are started. This not only allows systemd to start services in parallel, but also makes it possible to restart a service without losing any message sent to it while it is unavailable: the corresponding socket remains accessible and all messages are queued.
systemd uses socket units for socket-based activation.
Bus-based activation — System services that use D-Bus for inter-process communication can be started on-demand the first time a client application attempts to communicate with them. systemd uses D-Bus service files for bus-based activation. Device-based activation — System services that support device-based activation can be started on-demand when a particular type of hardware is plugged in or becomes available. systemd uses device units for device-based activation. Path-based activation — System services that support path-based activation can be started on-demand when a particular file or directory changes its state. systemd uses path units for path-based activation. Mount and automount point management — systemd monitors and manages mount and automount points. systemd uses mount units for mount points and automount units for automount points. Aggressive parallelization — Because of the use of socket-based activation, systemd can start system services in parallel as soon as all listening sockets are in place. In combination with system services that support on-demand activation, parallel activation significantly reduces the time required to boot the system. Transactional unit activation logic — Before activating or deactivating a unit, systemd calculates its dependencies, creates a temporary transaction, and verifies that this transaction is consistent. If a transaction is inconsistent, systemd automatically attempts to correct it and remove non-essential jobs from it before reporting an error. Backwards compatibility with SysV init — systemd supports SysV init scripts as described in the Linux Standard Base Core Specification, which eases the upgrade path to systemd service units.13.3. Compatibility changes
The systemd system and service manager is designed to be mostly compatible with SysV init and Upstart. The following are the most notable compatibility changes with regards to Red Hat Enterprise Linux 6 system that used SysV init:
- systemd has only limited support for runlevels. It provides a number of target units that can be directly mapped to these runlevels and for compatibility reasons, it is also
distributed with the earlier runlevel command. Not all systemd targets can be directly mapped to runlevels, however, and as a consequence, this command might return N to indicate an unknown runlevel. It is recommended that you avoid using the runlevel command if possible.
For more information about systemd targets and their comparison with runlevels, see Working with systemd targets. The systemctl utility does not support custom commands. In addition to standard commands such as start, stop, and status, authors of SysV init scripts could implement support for any number of arbitrary commands in order to provide additional functionality. For example, the init script for iptables could be executed with the panic command, which immediately enabled panic mode and reconfigured the system to start dropping all incoming and outgoing packets. This is not supported in systemd and the systemctl only accepts documented commands. The systemctl utility does not communicate with services that have not been started by systemd. When systemd starts a system service, it stores the ID of its main process in order to keep track of it. The systemctl utility then uses this PID to query and manage the service. Consequently, if a user starts a particular daemon directly on the command line, systemctl is unable to determine its current status or stop it. systemd stops only running services. Previously, when the shutdown sequence was initiated, Red Hat Enterprise Linux 6 and earlier releases of the system used symbolic links located in the /etc/rc0.d/ directory to stop all available system services regardless of their status. With systemd , only running services are stopped on shutdown. System services are unable to read from the standard input stream. When systemd starts a service, it connects its standard input to /dev/null to prevent any interaction with the user. System services do not inherit any context (such as the HOME and PATH environment variables) from the invoking user and their session. Each service runs in a clean execution context. When loading a SysV init script, systemd reads dependency information encoded in the Linux Standard Base (LSB) header and interprets it run time. All operations on service units are subject to a default timeout of 5 minutes to prevent a malfunctioning service from freezing the system. This value is hardcoded for services that are generated from initscripts and cannot be changed. However, individual configuration files can be used to specify a longer timeout value per service, see Changing the timeout limit.
13.4. Additional resources
-
Migration Planning Guide for Red Hat Enterprise Linux 7
Chapter 14. Managing system services with systemctl
The systemctl utility helps managing system services. You can use the systemctl utility to perform different tasks related to different services such as starting, stopping, restarting, enabling, and disabling services, listing services, and displaying system services statuses.
This section describes how to manage system services with the systemctl utility.
14.1. Service unit management with systemctl
The service units help to control the state of services and daemons in your system.
Service units end with the .service file extension, for example nfs-server.service. However, while using service file names in commands, you can omit the file extension. The systemctl utility assumes the argument is a service unit. For example, to stop the nfs-server.service, enter the following command:
# systemctl stop nfs-serverAdditionally, some service units have alias names. Aliases can be shorter than units, and you can use them instead of the actual unit names.
To find all aliases that can be used for a particular unit, use:
# systemctl show nfs-server.service -p NamesAdditional resources
-
Comparison of a service utility with systemctl
Listing system services
Displaying system service status
Starting a system service
Restarting a system service
Enabling a system service
Disabling a system service
Stopping a system service
14.2. Comparison of a service utility with systemctl
This section shows a comparison between a service utility and the usage of systemctl command.
Table 14.1. Comparison of the service utility with systemctl
servicesystemctlDescription
service
systemctl start
Starts a service.
service
systemctl stop
Stops a service.
service
systemctl restart
Restarts a service.
service
systemctl try-restart
Restarts a service only if it is running.
service
systemctl reload
Reloads configuration.
service
systemctl status
systemctl is-active
Checks if a service is running.
service --status-all
systemctl list-units --type service --all
Displays the status of all services.
14.3. Listing system services
You can list all currently loaded service units and the status of all available service units.
Procedure
To list all currently loaded service units, enter:
$ systemctl list-units --type service UNIT LOAD ACTIVE SUB DESCRIPTION abrt-ccpp.service loaded active exited Install ABRT coredump hook abrt-oops.service loaded active running ABRT kernel log watcher abrtd.service loaded active running ABRT Automated Bug Reporting Tool ---- systemd-vconsole-setup.service loaded active exited Setup Virtual Console tog-pegasus.service loaded active running OpenPegasus CIM Server LOAD = Reflects whether the unit definition was properly loaded. ACTIVE = The high-level unit activation state, i.e. generalization of SUB. SUB = The low-level unit activation state, values depend on unit type. 46 loaded units listed. Pass --all to see loaded but inactive units, too. To show all installed unit files use 'systemctl list-unit-files'By default, the systemctl list-units command displays only active units. For each service unit file, the command displays:
- UNIT: its full name LOAD: information whether the unit file has been loaded ACTIVE SUB: its high-level and low-level unit file activation state DESCRIPTION: a short description
To list all loaded units regardless of their state, enter the following command with the --all or -a command line option:
$ systemctl list-units --type service --allTo list the status (enabled / disabled) of all available service units, enter:
$ systemctl list-unit-files --type service UNIT FILE STATE abrt-ccpp.service enabled abrt-oops.service enabled abrtd.service enabled ... wpa_supplicant.service disabled ypbind.service disabled 208 unit files listed.For each service unit, this command displays:
- UNIT FILE: its full name STATE: information whether the service unit is enabled or disabled
14.4. Displaying system service status
You can inspect any service unit to get its detailed information and verify the state of the service whether it is enabled or running. You can also view services that are ordered to start after or before a particular service unit.
Procedure
To display detailed information about a service unit that corresponds to a system service, enter:
$ systemctl status Replace
This command displays the name of the selected service unit followed by its short description, one or more fields described in Available service unit information, if it is executed by the root user, and the most recent log entries.
Table 14.2. Available service unit information
FieldDescription
Loaded
Information whether the service unit has been loaded, the absolute path to the unit file, and a note whether the unit is enabled.
Active
Information whether the service unit is running followed by a time stamp.
Main PID
The PID of the corresponding system service followed by its name.
Status
Additional information about the corresponding system service.
Process
Additional information about related processes.
CGroup
Additional information about related Control Groups (cgroups).
Example 14.1. Displaying service status
The service unit for the GNOME Display Manager is named gdm.service. To determine the current status of this service unit, type the following a shell prompt:
# systemctl status gdm.service gdm.service - GNOME Display Manager Loaded: loaded (/usr/lib/systemd/system/gdm.service; enabled) Active: active (running) since Thu 2013-10-17 17:31:23 CEST; 5min ago Main PID: 1029 (gdm) CGroup: /system.slice/gdm.service ├─1029 /usr/sbin/gdm ├─1037 /usr/libexec/gdm-simple-slave --display-id /org/gno... └─1047 /usr/bin/Xorg :0 -background none -verbose -auth /r... Oct 17 17:31:23 localhost systemd[1]: Started GNOME Display Manager.To only verify that a particular service unit is running, enter:
$ systemctl is-activeTo determine whether a particular service unit is enabled, enter:
$ systemctl is-enabledBoth systemctl is-active and systemctl is-enabled return an exit status of 0 if the specified service unit is running or enabled.
To determine what services are ordered to start before the specified service unit, enter:
# systemctl list-dependencies --after Replace
# systemctl list-dependencies --after gdm.service gdm.service ├─dbus.socket ├─ ├─livesys.service ├─plymouth-quit.service ├─system.slice ├─systemd-journald.socket ├─systemd-user-sessions.service └─basic.target [output truncated]
To determine what services are ordered to start after the specified service unit, enter:
# systemctl list-dependencies --before Replace
# systemctl list-dependencies --before gdm.service gdm.service ├─dracut-shutdown.service ├─graphical.target │ ├─systemd-readahead-done.service │ ├─systemd-readahead-done.timer │ └─systemd-update-utmp-runlevel.service └─shutdown.target ├─systemd-reboot.service └─final.target └─systemd-reboot.service
14.5. Positive and negative service dependencies
In systemd, positive and negative dependencies between services exist. Starting a particular service may require starting one or more other services (positive dependency) or stopping one or more services (negative dependency).
When you attempt to start a new service, systemd resolves all dependencies automatically, without explicit notification to the user. This means that if you are already running a service, and you attempt to start another service with a negative dependency, the first service is automatically stopped.
For example, if you are running the postfix service, and you attempt to start the sendmail service, systemd first automatically stops postfix, because these two services are conflicting and cannot run on the same port.
14.6. Starting a system service
You can start system service in the current session using the start command. You must have a root access as starting a service may affect the state of the operating system.
Procedure
To start a selected service unit corresponding to a system service, type the following command as root:
# systemctl start Replace
Example 14.2. Starting httpd.service
The service unit for the Apache HTTP Server is named httpd.service. To activate this service unit and start the httpd daemon in the current session, enter the following command as root:
# systemctl start httpd.service14.7. Stopping a system service
You can stop system service in the current session using the stop command. You must have a root access as stopping a service may affect the state of the operating system.
Procedure
To stop the service unit corresponding to a system service, enter the following command as root:
# systemctl stop Replace
Example 14.3. Stopping bluetoothd.service
The service unit for the bluetoothd daemon is named bluetooth.service. To deactivate this service unit and stop the bluetoothd daemon in the current session, enter the following command as root:
# systemctl stop bluetooth.service14.8. Restarting a system service
You can restart system service in the current session using the restart command. You must have a root access as restarting a service may affect the state of the operating system.
This procedure describes how to:
- Stop the selected service unit in the current session and immediately start it again Restart a service unit only if the corresponding service is already running Reload configuration of a system service without interrupting
its execution
Procedure
To restart a service unit corresponding to a system service, enter the following command as root:
# systemctl restart Replace
If the selected service unit is not running, this command starts it too.
Alternatively, to restart a service unit only if the corresponding service is already running, enter the following command as root:
# systemctl try-restartTo reload the configuration without interrupting service execution, enter the following command as root:
# systemctl reloadSystem services that do not support this feature, ignore this command. To restart such services, use the reload-or-restart and reload-or-try-restart commands instead.
Example 14.4. Reloading httpd.service
In order to prevent users from encountering unnecessary error messages or partially rendered web pages, the Apache HTTP Server allows you to edit and reload its configuration without the need to restart it and interrupt actively processed requests. To do so, enter the following as root:
# systemctl reload httpd.service14.9. Enabling a system service
You can configure service to start automatically the system booting time. The enable command reads the [Install] section of the selected service unit and creates appropriate symbolic links to the /usr/lib/systemd/system/name.service file in the /etc/systemd/system/ directory and its sub-directories. However, it does not rewrite links that already exist.
Procedure
To configure a service unit that corresponds to a system service to be automatically started boot time, enter the following command as root:
# systemctl enable Replace
If you want to ensure that the symbolic links are re-created, enter the following command as root:
# systemctl reenableThis command disables the selected service unit and immediately enables it again.
Example 14.5. Enabling httpd.service
To configure the Apache HTTP Server to start automatically boot time, enter the following command as root:
# systemctl enable httpd.service Created symlink from /etc/systemd/system/multi-user.target.wants/httpd.service to /usr/lib/systemd/system/httpd.service.14.10. Disabling a system service
You can prevent a service unit from starting automatically boot time. The disable command reads the [Install] section of the selected service unit and removes appropriate symbolic links to the /usr/lib/systemd/system/name.service file from the /etc/systemd/system/ directory and its sub-directories.
Procedure
To configure a service unit that corresponds to a system service not to start automatically boot time, enter the following command as root:
# systemctl disable Replace
Example 14.6. Disabling bluetoothd.service
The service unit for the bluetoothd daemon is named bluetooth.service. To prevent this service unit from starting boot time, enter the following command as a root:
# systemctl disable bluetooth.service Removed symlink /etc/systemd/system/bluetooth.target.wants/bluetooth.service. Removed symlink /etc/systemd/system/dbus-org.bluez.service.To mask any service unit and prevent it from being started manually or by another service, enter the following command as root:
# systemctl maskThis command replaces the /etc/systemd/system/name.service file with a symbolic link to /dev/null, rendering the actual unit file inaccessible to systemd.
To revert this action and unmask a service unit, enter:
# systemctl unmaskChapter 15. Working with systemd targets
systemd targets are represented by target units. Target units file ends with the .target file extension and their only purpose is to group together other systemd units through a chain of dependencies. For example, the graphical.target unit, which is used to start a graphical session, starts system services such as the GNOME Display Manager (gdm.service) or Accounts Service (accounts-daemon.service) and also activates the multi-user.target unit. Similarly, the multi-user.target unit starts other essential system services such as NetworkManager (NetworkManager.service) or D-Bus (dbus.service) and activates another target unit named basic.target.
This section includes procedures to implement while working with systemd targets.
15.1. Difference between SysV runlevels and systemd targets
The previous versions of Red Hat Enterprise Linux were distributed with SysV init or Upstart, and implemented a predefined set of runlevels that represented specific modes of operation. These runlevels were numbered from 0 to 6 and were defined by a selection of system services to be run when a particular runlevel was enabled by the system administrator. Starting with Red Hat Enterprise Linux 7, the concept of runlevels has been replaced with systemd targets.
Red Hat Enterprise Linux 7 was distributed with a number of predefined targets that are more or less similar to the standard set of runlevels from the previous releases. For compatibility reasons, it also provides aliases for these targets that directly maps to the SysV runlevels.
The following table provides a complete list of SysV runlevels and their corresponding systemd targets:
Table 15.1. Comparison of SysV runlevels with systemd targets
RunlevelTarget UnitsDescription
0
runlevel0.target, poweroff.target
Shut down and power off the system.
1
runlevel1.target, rescue.target
Set up a rescue shell.
2
runlevel2.target, multi-user.target
Set up a non-graphical multi-user system.
3
runlevel3.target, multi-user.target
Set up a non-graphical multi-user system.
4
runlevel4.target, multi-user.target
Set up a non-graphical multi-user system.
5
runlevel5.target, graphical.target
Set up a graphical multi-user system.
6
runlevel6.target, reboot.target
Shut down and reboot the system.
The following table compares the SysV init commands with systemctl. Use the systemctl utility to view, change, or configure systemd targets:
The runlevel and telinit commands are still available in the system and work as expected, but are only included for compatibility reasons and should be avoided.
Table 15.2. Comparison of SysV init commands with systemctl
Old CommandNew CommandDescription
runlevel
systemctl list-units --type target
Lists currently loaded target units.
telinit runlevel
systemctl isolate name.target
Changes the current target.
Additional resources
- man sysv init man upstart init man systemctl
15.2. Viewing the default target
The default target unit is represented by the /etc/systemd/system/default.target file.
Procedure
To determine which target unit is used by default:
$ systemctl get-default graphical.targetTo determine the default target using the symbolic link:
$ ls -l /usr/lib/systemd/system/default.target= Viewing the target units
By default, the systemctl list-units command displays only active units.
Procedure
To list all loaded units regardless of their state:
$ systemctl list-units --type target --allTo list all currently loaded target units:
$ systemctl list-units --type target UNIT LOAD ACTIVE SUB DESCRIPTION basic.target loaded active active Basic System cryptsetup.target loaded active active Encrypted Volumes getty.target loaded active active Login Prompts graphical.target loaded active active Graphical Interface local-fs-pre.target loaded active active Local File Systems (Pre) local-fs.target loaded active active Local File Systems multi-user.target loaded active active Multi-User System network.target loaded active active Network paths.target loaded active active Paths remote-fs.target loaded active active Remote File Systems sockets.target loaded active active Sockets sound.target loaded active active Sound Card spice-vdagentd.target loaded active active Agent daemon for Spice guests swap.target loaded active active Swap sysinit.target loaded active active System Initialization time-sync.target loaded active active System Time Synchronized timers.target loaded active active Timers LOAD = Reflects whether the unit definition was properly loaded. ACTIVE = The high-level unit activation state, i.e. generalization of SUB. SUB = The low-level unit activation state, values depend on unit type. 17 loaded units listed.15.2.1. Changing the default target
The default target unit is represented by the /etc/systemd/system/default.target file. The following procedure describes how to change the default target by using the systemctl command:
Procedure
To determine the default target unit:
# systemctl get-defaultTo configure the system to use a different target unit by default:
# systemctl set-default multi-user.target rm /etc/systemd/system/default.target ln -s /usr/lib/systemd/system/multi-user.target /etc/systemd/system/default.targetThis command replaces the /etc/systemd/system/default.target file with a symbolic link to /usr/lib/systemd/system/name.target, where name is the name of the target unit you want to use. Replace multi-user with the name of the target unit you want to use by default.
Table 15.3. Common targets for set-default command
basic
unit target covering basic boot-up
rescue
unit target that pulls in the base system and spawns a rescue shell
multi-user
unit target for setting up a multi-user system
graphical
unit target for setting up a graphical login screen
emergency
unit target that starts an emergency shell on the main console
sysinit
unit target that pulls in the services required for system initialization
Reboot
# rebootAdditional resources
- For more details about target units see systemd.special manpage bootup man page
15.2.2. Changing the default target using symbolic link
The following procedure describes how to change the default target by creating a symbolic link to the target.
Procedure
Determine the default target unit:
# ls -l /etc/systemd/system/default.targetNote that in certain cases, the /etc/systemd/system/default.target link might not exist, and systemd looks for the default target unit in /usr. In such cases, determine the default target unit using the following command:
# ls -l /usr/lib/systemd/system/default.targetDelete the /etc/systemd/system/default.target link:
# rm /etc/systemd/system/default.targetCreate a symbolic link:
# ln -sf /usr/lib/systemd/system/graphical.target /etc/systemd/system/default.targetReboot the system:
# rebootVerification steps
Verify the newly created default.target:
$ systemctl get-default multi-user.target15.2.3. Changing the current target
This procedure explains how to change the target unit in the current session using the systemctl command.
Procedure
To change to a different target unit in the current session:
# systemctl isolate multi-user.targetThis command starts the target unit named multi-user and all dependent units, and immediately stops all others.
Replace multi-user with the name of the target unit you want to use by default.
Verification steps
Verify the newly created default.target:
$ systemctl get-default multi-user.target= Booting to rescue mode
Rescue mode provides a convenient single-user environment and allows you to repair your system in situations when it is unable to complete a regular booting process. In rescue mode, the system attempts to mount all local file systems and start some important system services, but it does not activate network interfaces or allow more users to be logged into the system the same time.
Procedure
To change the current target and enter rescue mode in the current session:
# systemctl rescue Broadcast message from [email protected] on pts/0 (Fri 2013-10-25 18:23:15 CEST): The system is going down to rescue mode NOW!This command is similar to systemctl isolate rescue.target, but it also sends an informative message to all users that are currently logged into the system.
To prevent systemd from sending a message, run the following command with the --no-wall command-line option: # systemctl --no-wall rescue
Emergency mode provides the most minimal environment possible and allows you to repair your system even in situations when the system is unable to enter rescue mode. In emergency mode, the system mounts the root file system only for reading, does not attempt to mount any other local file systems, does not activate network interfaces, and only starts a few essential services.
Procedure
To change the current target and enter emergency mode:
# systemctl emergencyThis command is similar to systemctl isolate emergency.target, but it also sends an informative message to all users that are currently logged into the system.
To prevent systemd from sending this message, run the following command with the --no-wall command-line option: # systemctl --no-wall emergency
Chapter 16. Shutting down, suspending, and hibernating the system
This section contains instructions about shutting down, suspending, or hibernating your operating system.
16.1. System shutdown
To shut down the system, you can either use the systemctl utility directly, or call this utility through the shutdown command.
The advantage of using the shutdown command is:
The support for time argument
This is particularly useful for scheduled maintenance. Also, users have more time to react to the warning that a system shutdown has been scheduled.
The option to cancel the shutdown16.2. Shutting down the system using the shutdown command
By following this procedure, you can use the shutdown command to perform various operations. You can either shut down the system and power off the machine a certain time, or shut down and halt the system without powering off the machine, or cancel a pending shutdown.
Prerequisites
- Switch to the root user
Procedure
To shut down the system and power off the machine a certain time, use the command in the following format:
shutdown --poweroff hh:mmWhere hh:mm is the time in 24 hour clock format. The /run/nologin file is created 5 minutes before system shutdown to prevent new logins.
When a time argument is used, an optional wall message can be appended to the command.
Alternatively, to shut down and halt the system after a delay, without powering off the machine, use:
shutdown --halt +mWhere +m is the delay time in minutes. The now keyword is an alias for +0.
To cancel a pending shutdown, use:
shutdown -c16.3. Shutting down the system using the systemctl command
By following this procedure, you can use the systemctl command to perform various operations. You can either shut down the system and power off the machine, or shut down and halt the system without powering off the machine.
Prerequisites
- Switch to the root user
Procedure
To shut down the system and power off the machine, use the command in the following format:
systemctl poweroffAlternatively, to shut down and halt the system without powering off the machine, use:
systemctl haltBy default, running either of these commands causes systemd to send an informative message to all users that are currently logged into the system. To prevent systemd from sending this message, run the selected command with the --no-wall command line option.
16.4. Restarting the system
You can restart the system by following this procedure.
Prerequisites
- Switch to the root user
Procedure
To restart the system, run the following command:
systemctl rebootBy default, this command causes systemd to send an informative message to all users that are currently logged into the system. To prevent systemd from sending this message, run this command with the --no-wall command line option.
16.5. Suspending the system
You can suspend the system by following this procedure.
Prerequisites
-
Switch to the root user.
Procedure
To suspend the system, run the following command:
systemctl suspendThis command saves the system state in RAM and with the exception of the RAM module, powers off most of the devices in the machine. When you turn the machine back on, the system then restores its state from RAM without having to boot again.
Because the system state is saved in RAM and not on the hard disk, restoring the system from suspend mode is significantly faster than from hibernation. However, note that the suspended system state is also vulnerable to power outages.
16.6. Hibernating the system
By following this procedure, you can either hibernate the system, or hibernate and suspend the system.
Prerequisites
- Switch to the root user.
Procedure
To hibernate the system, run the following command:
systemctl hibernateThis command saves the system state on the hard disk drive and powers off the machine. When you turn the machine back on, the system then restores its state from the saved data without having to boot again.
Because the system state is saved on the hard disk and not in RAM, the machine does not have to maintain electrical power to the RAM module. However, as a consequence, restoring the system from hibernation is significantly slower than restoring it from suspend mode.
Alternatively, to hibernate and suspend the system, run the following command:
systemctl hybrid-sleep16.7. Overview of the power management commands with systemctl
You can use the following list of the systemctl commands to control the power management of your system.
Table 16.1. Overview of the systemctl power management commands
systemctl commandDescription
systemctl halt
Halts the system.
systemctl poweroff
Powers off the system.
systemctl reboot
Restarts the system.
systemctl suspend
Suspends the system.
systemctl hibernate
Hibernates the system.
systemctl hybrid-sleep
Hibernates and suspends the system.
Chapter 17. Working with systemd unit files
This chapter includes the description of systemd unit files. The following sections show you how to:
- Create custom unit files Convert SysV init scripts to unit files Modify existing
unit files Work with instantiated units
17.1. Introduction to unit files
A unit file contains configuration directives that describe the unit and define its behavior. Several systemctl commands work with unit files in the background. To make finer adjustments, system administrator must edit or create unit files manually. systemd unit files locations lists three main directories where unit files are stored on the system, the /etc/systemd/system/ directory is reserved for unit files created or customized by the system administrator.
Unit file names take the following form:
unit_name.type_extensionHere, unit_name stands for the name of the unit and type_extension identifies the unit type. For a complete list of unit types, see systemd unit files
For example, there usually is sshd.service as well as sshd.socket unit present on your system.
Unit files can be supplemented with a directory for additional configuration files. For example, to add custom configuration options to sshd.service, create the sshd.service.d/custom.conf file and insert additional directives there. For more information on configuration directories, see Modifying existing unit files.
Also, the sshd.service.wants/ and sshd.service.requires/ directories can be created. These directories contain symbolic links to unit files that are dependencies of the sshd service. The symbolic links are automatically created either during installation according to [Install] unit file options or runtime based on [Unit] options. It is also possible to create these directories and symbolic links manually. For more details on [Install] and [Unit] options, see the tables below.
Many unit file options can be set using the so called unit specifiers – wildcard strings that are dynamically replaced with unit parameters when the unit file is loaded. This enables creation of generic unit files that serve as templates for generating instantiated units. See Working with instantiated units.
17.2. Unit file structure
Unit files typically consist of three sections:
- The [Unit] section — contains generic options that are not dependent on the type of the unit. These options provide unit description, specify the unit’s behavior, and set dependencies to other units. For a list of most frequently used [Unit] options, see
Important [Unit] section options. The [Unit type] section — if a unit has type-specific directives, these are grouped under a section named after the unit type. For example, service unit files contain the [Service] section. The [Install] section —
contains information about unit installation used by systemctl enable and disable commands. For a list of options for the [Install] section, see Important [Install] section options.
17.3. Important [Unit] section options
The following tables lists important options of the [Unit] section.
Table 17.1. Important [Unit] section options
Option [a]Description
Description
A meaningful description of the unit. This text is displayed for example in the output of the systemctl status command.
Documentation
Provides a list of URIs referencing documentation for the unit.
After[b]
Defines the order in which units are started. The unit starts only after the units specified in After are active. Unlike Requires, After does not explicitly activate the specified units. The Before option has the opposite functionality to After.
Requires
Configures dependencies on other units. The units listed in Requires are activated together with the unit. If any of the required units fail to start, the unit is not activated.
Wants
Configures weaker dependencies than Requires. If any of the listed units does not start successfully, it has no impact on the unit activation. This is the recommended way to establish custom unit dependencies.
Conflicts
Configures negative dependencies, an opposite to Requires.
[a] For a complete list of options configurable in the [Unit] section, see the systemd.unit(5) manual page.
[b] In most cases, it is sufficient to set only the ordering dependencies with After and Before unit file options. If you also set a requirement dependency with Wants (recommended) or Requires, the ordering dependency still needs to be specified. That is because ordering and requirement dependencies work independently from each other.
17.4. Important [Service] section options
The following tables lists important options of the [Service] section.
Table 17.2. Important [Service] section options
Option [a]Description
Type
Configures the unit process startup type that affects the functionality of ExecStart and related options. One of:
* simple – The default value. The process started with ExecStart is the main process of the service.
* forking – The process started with ExecStart spawns a child process that becomes the main process of the service. The parent process exits when the startup is complete.
* oneshot – This type is similar to simple, but the process exits before starting consequent units.
* dbus – This type is similar to simple, but consequent units are started only after the main process gains a D-Bus name.
* notify – This type is similar to simple, but consequent units are started only after a notification message is sent via the sd_notify() function.
* idle – similar to simple, the actual execution of the service binary is delayed until all jobs are finished, which avoids mixing the status output with shell output of services.
ExecStart
Specifies commands or scripts to be executed when the unit is started. ExecStartPre and ExecStartPost specify custom commands to be executed before and after ExecStart. Type=oneshot enables specifying multiple custom commands that are then executed sequentially.
ExecStop
Specifies commands or scripts to be executed when the unit is stopped.
ExecReload
Specifies commands or scripts to be executed when the unit is reloaded.
Restart
With this option enabled, the service is restarted after its process exits, with the exception of a clean stop by the systemctl command.
RemainAfterExit
If set to True, the service is considered active even when all its processes exited. Default value is False. This option is especially useful if Type=oneshot is configured.
[a] For a complete list of options configurable in the [Service] section, see the systemd.service(5) manual page.
17.5. Important [Install] section options
The following tables lists important options of the [Install] section.
Table 17.3. Important [Install] section options
Option [a]Description
Alias
Provides a space-separated list of additional names for the unit. Most systemctl commands, excluding systemctl enable, can use aliases instead of the actual unit name.
RequiredBy
A list of units that depend on the unit. When this unit is enabled, the units listed in RequiredBy gain a Require dependency on the unit.
WantedBy
A list of units that weakly depend on the unit. When this unit is enabled, the units listed in WantedBy gain a Want dependency on the unit.
Also
Specifies a list of units to be installed or uninstalled along with the unit.
DefaultInstance
Limited to instantiated units, this option specifies the default instance for which the unit is enabled. See Working with instantiated units.
[a] For a complete list of options configurable in the [Install] section, see the systemd.unit(5) manual page.
17.6. Creating custom unit files
There are several use cases for creating unit files from scratch: you could run a custom daemon, create a second instance of some existing service as in Creating a custom unit file by using the second instance of the sshd service
On the other hand, if you intend just to modify or extend the behavior of an existing unit, use the instructions from Modifying existing unit files.
Procedure
The following procedure describes the general process of creating a custom service:
Prepare the executable file with the custom service. This can be a custom-created script, or an executable delivered by a software provider. If required, prepare a PID file to hold a constant PID for the main process of the custom service. It is also possible to include environment files to store shell variables for the service. Make sure the source script is executable (by executing the chmod a+x) and is not interactive.Create a unit file in the /etc/systemd/system/ directory and make sure it has correct file permissions. Execute as root:
touch /etc/systemd/system/name.service chmod 664 /etc/systemd/system/name.serviceReplace name with a name of the service to be created. Note that file does not need to be executable.
Open the name.service file created in the previous step, and add the service configuration options. There is a variety of options that can be used depending on the type of service you wish to create, see Unit file structure.
The following is an example unit configuration for a network-related service:
[Unit] Description=service_description After=network.target [Service] ExecStart=path_to_executable Type=forking PIDFile=path_to_pidfile [Install] WantedBy=default.targetWhere:
- service_description is an informative
description that is displayed in journal log files and in the output of the systemctl status command. the After setting ensures that the service is started only after the network is running. Add a space-separated list of other relevant services or targets. path_to_executable stands for the path to the actual service executable. Type=forking is used for daemons that make the fork system call. The main process of the service is created with the PID
specified in path_to_pidfile. Find other startup types in Important [Service] section options. WantedBy states the target or targets that the service should be started under. Think of these targets as of a replacement of the
older concept of runlevels.
Notify systemd that a new name.service file exists by executing the following command as root:
systemctl daemon-reload systemctl start name.serviceAlways run the systemctl daemon-reload command after creating new unit files or modifying existing unit files. Otherwise, the systemctl start or systemctl enable commands could fail due to a mismatch between states of systemd and actual service unit files on disk. Note, that on systems with a large number of units this can take a long time, as the state of each unit has to be serialized and subsequently deserialized during the reload.
17.7. Creating a custom unit file by using the second instance of the sshd service
System Administrators often need to configure and run multiple instances of a service. This is done by creating copies of the original service configuration files and modifying certain parameters to avoid conflicts with the primary instance of the service. The following procedure shows how to create a second instance of the sshd service.
Procedure
Create a copy of the sshd_config file that will be used by the second daemon:
# cp /etc/ssh/sshd,-second_configEdit the sshd-second_config file created in the previous step to assign a different port number and PID file to the second daemon:
Port 22220 PidFile /var/run/sshd-second.pidSee the sshd_config(5) manual page for more information on Port and PidFile options. Make sure the port you choose is not in use by any other service. The PID file does not have to exist before running the service, it is generated automatically on service start.
Create a copy of the systemd unit file for the sshd service:
# cp /usr/lib/systemd/system/sshd.service /etc/systemd/system/sshd-second.serviceAlter the sshd-second.service created in the previous step as follows:
Modify the Description option:
Description=OpenSSH server second instance daemonAdd sshd.service to services specified in the After option, so that the second instance starts only after the first one has already started:
After=syslog.target network.target auditd.service sshd.service The first instance of sshd includes key generation, therefore remove the ExecStartPre=/usr/sbin/sshd-keygen line.Add the -f /etc/ssh/sshd-second_config parameter to the sshd command, so that the alternative configuration file is used:
ExecStart=/usr/sbin/sshd -D -f /etc/ssh/sshd-second_config $OPTIONSAfter the above modifications, the sshd-second.service should look as follows:
[Unit] Description=OpenSSH server second instance daemon After=syslog.target network.target auditd.service sshd.service [Service] EnvironmentFile=/etc/sysconfig/sshd ExecStart=/usr/sbin/sshd -D -f /etc/ssh/sshd-second_config $OPTIONS ExecReload=/bin/kill -HUP $MAINPID KillMode=process Restart=on-failure RestartSec=42s [Install] WantedBy=multi-user.targetIf using SELinux, add the port for the second instance of sshd to SSH ports, otherwise the second instance of sshd will be rejected to bind to the port:
# semanage port -a -t ssh_port_t -p tcp 22220Enable sshd-second.service, so that it starts automatically upon boot:
# systemctl enable sshd-second.service Verify if the sshd-second.service is running by using the systemctl status command.Verify if the port is enabled correctly by connecting to the service:
$ ssh -p 22220 [email protected]If the firewall is in use, make sure that it is configured appropriately in order to allow connections to the second instance of sshd.
17.8. Converting SysV init scripts to unit files
Before taking time to convert a SysV init script to a unit file, make sure that the conversion was not already done elsewhere. All core services installed on Red Hat Enterprise Linux come with default unit files, and the same applies for many third-party software packages.
Converting an init script to a unit file requires analyzing the script and extracting the necessary information from it. Based on this data you can create a unit file. As init scripts can vary greatly depending on the type of the service, you might need to employ more configuration options for translation than outlined in this chapter. Note that some levels of customization that were available with init scripts are no longer supported by systemd units.
The majority of information needed for conversion is provided in the script’s header. The following example shows the opening section of the init script used to start the postfix service on Red Hat Enterprise Linux 6:
#!/bin/bash # postfix Postfix Mail Transfer Agent # chkconfig: 2345 80 30 # description: Postfix is a Mail Transport Agent, which is the program that moves mail from one machine to another. # processname: master # pidfile: /var/spool/postfix/pid/master.pid # config: /etc/postfix/main.cf # config: /etc/postfix/master.cf ### BEGIN INIT INFO # Provides: postfix MTA # Required-Start: $local_fs $network $remote_fs # Required-Stop: $local_fs $network $remote_fs # Default-Start: 2 3 4 5 # Default-Stop: 0 1 6 # Short-Description: start and stop postfix # Description: Postfix is a Mail Transport Agent, which is the program that moves mail from one machine to another. ### END INIT INFOIn the above example, only lines starting with # chkconfig and # description are mandatory, so you might not find the rest in different init files. The text enclosed between the BEGIN INIT INFO and END INIT INFO lines is called Linux Standard Base (LSB) header. If specified, LSB headers contain directives defining the service description, dependencies, and default runlevels. What follows is an overview of analytic tasks aiming to collect the data needed for a new unit file. The postfix init script is used as an example.
17.9. Finding the systemd service description
You can find descriptive information about the script on the line starting with #description. Use this description together with the service name in the Description option in the [Unit] section of the unit file. The LSB header might contain similar data on the #Short-Description and #Description lines.
17.10. Finding the systemd service dependencies
The LSB header might contain several directives that form dependencies between services. Most of them are translatable to systemd unit options, see the following table:
Table 17.4. Dependency options from the LSB header
LSB OptionDescriptionUnit File Equivalent
Provides
Specifies the boot facility name of the service, that can be referenced in other init scripts (with the "$" prefix). This is no longer needed as unit files refer to other units by their file names.
–
Required-Start
Contains boot facility names of required services. This is translated as an ordering dependency, boot facility names are replaced with unit file names of corresponding services or targets they belong to. For example, in case of postfix, the Required-Start dependency on $network was translated to the After dependency on network.target.
After, Before
Should-Start
Constitutes weaker dependencies than Required-Start. Failed Should-Start dependencies do not affect the service startup.
After, Before
Required-Stop, Should-Stop
Constitute negative dependencies.
Conflicts
17.11. Finding default targets of the service
The line starting with #chkconfig contains three numerical values. The most important is the first number that represents the default runlevels in which the service is started. Map these runlevels to equivalent systemd targets. Then list these targets in the WantedBy option in the [Install] section of the unit file. For example, postfix was previously started in runlevels 2, 3, 4, and 5, which translates to multi-user.target and graphical.target. Note that the graphical.target depends on multiuser.target, therefore it is not necessary to specify both. You might find information on default and forbidden runlevels also #Default-Start and #Default-Stop lines in the LSB header.
The other two values specified on the #chkconfig line represent startup and shutdown priorities of the init script. These values are interpreted by systemd if it loads the init script, but there is no unit file equivalent.
17.12. Finding files used by the service
Init scripts require loading a function library from a dedicated directory and allow importing configuration, environment, and PID files. Environment variables are specified on the line starting with #config in the init script header, which translates to the EnvironmentFile unit file option. The PID file specified on the #pidfile init script line is imported to the unit file with the PIDFile option.
The key information that is not included in the init script header is the path to the service executable, and potentially some other files required by the service. In previous versions of Red Hat Enterprise Linux, init scripts used a Bash case statement to define the behavior of the service on default actions, such as start, stop, or restart, as well as custom-defined actions. The following excerpt from the postfix init script shows the block of code to be executed service start.
conf_check() [ -x /usr/sbin/postfix ] make_aliasesdb() [ "$ALIASESDB_STAMP" -nt /etc/aliases.db ] start() [ "$EUID" != "0" ] && exit 4 # Check that networking is up. [ $NETWORKING = "no" ] && exit 1 conf_check # Start daemons. echo -n $"Starting postfix: " make_aliasesdb >/dev/null 2>&1 [ -x $CHROOT_UPDATE ] && $CHROOT_UPDATE /usr/sbin/postfix start 2>/dev/null 1>&2 && successThe extensibility of the init script allowed specifying two custom functions, conf_check() and make_aliasesdb(), that are called from the start() function block. On closer look, several external files and directories are mentioned in the above code: the main service executable /usr/sbin/postfix, the /etc/postfix/ and /var/spool/postfix/ configuration directories, as well as the /usr/sbin/postconf/ directory.
systemd supports only the predefined actions, but enables executing custom executables with ExecStart, ExecStartPre, ExecStartPost, ExecStop, and ExecReload options. The /usr/sbin/postfix together with supporting scripts are executed on service start. Converting complex init scripts requires understanding the purpose of every statement in the script. Some of the statements are specific to the operating system version, therefore you do not need to translate them. On the other hand, some adjustments might be needed in the new environment, both in unit file as well as in the service executable and supporting files.
17.13. Modifying existing unit files
Services installed on the system come with default unit files that are stored in the /usr/lib/systemd/system/ directory. System Administrators should not modify these files directly, therefore any customization must be confined to configuration files in the /etc/systemd/system/ directory.
Procedure
Depending on the extent of the required changes, pick one of the following approaches:
- Create a directory for supplementary configuration files /etc/systemd/system/unit.d/. This method is recommended for most use cases. It enables extending the default configuration with additional functionality, while still referring to the original unit file. Changes to the default unit
introduced with a package upgrade are therefore applied automatically. See Extending the default unit configuration for more information. Create a copy of the original unit file /usr/lib/systemd/system/
in /etc/systemd/system/ and make changes there. The copy overrides the original file, therefore changes introduced with the package update are not applied. This method is useful for making significant unit changes that should persist regardless of package updates. See
Overriding the default unit configuration for details.
To apply changes to unit files without rebooting the system, execute:
systemctl daemon-reloadThe daemon-reload option reloads all unit files and recreates the entire dependency tree, which is needed to immediately apply any change to a unit file. As an alternative, you can achieve the same result with the following command, which must be executed under the root user:
init qIf the modified unit file belongs to a running service, this service must be restarted to accept new settings:
systemctl restart name.serviceTo modify properties, such as dependencies or timeouts, of a service that is handled by a SysV initscript, do not modify the initscript itself. Instead, create a systemd drop-in configuration file for the service as described in: Extending the default unit configuration and Overriding the default unit configuration.
Then manage this service in the same way as a normal systemd service.
For example, to extend the configuration of the network service, do not modify the /etc/rc.d/init.d/network initscript file. Instead, create new directory /etc/systemd/system/network.service.d/ and a systemd drop-in file /etc/systemd/system/network.service.d/my_config.conf. Then, put the modified values into the drop-in file. Note: systemd knows the network service as network.service, which is why the created directory must be called network.service.d
17.14. Extending the default unit configuration
This section describes how to extend the default unit file with additional configuration options.
Procedure
To extend the default unit file with additional configuration options, first create a configuration directory in /etc/systemd/system/. If extending a service unit, execute the following command as root:
mkdir /etc/systemd/system/name.service.d/Replace name with the name of the service you want to extend. The above syntax applies to all unit types.
Create a configuration file in the directory made in the previous step. Note that the file name must end with the .conf suffix. Type:
touch /etc/systemd/system/name.service.d/config_name.confReplace config_name with the name of the configuration file. This file adheres to the normal unit file structure, therefore all directives must be specified under appropriate sections, see Unit file structure.
For example, to add a custom dependency, create a configuration file with the following content:
[Unit] Requires=new_dependency After=new_dependencyWhere new_dependency stands for the unit to be marked as a dependency. Another example is a configuration file that restarts the service after its main process exited, with a delay of 30 seconds:
[Service] Restart=always RestartSec=30It is recommended to create small configuration files focused only on one task. Such files can be easily moved or linked to configuration directories of other services.
To apply changes made to the unit, execute as root:
systemctl daemon-reload systemctl restart name.serviceExample 17.1. Extending the httpd.service configuration
To modify the httpd.service unit so that a custom shell script is automatically executed when starting the Apache service, perform the following steps.
Create a directory and a custom configuration file:
# mkdir /etc/systemd/system/httpd.service.d/# touch /etc/systemd/system/httpd.service.d/custom_script.confProvided that the script you want to start automatically with Apache is located /usr/local/bin/custom.sh, insert the following text to the custom_script.conf file:
[Service] ExecStartPost=/usr/local/bin/custom.shTo apply the unit changes, execute:
# systemctl daemon-reload# systemctl restart httpd.serviceThe configuration files from configuration directories in /etc/systemd/system/ take precedence over unit files in /usr/lib/systemd/system/. Therefore, if the configuration files contain an option that can be specified only once, such as Description or ExecStart, the default value of this option is overridden. Note that in the output of the systemd-delta command, described in Monitoring overridden units ,such units are always marked as [EXTENDED], even though in sum, certain options are actually overridden.
17.15. Overriding the default unit configuration
This section describes how to override the default unit configuration.
Procedure
To make changes that will persist after updating the package that provides the unit file, first copy the file to the /etc/systemd/system/ directory. To do so, execute the following command as root:
cp /usr/lib/systemd/system/name.service /etc/systemd/system/name.serviceWhere name stands for the name of the service unit you wish to modify. The above syntax applies to all unit types.
Open the copied file with a text editor, and make the desired changes. To apply the unit changes, execute as root:
systemctl daemon-reload systemctl restart name.service17.16. Changing the timeout limit
You can specify a timeout value per service to prevent a malfunctioning service from freezing the system. Otherwise, timeout is set by default to 90 seconds for normal services and to 300 seconds for SysV-compatible services.
For example, to extend timeout limit for the httpd service:
Procedure
Copy the httpd unit file to the /etc/systemd/system/ directory:
cp /usr/lib/systemd/system/httpd.service /etc/systemd/system/httpd.serviceOpen file /etc/systemd/system/httpd.service and specify the TimeoutStartUSec value in the [Service] section:
… [Service] … PrivateTmp=true TimeoutStartSec=10 [Install] WantedBy=multi-user.target …Reload the systemd daemon:
systemctl daemon-reloadOptional. Verify the new timeout value:
systemctl show httpd -p TimeoutStartUSecTo change the timeout limit globally, input the DefaultTimeoutStartSec in the /etc/systemd/system.conf file.
17.17. Monitoring overridden units
This section describes how to display an overview of overridden or modified unit files.
Procedure
To display an overview of overridden or modified unit files, use the following command:
systemd-deltaFor example, the output of the above command can look as follows:
[EQUIVALENT] /etc/systemd/system/default.target → /usr/lib/systemd/system/default.target [OVERRIDDEN] /etc/systemd/system/autofs.service → /usr/lib/systemd/system/autofs.service --- /usr/lib/systemd/system/autofs.service 2014-10-16 21:30:39.000000000 -0400 + /etc/systemd/system/autofs.service 2014-11-21 10:00:58.513568275 -0500 @@ -8,7 +8,8 @@ EnvironmentFile=-/etc/sysconfig/autofs ExecStart=/usr/sbin/automount $OPTIONS --pid-file /run/autofs.pid ExecReload=/usr/bin/kill -HUP $MAINPID -TimeoutSec=180 +TimeoutSec=240 +Restart=Always [Install] WantedBy=multi-user.target [MASKED] /etc/systemd/system/cups.service → /usr/lib/systemd/system/cups.service [EXTENDED] /usr/lib/systemd/system/sssd.service → /etc/systemd/system/sssd.service.d/journal.conf 4 overridden configuration files found.17.18. Working with instantiated units
It is possible to instantiate multiple units from a single template configuration file runtime. The "@" character is used to mark the template and to associate units with it. Instantiated units can be started from another unit file (using Requires or Wants options), or with the systemctl start command. Instantiated service units are named the following way:
template_name@instance_name.serviceWhere template_name stands for the name of the template configuration file. Replace instance_name with the name for the unit instance. Several instances can point to the same template file with configuration options common for all instances of the unit. Template unit name has the form of:
unit_name@.serviceFor example, the following Wants setting in a unit file:
Wants=first makes systemd search for given service units. If no such units are found, the part between "@" and the type suffix is ignored and systemd searches for the [email protected] file, reads the configuration from it, and starts the services.
For example, the [email protected] template contains the following directives:
[Unit] Description=Getty on %I … [Service] ExecStart=-/sbin/agetty --noclear %I $TERM …When the and are instantiated from the above template, Description= is resolved as Getty on ttyA and Getty on ttyB.
17.19. Important unit specifiers
Wildcard characters, called unit specifiers, can be used in any unit configuration file. Unit specifiers substitute certain unit parameters and are interpreted runtime. The following table lists unit specifiers that are particularly useful for template units.
Table 17.5. Important unit specifiers
Unit SpecifierMeaningDescription
%n
Full unit name
Stands for the full unit name including the type suffix. %N has the same meaning but also replaces the forbidden characters with ASCII codes.
%p
Prefix name
Stands for a unit name with type suffix removed. For instantiated units %p stands for the part of the unit name before the "@" character.
%i
Instance name
Is the part of the instantiated unit name between the "@" character and the type suffix. %I has the same meaning but also replaces the forbidden characters for ASCII codes.
%H
Host name
Stands for the hostname of the running system the point in time the unit configuration is loaded.
%t
Runtime directory
Represents the runtime directory, which is either /run for the root user, or the value of the XDG_RUNTIME_DIR variable for unprivileged users.
For a complete list of unit specifiers, see the systemd.unit(5) manual page.
17.20. Additional resources
- How to write a service unit file which enforces that particular services have to be started
How to decide what dependencies a systemd service unit definition should have Is there any useful information about writing unit files? How to set limits for services in RHEL 7 and systemd
Chapter 18. Optimizing systemd to shorten the boot time
There is a list of systemd unit files that are enabled by default. System services that are defined by these unit files are automatically run boot, which influences the boot time.
This section describes:
- The tools to examine system boot performance. The purpose
of systemd units enabled by default, and circumstances under which you can safely disable such systemd units in order to shorten the boot time.
18.1. Examining system boot performance
To examine system boot performance, you can use the systemd-analyze command. This command has many options available. However, this section covers only the selected ones that may be important for systemd tuning in order to shorten the boot time.
For a complete list and detailed description of all options, see the systemd-analyze man page.
Prerequisites
- Before starting to examine systemd in order to tune the boot time, you may want to list all enabled services:
Procedure
$ systemctl list-unit-files --state=enabledAnalyzing overall boot timeProcedure
- For the overall information about the time that the last successful boot took, use:
Procedure
- For the information about the initialization time of each systemd unit, use:
The output lists the units in descending order according to the time they took to initialize during the last successful boot.
Identifying critical unitsProcedure
- To identify the units that took most time to initialize the last successful boot, use:
The output highlights the units that critically slow down the boot with the red color.
Figure 18.1. The output of the systemd-analyze critical-chain command

18.2. A guide to selecting services that can be safely disabled
If you find the boot time of your system long, you can shorten it by disabling some of the services enabled on boot by default.
To list such services, run:
$ systemctl list-unit-files --state=enabledTo disable a service, run:
# systemctl disable service_nameHowever, certain services must stay enabled in order that your operating system is safe and functions in the way you need.
You can use the table below as a guide to selecting the services that you can safely disable. The table lists all services enabled by default on a minimal installation of Red Hat Enterprise Linux, and for each service it states whether this service can be safely disabled.
The table also provides more information about the circumstances under which the service can be disabled, or the reason why you should not disable the service.
Table 18.1. Services enabled by default on a minimal installation of RHEL
Service nameCan it be disabled?More information
auditd.service
yes
Disable auditd.service only if you do not need audit messages from the kernel. Be aware that if you disable auditd.service, the /var/log/audit/audit.log file is not produced. Consequently, you are not able to retroactively review some commonly-reviewed actions or events, such as user logins, service starts or password changes. Also note that auditd has two parts: a kernel part, and a service itself. By using the systemctl disable auditd command, you only disable the service, but not the kernel part. To disable system auditing in its entirety, set audit=0 on kernel command line.
[email protected]
no
This service runs only when it is really needed, so it does not need to be disabled.
crond.service
yes
Be aware that no items from crontab will run if you disable crond.service.
dbus-org.fedoraproject.FirewallD1.service
yes
A symlink to firewalld.service
dbus-org.freedesktop.NetworkManager.service
yes
A symlink to NetworkManager.service
dbus-org.freedesktop.nm-dispatcher.service
yes
A symlink to NetworkManager-dispatcher.service
firewalld.service
yes
Disable firewalld.service only if you do not need firewall.
[email protected]
no
This service runs only when it is really needed, so it does not need to be disabled.
import-state.service
yes
Disable import-state.service only if you do not need to boot from a network storage.
irqbalance.service
yes
Disable irqbalance.service only if you have just one CPU. Do not disable irqbalance.service on systems with multiple CPUs.
kdump.service
yes
Disable kdump.service only if you do not need reports from kernel crashes.
loadmodules.service
yes
This service is not started unless the /etc/rc.modules or /etc/sysconfig/modules directory exists, which means that it is not started on a minimal RHEL installation.
lvm2-monitor.service
yes
Disable lvm2-monitor.service only if you do not use Logical Volume Manager (LVM).
microcode.service
no
Do not be disable the service because it provides updates of the microcode software in CPU.
NetworkManager-dispatcher.service
yes
Disable NetworkManager-dispatcher.service only if you do not need notifications on network configuration changes (for example in static networks).
NetworkManager-wait-online.service
yes
Disable NetworkManager-wait-online.service only if you do not need working network connection available right after the boot. If the service is enabled, the system does not finish the boot before the network connection is working. This may prolong the boot time significantly.
NetworkManager.service
yes
Disable NetworkManager.service only if you do not need connection to a network.
nis-domainname.service
yes
Disable nis-domainname.service only if you do not use Network Information Service (NIS).
rhsmcertd.service
no
rngd.service
yes
Disable rngd.service only if you do not need a lot of entropy on your system, or you do not have any sort of hardware generator. Note that the service is necessary in environments that require a lot of good entropy, such as systems used for generation of X.509 certificates (for example the FreeIPA server).
rsyslog.service
yes
Disable rsyslog.service only if you do not need persistent logs, or you set systemd-journald to persistent mode.
selinux-autorelabel-mark.service
yes
Disable selinux-autorelabel-mark.service only if you do not use SELinux.
sshd.service
yes
Disable sshd.service only if you do not need remote logins by OpenSSH server.
sssd.service
yes
Disable sssd.service only if there are no users who log in the system over the network (for example by using LDAP or Kerberos). Red Hat recommends to disable all sssd-* units if you disable sssd.service.
syslog.service
yes
An alias for rsyslog.service
tuned.service
yes
Disable tuned.service only if you do need to use performance tuning.
lvm2-lvmpolld.socket
yes
Disable lvm2-lvmpolld.socket only if you do not use Logical Volume Manager (LVM).
dnf-makecache.timer
yes
Disable dnf-makecache.timer only if you do not need your package metadata to be updated automatically.
unbound-anchor.timer
yes
Disable unbound-anchor.timer only if you do not need daily update of the root trust anchor for DNS Security Extensions (DNSSEC). This root trust anchor is used by Unbound resolver and resolver library for DNSSEC validation.
To find more information about a service, you can run one of the following commands:
$ systemctl cat The systemctl cat command provides the content of the service file located under /usr/lib/systemd/system/
For more information on drop-in files, see the systemd.unit man page.
The systemctl help command shows the man page of the particular service.
18.3. Additional resources
- systemctl(1) man page systemd(1) man page systemd-delta(1) man page systemd.directives(7) man page systemd.unit(5) man page systemd.service(5) man page systemd.target(5) man page systemd.kill(5) man page
systemd trang chủ Page
Chapter 19. Introduction to managing user and group accounts
The control of users and groups is a core element of Red Hat Enterprise Linux (RHEL) system administration. Each RHEL user has distinct login credentials and can be assigned to various groups to customize their system privileges.
19.1. Introduction to users and groups
A user who creates a file is the owner of that file and the group owner of that file. The file is assigned separate read, write, and execute permissions for the owner, the group, and those outside that group. The file owner can be changed only by the root user. Access permissions to the file can be changed by both the root user and the file owner. A regular user can change group ownership of a file they own to a group of which they are a thành viên of.
Each user is associated with a unique numerical identification number called user ID (UID). Each group is associated with a group ID (GID). Users within a group share the same permissions to read, write, and execute files owned by that group.
19.2. Configuring reserved user and group IDs
RHEL reserves user and group IDs below 1000 for system users and groups. You can find the reserved user and group IDs in the setup package. To view reserved user and group IDs, use:
cat /usr/share/doc/setup*/uidgidIt is recommended to assign IDs to the new users and groups starting 5000, as the reserved range can increase in the future.
To make the IDs assigned to new users start 5000 by default, modify the UID_MIN and GID_MIN parameters in the /etc/login.defs file.
Procedure
To modify and make the IDs assigned to new users start 5000 by default:
Open the /etc/login.defs file in an editor of your choice.Find the lines that define the minimum value for automatic UID selection.
# Min/max values for automatic uid selection in useradd # UID_MIN 1000Modify the UID_MIN value to start 5000.
# Min/max values for automatic uid selection in useradd # UID_MIN 5000Find the lines that define the minimum value for automatic GID selection.
# Min/max values for automatic gid selection in groupadd # GID_MIN 1000Modify the GID_MIN value to start 5000.
# Min/max values for automatic gid selection in groupadd # GID_MIN 5000The dynamically assigned UIDs and GIDs for the regular users now start 5000.
The UID’s and GID’s of users and groups created before you changed the UID_MIN and GID_MIN values do not change.
This will allow new user’s group to have same 5000+ ID as UID and GID.
Do not raise IDs reserved by the system above 1000 by changing SYS_UID_MAX to avoid conflict with systems that retain the 1000 limit.
19.3. User private groups
RHEL uses the user private group (UPG) system configuration, which makes UNIX groups easier to manage. A user private group is created whenever a new user is added to the system. The user private group has the same name as the user for which it was created and that user is the only thành viên of the user private group.
UPGs simplify the collaboration on a project between multiple users. In addition, UPG system configuration makes it safe to set default permissions for a newly created file or directory, as it allows both the user, and the group this user is a part of, to make modifications to the file or directory.
A list of all groups is stored in the /etc/group configuration file.
Chapter 20. Managing user accounts in the web console
The RHEL web console offers a graphical interface that enables you to execute a wide range of administrative tasks without accessing your terminal directly. For example, you can add, edit or remove system user accounts.
After reading this section, you will know:
- From where the existing accounts come from. How to add new accounts. How to set password expiration. How and when to terminate user sessions.
Prerequisites
- Set up the RHEL web console.
For details, see Getting started using the RHEL web console. Log in to the RHEL web console with an account that has administrator permissions assigned. For details, see
Logging in to the RHEL web console.
20.1. System user accounts managed in the web console
With user accounts displayed in the RHEL web console you can:
- Authenticate users when accessing the system. Set the access rights to the system.
The RHEL web console displays all user accounts located in the system. Therefore, you can see least one user account just after the first login to the web console.
After logging into the RHEL web console, you can perform the following operations:
- Create
new users accounts. Change their parameters. Lock accounts. Terminate user sessions.
20.2. Adding new accounts using the web console
Use the following steps for adding user accounts to the system and setting administration rights to the accounts through the RHEL web console.
Procedure
Log in to the RHEL web console. Click Accounts. Click Create New Account.In the Full Name field, enter the full name of the user.
The RHEL web console automatically suggests a user name from the full name and fills it in the User Name field. If you do not want to use the original naming convention consisting of the first letter of the first name and the whole surname, update the suggestion.
In the Password/Confirm fields, enter the password and retype it for verification that your password is correct.
The color bar placed below the fields shows you security level of the entered password, which does not allow you to create a user with a weak password.
Click Create to save the settings and close the dialog box. Select the newly created account.Select Server Administrator in the Roles item.
Now you can see the new account in the Accounts settings and you can use the credentials to connect to the system.
20.3. Enforcing password expiration in the web console
By default, user accounts have set passwords to never expire. You can set system passwords to expire after a defined number of days. When the password expires, the next login attempt will prompt for a password change.
Procedure
Log in to the RHEL 8 web console. Click Accounts. Select the user account for which to enforce password expiration. In the user account settings, click the second edit. In the Password Expiration dialog box, select Require password change every … days and enter a positive whole number representing the number of days after which the password expires. Click Change.Verification steps
To verify that the password expiration is set, open the account settings.
The RHEL 8 web console displays a link with the date of expiration.
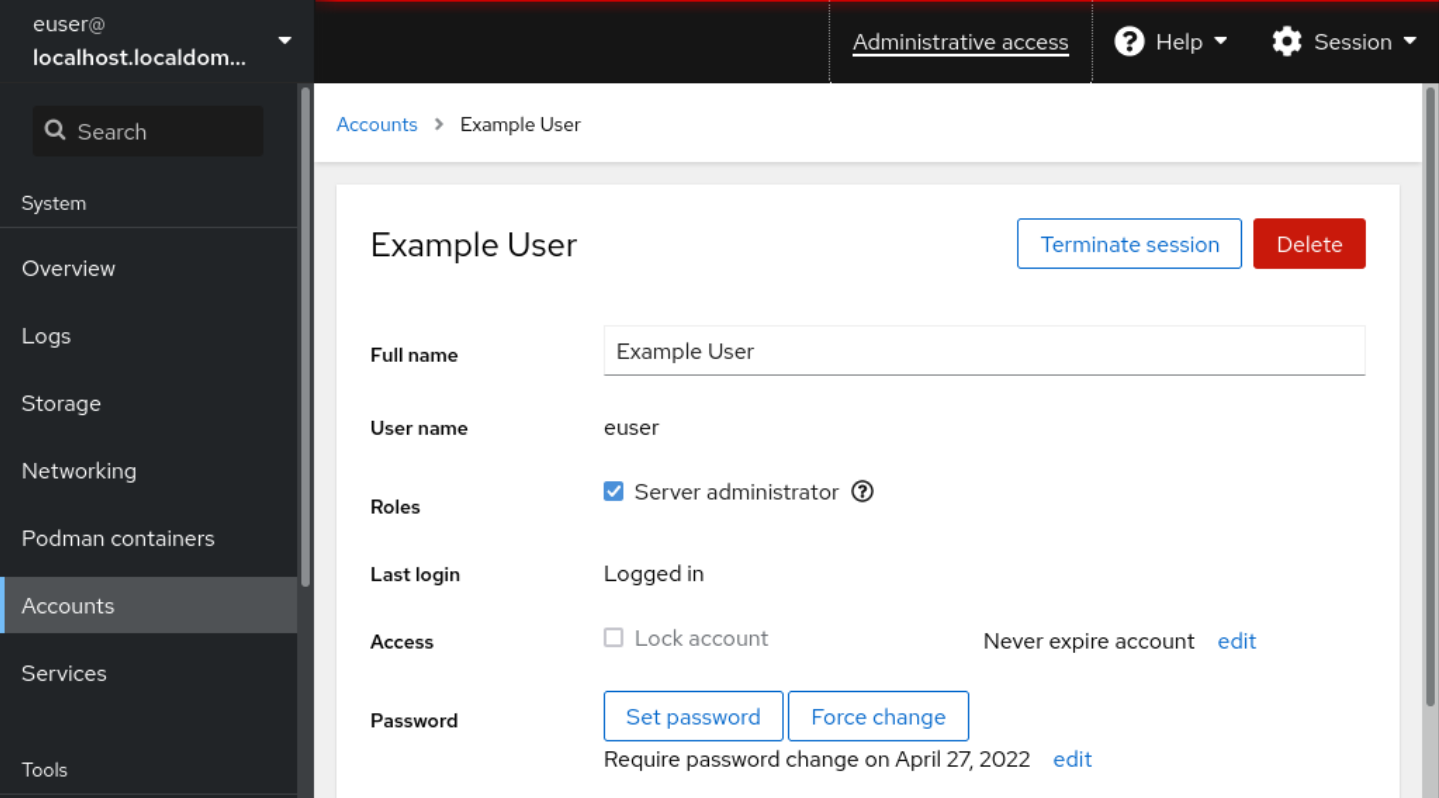
20.4. Terminating user sessions in the web console
A user creates user sessions when logging into the system. Terminating user sessions means to log the user out from the system. It can be helpful if you need to perform administrative tasks sensitive to configuration changes, for example, system upgrades.
In each user account in the RHEL 8 web console, you can terminate all sessions for the account except for the web console session you are currently using. This prevents you from loosing access to your system.
Procedure
Log in to the RHEL 8 web console. Click Accounts. Click the user account for which you want to terminate the session.Click Terminate Session.
If the Terminate Session button is inactive, the user is not logged in to the system.
The RHEL web console terminates the sessions.
Chapter 21. Managing users from the command line
You can manage users and groups using the command-line interface (CLI). This enables you to add, remove, and modify users and user groups in Red Hat Enterprise Linux environment.
21.1. Adding a new user from the command line
This section describes how to use the useradd utility to add a new user.
Prerequisites
- Root access
Procedure
To add a new user, use:
# useradd options usernameReplace options with the command-line options for the useradd command, and replace username with the name of the user.
Example 21.1. Adding a new user
To add the user sarah with user ID 5000, use:
+
# useradd -u 5000 sarahVerification steps
To verify the new user is added, use the id utility.
# id sarahThe output returns:
uid=5000(sarah) gid=5000(sarah) groups=5000(sarah)Additional resources
- useradd man page
21.2. Adding a new group from the command line
This section describes how to use the groupadd utility to add a new group.
Prerequisites
- Root access
Procedure
To add a new group, use:
# groupadd options group-nameReplace options with the command-line options for the groupadd command, and replace group-name with the name of the group.
Example 21.2. Adding a new group
To add the group sysadmins with group ID 5000, use:
+
# groupadd -g 5000 sysadminsVerification steps
To verify the new group is added, use the tail utility.
# tail /etc/groupThe output returns:
sysadmins:x:5000:Additional resources
- groupadd man page
21.3. Adding a user to a supplementary group from the command line
You can add a user to a supplementary group to manage permissions or enable access to certain files or devices.
Prerequisites
- root access
Procedure
To add a group to the supplementary groups of the user, use:
# usermod --append -G group-name usernameReplace group-name with the name of the group, and replace username with the name of the user.
Example 21.3. Adding a user to a supplementary group
To add the user sysadmin to the group system-administrators, use:
# usermod --append -G system-administrators sysadminVerification steps
To verify the new groups is added to the supplementary groups of the user sysadmin, use:
# groups sysadminThe output displays:
sysadmin : sysadmin system-administrators21.4. Creating a group directory
Under the UPG system configuration, you can apply the set-group identification permission (setgid bit) to a directory. The setgid bit makes managing group projects that share a directory simpler. When you apply the setgid bit to a directory, files created within that directory are automatically assigned to a group that owns the directory. Any user that has the permission to write and execute within this group can now create, modify, and delete files in the directory.
The following section describes how to create group directories.
Prerequisites
- Root access
Procedure
Create a directory:
# mkdir directory-nameReplace directory-name with the name of the directory.
Create a group:
# groupadd group-nameReplace group-name with the name of the group.
Add users to the group:
# usermod --append -G group-name usernameReplace group-name with the name of the group, and replace username with the name of the user.
Associate the user and group ownership of the directory with the group-name group:
# chown :group-name directory-nameReplace group-name with the name of the group, and replace directory-name with the name of the directory.
Set the write permissions to allow the users to create and modify files and directories and set the setgid bit to make this permission be applied within the directory-name directory:
# chmod g+rwxs directory-nameReplace directory-name with the name of the directory.
Now all members of the group-name group can create and edit files in the directory-name directory. Newly created files retain the group ownership of group-name group.
Verification steps
To verify the correctness of set permissions, use:
# ls -ld directory-nameReplace directory-name with the name of the directory.
The output returns:
drwxrwsr-x. 2 root group-name 6 Nov 25 08:45 directory-nameChapter 22. Editing user groups using the command line
A user belongs to a certain set of groups that allow a logical collection of users with a similar access to files and folders. You can edit the primary and supplementary user groups from the command line to change the user’s permissions.
22.1. Primary and supplementary user groups
A group is an entity which ties together multiple user accounts for a common purpose, such as granting access to particular files.
On Linux, user groups can act as primary or supplementary. Primary and supplementary groups have the following properties:
Primary group
- Every user has just one primary group all times. You can change the user’s primary group.
- You can add an existing user to an existing supplementary group to manage users with the
same security and access privileges within the group. Users can be members of zero or multiple supplementary groups.
22.2. Listing the primary and supplementary groups of a user
You can list the groups of users to see which primary and supplementary groups they belong to.
Procedure
Display the names of the primary and any supplementary group of a user:
$ groups user-nameReplace user-name with the name of the user. If you do not provide a user name, the command displays the group membership for the current user. The first group is the primary group followed by the optional supplementary groups.
Example 22.1. Listing of groups for user sarah:
$ groups sarah
The output displays:
sarah : sarah wheel developerUser sarah has a primary group sarah and is a thành viên of supplementary groups wheel and developer.
Example 22.2. Listing of groups for user marc:
$ groups marc
The output displays:
marc : marcUser marc has only a primary group marc and no supplementary groups.
22.3. Changing the primary group of a user
You can change the primary group of an existing user to a new group.
Prerequisites:
root access The new group must existProcedure
Change the primary group of a user:
# usermod -g group-name user-nameReplace group-name with the name of the new primary group, and replace user-name with the name of the user.
When you change a user’s primary group, the command also automatically changes the group ownership of all files in the user’s home directory to the new primary group. You must fix the group ownership of files outside of the user’s home directory manually.
Example 22.3. Example of changing the primary group of a user:
If the user sarah belongs to the primary group sarah2, and you want to change the primary group of the user to sarah2, use:
# usermod -g sarah2 sarahVerification steps
Verify that you changed the primary group of the user:
$ groups sarahThe output displays:
sarah : sarah222.4. Adding a user to a supplementary group from the command line
You can add a user to a supplementary group to manage permissions or enable access to certain files or devices.
Prerequisites
- root access
Procedure
To add a group to the supplementary groups of the user, use:
# usermod --append -G group-name usernameReplace group-name with the name of the group, and replace username with the name of the user.
Example 22.4. Adding a user to a supplementary group
To add the user sysadmin to the group system-administrators, use:
# usermod --append -G system-administrators sysadminVerification steps
To verify the new groups is added to the supplementary groups of the user sysadmin, use:
# groups sysadminThe output displays:
sysadmin : sysadmin system-administrators22.5. Removing a user from a supplementary group
You can remove an existing user from a supplementary group to limit their permissions or access to files and devices.
Prerequisites
- root access
Procedure
Remove a user from a supplementary group:
# gpasswd -d user-name group-nameReplace user-name with the name of the user, and replace group-name with the name of the supplementary group.
Example 22.5. Removing user from a supplementary group
If the user sarah has a primary group sarah2, and belongs to the secondary groups wheel and developers, and you want to remove that user from the group developers, use:
# gpasswd -d sarah developersVerification steps
Verify that you removed the user sarah from the secondary group developers:
$ groups sarahThe output displays:
sarah : sarah2 wheel22.6. Changing all of the supplementary groups of a user
You can overwrite the list of supplementary groups that you want the user to remain a thành viên of.
Prerequisites
- root access The supplementary groups must exist
Procedure
Overwrite a list of user’s supplementary groups:
# usermod -G group-names usernameReplace group-names with the name of one or more supplementary groups. To add the user to several supplementary groups once, separate the group names using commas and no intervening spaces. For example: wheel,developer.
Replace user-name with the name of the user.
If the user is currently a thành viên of a group that you do not specify, the command removes the user from the group.
Example 22.6. Changing the list of supplementary groups of a user
If the user sarah has a primary group sarah2, and belongs to the supplementary group wheel, and you want the user to belong to three more supplementary groups developer, sysadmin, and security, use:
# usermod -G wheel,developer,sysadmin,security sarahVerification steps
Verify that you set the list of the supplementary groups correct:
# groups sarahThe output displays:
sarah : sarah2 wheel developer sysadmin securityChapter 23. Managing sudo access
System administrators can grant sudo access to allow non-root users to execute administrative commands that are normally reserved for the root user. As a result, non-root users can execute such commands without logging in to the root user account.
23.1. User authorizations in sudoers
The /etc/sudoers file specifies which users can run which commands using the sudo command. The rules can apply to individual users and user groups. You can also use aliases to simplify defining rules for groups of hosts, commands, and even users. Default aliases are defined in the first part of the /etc/sudoers file.
When a user tries to use sudo privileges to run a command that is not allowed in the /etc/sudoers file, the system records a message containing username : user NOT in sudoers to the journal log.
The default /etc/sudoers file provides information and examples of authorizations. You can activate a specific example rule by removing the # comment character from the beginning of the line. The authorizations section relevant for user is marked with the following introduction:
## Next comes the main part: which users can run what software on ## which machines (the sudoers file can be shared between multiple ## systems).You can use the following format to create new sudoers authorizations and to modify existing authorizations:
username hostname=path/to/commandWhere:
- username is the name of the user or group, for example, user1 or %group1. hostname is the name of the host on which the rule applies. path/to/command is the complete absolute path to the command. You can also limit the user to only performing a command with
specific options and arguments by adding those options after the command path. If you do not specify any options, the user can use the command with all options.
You can replace any of these variables with ALL to apply the rule to all users, hosts, or commands.
With overly permissive rules, such as ALL ALL=(ALL) ALL, all users are able to run all commands as all users on all hosts. This can lead to security risks.
You can specify the arguments negatively using the ! operator. For example, use !root to specify all users except the root user. Note that using the allowlists to allow specific users, groups, and commands, is more secure than using the blocklists to disallowing specific users, groups, and commands. By using the allowlists you also block new unauthorized users or groups.
Avoid using negative rules for commands because users can overcome such rules by renaming commands using the alias command.
The system reads the /etc/sudoers file from beginning to end. Therefore, if the file contains multiple entries for a user, the entries are applied in order. In case of conflicting values, the system uses the last match, even if it is not the most specific match.
The preferred way of adding new rules to sudoers is by creating new files in the /etc/sudoers.d/ directory instead of entering rules directly to the /etc/sudoers file. This is because the contents of this directory are preserved during system updates. In addition, it is easier to fix any errors in the separate files than in the /etc/sudoers file. The system reads the files in the /etc/sudoers.d directory when it reaches the following line in the /etc/sudoers file:
#includedir /etc/sudoers.dNote that the number sign # the beginning of this line is part of the syntax and does not mean the line is a comment. The names of files in that directory must not contain a period . and must not end with a tilde ~.
23.2. Granting sudo access to a user
System administrators can grant sudo access to allow non-root users to execute administrative commands. The sudo command provides users with administrative access without using the password of the root user.
When users need to perform an administrative command, they can precede that command with sudo. The command is then executed as if they were the root user.
Be aware of the following limitations:
- Only users listed in the /etc/sudoers configuration file can use the sudo command. The command is executed in the shell of the user, not in the root shell.
Prerequisites
- root access
Procedure
As root, open the /etc/sudoers file.
# visudoThe /etc/sudoers file defines the policies applied by the sudo command.
In the /etc/sudoers file, find the lines that grant sudo access to users in the administrative wheel group.
## Allows people in group wheel to run all commands %wheel ALL=(ALL) ALL Make sure the line that starts with %wheel does not have the # comment character before it. Save any changes, and exit the editor.Add users you want to grant sudo access to into the administrative wheel group.
# usermod --append -G wheel usernameReplace username with the name of the user.
Verification steps
Verify that the user is added to the administrative wheel group:
# id username uid=5000(username) gid=5000(_username) groups=5000(username),10(wheel)23.3. Enabling unprivileged users to run certain commands
You can configure a policy that allows unprivileged user to run certain command on a specific workstation. To configure this policy, you need to create and edit file in the sudoers.d directory.
Prerequisites
- root access
Procedure
As root, create a new sudoers.d directory under /etc/:
# mkdir -p /etc/sudoers.d/Create a new file in the /etc/sudoers.d directory:
# visudo -f /etc/sudoers.d/file-nameReplace file-name with the name of the file you want to create. The file will open automatically.
Add the following line to the newly created file:
username hostname = /path/to/the/commandReplace username with the name of the user. Replace hostname with the name of the host. Replace /path/to/the/command with the absolute path to the command (for example, /usr/bin/yum).
Save any changes, and exit the editor.
Example 23.1. Enabling an unprivileged user to install programs with yum
To enable the user sarah to install programs on the localhost.localdomain workstation using the yum utilities with sudo privileges, use:
As root, create a new sudoers.d directory under /etc/:
# mkdir -p /etc/sudoers.d/Create a new file in the /etc/sudoers.d directory:
# visudo -f /etc/sudoers.d/sarahThe file will open automatically.
Add the following line to the /etc/sudoers.d/sarah file:
sarah localhost.localdomain = /usr/bin/yumEnsure that the two command paths are separated by a , comma followed by a space.
Optional: To receive email notifications every time the user sarah attempts to use sudo privileges, add the following lines to the file:
Defaults mail_always Defaults mailto=""To verify if the user sarah can run the yum command with sudo privileges, switch the account:
# su sarah -Enter the sudo yum command:
$ sudo yum [sudo] password for sarah:Enter the sudo password for the user sarah.
The system displays the list of yum commands and options:
... usage: yum [options] COMMAND ...If you receive the sarah is not in the sudoers file. This incident will be reported. message, the configuration was not completed correctly. Ensure that you are executing this procedure as root and that you followed the steps thoroughly.
23.4. Additional resources
- The sudo(8) man page The visudo(8) man page
Chapter 24. Changing and resetting the root password
If the existing root password is no longer satisfactory or is forgotten, you can change or reset it both as the root user and a non-root user.
24.1. Changing the root password as the root user
This section describes how to use the passwd command to change the root password as the root user.
Prerequisites
- Root access
Procedure
To change the root password, use:
# passwdYou are prompted to enter your current password before you can change it.
24.2. Changing or resetting the forgotten root password as a non-root user
This section describes how to use the passwd command to change or reset the forgotten root password as a non-root user.
Prerequisites
- You are able to log in as a non-root user. You are a thành viên of the administrative wheel group.
Procedure
To change or reset the root password as a non-root user that belongs to the wheel group, use:
$ sudo passwd rootYou are prompted to enter your current non-root password before you can change the root password.
24.3. Resetting the root password on boot
If you are unable to log in as a non-root user or do not belong to the administrative wheel group, you can reset the root password on boot by switching into a specialized chroot jail environment.
Procedure
Reboot the system and, on the GRUB 2 boot screen, press the e key to interrupt the boot process.
The kernel boot parameters appear.
load_video set gfx_payload=keep insmod gzio linux ($root)/vmlinuz-4.18.0-80.e18.x86_64 root=/dev/mapper/rhel-root ro crash kernel=auto resume=/dev/mapper/rhel-swap rd.lvm.lv/swap rhgb quiet initrd ($root)/initramfs-4.18.0-80.e18.x86_64.img $tuned_initrdGo to the end of the line that starts with linux.
linux ($root)/vmlinuz-4.18.0-80.e18.x86_64 root=/dev/mapper/rhel-root ro crash kernel=auto resume=/dev/mapper/rhel-swap rd.lvm.lv/swap rhgb quietPress Ctrl+e to jump to the end of the line.
Add rd.break to the end of the line that starts with linux.
linux ($root)/vmlinuz-4.18.0-80.e18.x86_64 root=/dev/mapper/rhel-root ro crash kernel=auto resume=/dev/mapper/rhel-swap rd.lvm.lv/swap rhgb quiet rd.breakPress Ctrl+x to start the system with the changed parameters.
The switch_root prompt appears.
Remount the file system as writable:
mount -o remount,rw /sysrootThe file system is mounted as read-only in the /sysroot directory. Remounting the file system as writable allows you to change the password.
Enter the chroot environment:
chroot /sysrootThe sh-4.4# prompt appears.
Reset the root password:
passwdFollow the instructions displayed by the command line to finalize the change of the root password.
Enable the SELinux relabeling process on the next system boot:
touch /.autorelabelExit the chroot environment:
exitExit the switch_root prompt:
exit Wait until the SELinux relabeling process is finished. Note that relabeling a large disk might take a long time. The system reboots automatically when the process is complete.Verification steps
To verify that the root password is successfully changed, log in as a normal user and open the Terminal.Run the interactive shell as root:
$ su Enter your new root password.Print the user name associated with the current effective user ID:
whoamiThe output returns:
rootChapter 25. Managing file permissions
File permissions control the ability of user and group accounts to view, modify, access, and execute the contents of the files and directories.
Every file or directory has three levels of ownership:
- User owner (u). Group owner (g). Others (o).
Each level of ownership can be assigned the following permissions:
- Read (r). Write (w). Execute (x).
Note that the execute permission for a file allows you to execute that file. The execute permission for a directory allows you to access the contents of the directory, but not execute it.
When a new file or directory is created, the default set of permissions are automatically assigned to it. The default permissions for a file or directory are based on two factors:
- Base permission. The user file-creation mode mask (umask).
25.1. Base file permissions
Whenever a new file or directory is created, a base permission is automatically assigned to it. Base permissions for a file or directory can be expressed in symbolic or octal values.
Permission
Symbolic value
Octal value
No permission
---
0
Execute
--x
1
Write
-w-
2
Write and execute
-wx
3
Read
r--
4
Read and execute
r-x
5
Read and write
rw-
6
Read, write, execute
rwx
7
The base permission for a directory is 777 (drwxrwxrwx), which grants everyone the permissions to read, write, and execute. This means that the directory owner, the group, and others can list the contents of the directory, create, delete, and edit items within the directory, and descend into it.
Note that individual files within a directory can have their own permission that might prevent you from editing them, despite having unrestricted access to the directory.
The base permission for a file is 666 (-rw-rw-rw-), which grants everyone the permissions to read and write. This means that the file owner, the group, and others can read and edit the file.
Example 25.1. Permissions for a file
If a file has the following permissions:
$ ls -l -rwxrw----. 1 sysadmins sysadmins 2 Mar 2 08:43 file- - indicates it is a file. rwx indicates that the file owner has
permissions to read, write, and execute the file. rw- indicates that the group has permissions to read and write, but not execute the file. --- indicates that other users have no permission to read, write, or execute the file. . indicates that the SELinux security context is set for the file.
Example 25.2. Permissions for a directory
If a directory has the following permissions:
$ ls -dl directory drwxr-----. 1 sysadmins sysadmins 2 Mar 2 08:43 directory- d indicates it is a directory.
rwx indicates that the directory owner has the permissions to read, write, and access the contents of the directory.
As a directory owner, you can list the items (files, subdirectories) within the directory, access the content of those items, and modify them.
r-- indicates that the group has permissions to read, but not write or access the contents of the directory.
As a thành viên of the group that owns the directory, you can list the items within the directory. You cannot access information about the items within the directory or modify them.
--- indicates that other users have no permission to read, write, or access the contents of the directory.
As someone who is not a user owner, or as group owner of the directory, you cannot list the items within the directory, access information about those items, or modify them.
. indicates that the SELinux security context is set for the directory.The base permission that is automatically assigned to a file or directory is not the default permission the file or directory ends up with. When you create a file or directory, the base permission is altered by the umask. The combination of the base permission and the umask creates the default permission for files and directories.
25.2. User file-creation mode mask
The user file-creation mode mask (umask) is variable that controls how file permissions are set for newly created files and directories. The umask automatically removes permissions from the base permission value to increase the overall security of a linux system. The umask can be expressed in symbolic or octal values.
Permission
Symbolic value
Octal value
Read, write, and execute
rwx
0
Read and write
rw-
1
Read and execute
r-x
2
Read
r--
3
Write and execute
-wx
4
Write
-w-
5
Execute
--x
6
No permissions
---
7
The default umask for a standard user is 0002. The default umask for a root user is 0022.
The first digit of the umask represents special permissions (sticky bit, ). The last three digits of the umask represent the permissions that are removed from the user owner (u), group owner (g), and others (o) respectively.
Example 25.3. Applying the umask when creating a file
The following example illustrates how the umask with an octal value of 0137 is applied to the file with the base permission of 777, to create the file with the default permission of 640.
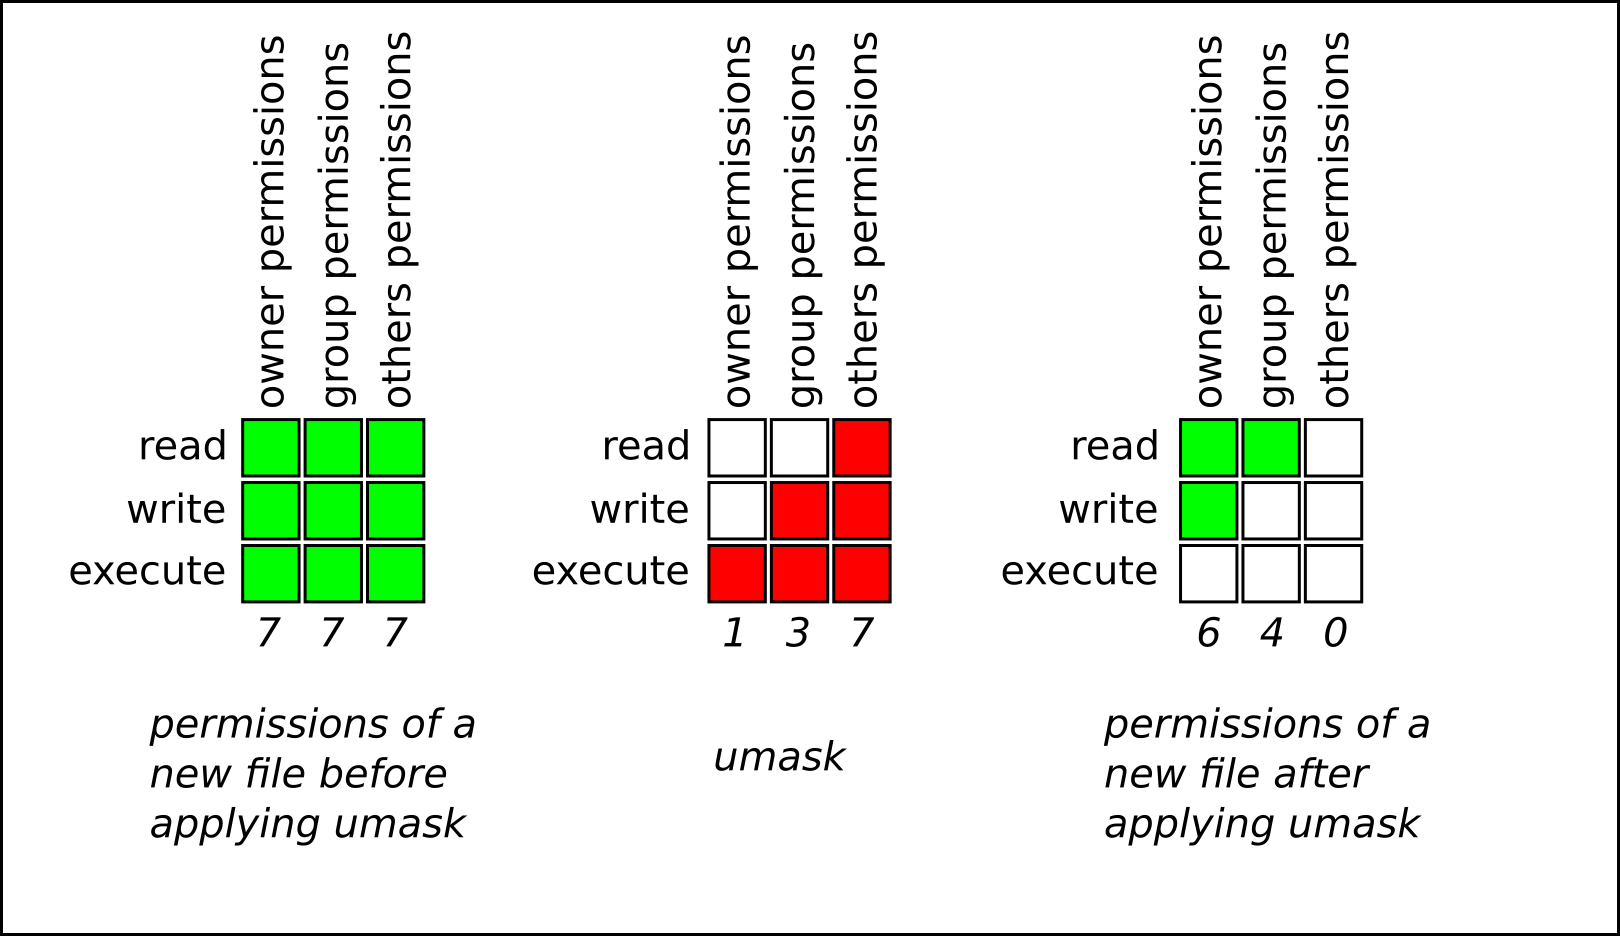
25.3. Default file permissions
The default permissions are set automatically for all newly created files and directories. The value of the default permissions is determined by applying the umask to the base permission.
Example 25.4. Default permissions for a directory created by a standard user
When a standard user creates a new directory, the umask is set to 002 (rwxrwxr-x), and the base permissions for a directory are set to 777 (rwxrwxrwx). This brings the default permissions to 775 (drwxrwxr-x).
Symbolic value
Octal value
Base permission
rwxrwxrwx
777
Umask
rwxrwxr-x
002
Default permission
rwxrwxr-x
775
This means that the directory owner and the group can list the contents of the directory, create, delete, and edit items within the directory, and descend into it. Other users can only list the contents of the directory and descend into it.
Example 25.5. Default permissions for a file created by a standard user
When a standard user creates a new file, the umask is set to 002 (rwxrwxr-x), and the base permissions for a file are set to 666 (rw-rw-rw-). This brings the default permissions to 664 (-rw-rw-r--).
Symbolic value
Octal value
Base permission
rw-rw-rw-
666
Umask
rwxrwxr-x
002
Default permission
rw-rw-r--
664
This means that the file owner and the group can read and edit the file, while other users can only read the file.
Example 25.6. Default permissions for a directory created by the root user
When a root user creates a new directory, the umask is set to 022 (rwxr-xr-x), and the base permissions for a directory are set to 777 (rwxrwxrwx). This brings the default permissions to 755 (rwxr-xr-x).
Symbolic value
Octal value
Base permission
rwxrwxrwx
777
Umask
rwxr-xr-x
022
Default permission
rwxr-xr-x
755
This means that the directory owner can list the contents of the directory, create, delete, and edit items within the directory, and descend into it. The group and others can only list the contents of the directory and descend into it.
Example 25.7. Default permissions for a file created by the root user
When a root user creates a new file, the umask is set to 022 (rwxr-xr-x), and the base permissions for a file are set to 666 (rw-rw-rw-). This brings the default permissions to 644 (-rw-r—r--).
Symbolic value
Octal value
Base permission
rw-rw-rw-
666
Umask
rwxr-xr-x
022
Default permission
rw-r—r--
644
This means that the file owner can read and edit the file, while the group and others can only read the file.
For security reasons, regular files cannot have execute permissions by default, even if the umask is set to 000 (rwxrwxrwx). However, directories can be created with execute permissions.
25.4. Changing file permissions using symbolic values
You can use the chmod utility with symbolic values (a combination letters and signs) to change file permissions for a file or directory.
You can assign the following permissions:
- Read (r) Write
(w) Execute (x)
Permissions can be assigned to the following levels of ownership:
- User owner (u) Group owner (g) Other (o) All (a)
To add or remove permissions you can use the following signs:
- + to add the permissions on top of the existing permissions - to remove the permissions from the existing permission = to remove the existing permissions and explicitly define the new ones
Procedure
To change the permissions for a file or directory, use:
$ chmod Replace
See Base file permissions for more details.
Verification steps
To see the permissions for a particular file, use:
$ ls -l file-nameReplace file-name with the name of the file.
To see the permissions for a particular directory, use:
$ ls -dl directory-nameReplace directory-name with the name of the directory.
To see the permissions for all the files within a particular directory, use:
$ ls -l directory-nameReplace directory-name with the name of the directory.
Example 25.8. Changing permissions for files and directories
To change file permissions for my-file.txt from -rw-rw-r-- to -rw------, use:
Display the current permissions for my-file.txt:
$ ls -l my-file.txt -rw-rw-r--. 1 username username 0 Feb 24 17:56 my-file.txtRemove the permissions to read, write, and execute (rwx) the file from group owner (g) and others (o):
$ chmod go= my-file.txtNote that any permission that is not specified after the equals sign (=) is automatically prohibited.
Verify that the permissions for my-file.txt were set correctly:
$ ls -l my-file.txt -rw-------. 1 username username 0 Feb 24 17:56 my-file.txtTo change file permissions for my-directory from drwxrwx--- to drwxrwxr-x, use:
Display the current permissions for my-directory:
$ ls -dl my-directory drwxrwx---. 2 username username 4096 Feb 24 18:12 my-directoryAdd the read and execute (r-x) access for all users (a):
$ chmod o+rx my-directoryVerify that the permissions for my-directory and its content were set correctly:
$ ls -dl my-directory drwxrwxr-x. 2 username username 4096 Feb 24 18:12 my-directory25.5. Changing file permissions using octal values
You can use the chmod utility with octal values (numbers) to change file permissions for a file or directory.
Procedure
To change the file permissions for an existing file or directory, use:
$ chmod octal_value file-nameReplace file-name with the name of the file or directory. Replace octal_value with an octal value. See Base file permissions for more details.
Chapter 26. Managing the umask
You can use the umask utility to display, set, or change the current or default value of the umask.
26.1. Displaying the current value of the umask
You can use the umask utility to display the current value of the umask in symbolic or octal mode.
Procedure
To display the current value of the umask in symbolic mode, use:
$ umask -STo display the current value of the umask in the octal mode, use:
$ umaskWhen displaying the umask in octal mode, you may notice it displayed as a four digit number (0002 or 0022). The first digit of the umask represents a special bit (sticky bit, SGID bit, or SUID bit). If the first digit is set to 0, the special bit is not set.
26.2. Displaying the default bash umask
There are a number of shells you can use, such as bash, ksh, zsh and tcsh. Those shells can behave as login or non-login shells. You can invoke the login shell by opening a native or a GUI terminal.
To determine whether you are executing a command in a login or a non-login shell, use the echo $0 command.
Example 26.1. Determining if you are working in a login or a non-login bash shell
If the output of the echo $0 command returns bash, you are executing the command in a non-login shell.
$ echo $0 bashThe default umask for the non-login shell is set in the /etc/bashrc configuration file.
If the output of the echo $0 command returns -bash, you are executing the command in a login shell.
# echo $0 -bashThe default umask for the login shell is set in the /etc/profile configuration file.
Procedure
To display the default bash umask for the non-login shell, use:
$ grep umask /etc/bashrcThe output returns:
# By default, we want umask to get set. This sets it for non-login shell. umask 002 umask 022To display the default bash umask for the login shell, use:
$ grep umask /etc/profileThe output returns:
# By default, we want umask to get set. This sets it for login shell umask 002 umask 02226.3. Setting the umask using symbolic values
You can use the umask utility with symbolic values (a combination letters and signs) to set the umask for the current shell session
You can assign the following permissions:
- Read (r) Write (w) Execute (x)
Permissions can be assigned to the following levels of ownership:
- User owner (u) Group owner
(g) Other (o) All (a)
To add or remove permissions you can use the following signs:
- + to add the permissions on top of the existing permissions - to remove the permissions from the existing permission
= to remove the existing permissions and explicitly define the new ones
Any permission that is not specified after the equals sign (=) is automatically prohibited.
Procedure
To set the umask for the current shell session, use:
$ umask -S Replace
See User file-creation mode for more details.
The umask is only valid for the current shell session.
26.4. Setting the umask using octal values
You can use the umask utility with octal values (numbers) to set the umask for the current shell session.
Procedure
To set the umask for the current shell session, use:
$ umask octal_valueReplace octal_value with an octal value. See User file-creation mode mask for more details.
The umask is only valid for the current shell session.
26.5. Changing the default umask for the non-login shell
You can change the default bash umask for standard users by modifying the /etc/bashrc file.
Prerequisites
- root access
Procedure
As root, open the /etc/bashrc file in the editor.Modify the following sections to set a new default bash umask:
if [ $UID -gt 199 ] && [ “id -gn” = “id -un” ]; then umask 002 else umask 022 fiReplace the default octal value of the umask (002) with another octal value. See User file-creation mode mask for more details.
Save the changes and exit the editor.26.6. Changing the default umask for the login shell
You can change the default bash umask for the root user by modifying the /etc/profile file.
Prerequisites
- root access
Procedure
As root, open the /etc/profile file in the editor.Modify the following sections to set a new default bash umask:
if [ $UID -gt 199 ] && [ “/usr/bin/id -gn” = “/usr/bin/id -un” ]; then umask 002 else umask 022 fiReplace the default octal value of the umask (022) with another octal value. See User file-creation mode mask for more details.
Save the changes and exit the editor.26.7. Changing the default umask for a specific user
You can change the default umask for a specific user by modifying the .bashrc for that user.
Procedure
Append the line that specifies the octal value of the umask into the .bashrc file for the particular user.
$ echo 'umask octal_value' >> /home/username/.bashrcReplace octal_value with an octal value and replace username with the name of the user. See User file-creation mode mask for more details.
26.8. Setting default permissions for newly created home directories
You can change the permission modes for home directories of newly created users by modifying the /etc/login.defs file.
Procedure
As root, open the /etc/login.defs file in the editor.Modify the following section to set a new default HOME_MODE:
# HOME_MODE is used by useradd(8) and newusers(8) to set the mode for new # home directories. # If HOME_MODE is not set, the value of UMASK is used to create the mode. HOME_MODE 0700Replace the default octal value (0700) with another octal value. The selected mode will be used to create the permissions for the home directory.
If HOME_MODE is set, save the changes and exit the editor.If HOME_MODE is not set, modify the UMASK to set the mode for the newly created home directories:
# Default initial "umask" value used by login(1) on non-PAM enabled systems. # Default "umask" value for pam_umask(8) on PAM enabled systems. # UMASK is also used by useradd(8) and newusers(8) to set the mode for new # home directories if HOME_MODE is not set. # 022 is the default value, but 027, or even 077, could be considered # for increased privacy. There is no One True Answer here: each sysadmin # must make up their mind. UMASK 022Replace the default octal value (022) with another octal value. See User file-creation mode mask for more details.
Save the changes and exit the editor.Chapter 27. Using dnstap in RHEL
The dnstap utility provides an advanced way to monitor and log details of incoming name queries. It records sent messages from the named service. This section explains how to record DNS queries using dnstap.
27.1. Recording DNS queries using dnstap in RHEL
The network administrators can record the DNS queries to collect the website or IP address information along with the domain health.
Prerequisites
- Upgrade BIND packages to version bind-9.11.26-2 or newer.
If you already have a BIND version installed and running, adding a new version of BIND will overwrite the existing version.
Procedure
Following are the steps to record DNS queries:
Edit the /etc/named.conf file in the options block to enable dnstap and target file:
options # … dnstap all; ; # Configure filter dnstap-output file “/var/named/data/dnstap.bin”; # … ; # end of options( all | auth | client | forwarder | resolver | update ) [ ( query | response ) ];
The dnstap filter contains multiple definitions delimited by a ; in the dnstap block.
Following is the syntax for each rule:
- auth - Authoritative zone response or answer. client - Internal client query or answer. forwarder - Forwarded query or response from it. resolver - Iterative resolution query or response.
update - Dynamic zone update requests. all - Any from the above options.
query | response - If no query or response keyword is specified, both would be recorded.
The following example requests auth responses only, client queries and both queries and responses of dynamic updates:
Configure the periodic rollout for the active logs.
In the following example, the content of the user-edited script run once per day by cron. Number 3 signifies the backup log files limited to that number. Because the file gets removed, it never reaches the .2 suffix.
Example: sudoedit /etc/cron.daily/dnstap #!/bin/sh rndc dnstap -roll 3 mv /var/named/data/dnstap.bin.1 /var/log/named/dnstap/dnstap-$(date -I).bin # use dnstap-read to analyze saved logs sudo chmod a+x /etc/cron.daily/dnstapUse the dnstap-read utility to handle and analyze the logs in a human-readable format.
In the following example, the detailed dnstap output gets printed in the YAML file format.
Example: dnstap-read -y [file-name]Chapter 28. Managing the Access Control List
Each file and directory can only have one user owner and one group owner a time. If you want to grant a user permissions to access specific files or directories that belong to a different user or group while keeping other files and directories private, you can utilize Linux Access Control Lists (ACLs).
28.1. Displaying the current Access Control List
You can use the getfacl utility to display the current ACL.
Procedure
To display the current ACL for a particular file or directory, use:
$ getfacl file-nameReplace file-name with the name of the file or directory.
28.2. Setting the Access Control List
You can use the setfacl utility to set the ACL for a file or directory.
Prerequisites
- root access.
Procedure
- To set the ACL for a file or directory, use:
Replace username with the name of the user, symbolic_value with a symbolic value, and file-name with the name of the file or directory. For more information see the setfacl man page.
Example 28.1. Modifying permissions for a group project
The following example describes how to modify permissions for the group-project file owned by the root user that belongs to the root group so that this file is:
- Not executable by anyone. The user andrew has the rw- permissions. The user susan has the --- permissions. Other users have the r-- permissions.
Procedure
# setfacl -m u:andrew:rw- group-project # setfacl -m u:susan:--- group-projectVerification steps
To verify that the user andrew has the rw- permission, the user susan has the --- permission, and other users have the r-- permission, use:
$ getfacl group-projectThe output returns:
# file: group-project # owner: root # group: root user:andrew:rw- user:susan:--- group::r-- mask::rw- other::r--Chapter 29. Using the Chrony suite to configure NTP
Accurate timekeeping is important for a number of reasons in IT. In networking for example, accurate time stamps in packets and logs are required. In Linux systems, the NTP protocol is implemented by a daemon running in user space.
The user space daemon updates the system clock running in the kernel. The system clock can keep time by using various clock sources. Usually, the Time Stamp Counter (TSC) is used. The TSC is a CPU register which counts the number of cycles since it was last reset. It is very fast, has a high resolution, and there are no interruptions.
Starting with Red Hat Enterprise Linux 8, the NTP protocol is implemented by the chronyd daemon, available from the repositories in the chrony package.
The following sections describe how to use the chrony suite to configure NTP.
29.1. Introduction to chrony suite
chrony is an implementation of the Network Time Protocol (NTP). You can use chrony:
- To synchronize the system clock with NTP servers To synchronize the system clock with a reference clock, for example a GPS receiver To synchronize the system clock with a manual time input As an NTPv4(RFC 5905) server or peer to provide a time service to other computers in the network
chrony performs well in a wide range of conditions, including intermittent network connections, heavily congested networks, changing temperatures (ordinary computer clocks are sensitive to temperature), and systems that do not run continuously, or run on a virtual machine.
Typical accuracy between two machines synchronized over the Internet is within a few milliseconds, and for machines on a LAN within tens of microseconds. Hardware timestamping or a hardware reference clock may improve accuracy between two machines synchronized to a sub-microsecond level.
chrony consists of chronyd, a daemon that runs in user space, and chronyc, a command line program which can be used to monitor the performance of chronyd and to change various operating parameters when it is running.
The chrony daemon, chronyd, can be monitored and controlled by the command line utility chronyc. This utility provides a command prompt which allows entering a number of commands to query the current state of chronyd and make changes to its configuration. By default, chronyd accepts only commands from a local instance of chronyc, but it can be configured to accept monitoring commands also from remote hosts. The remote access should be restricted.
29.2. Using chronyc to control chronyd
This section describes how to control chronyd using the chronyc command line utility.
Procedure
To make changes to the local instance of chronyd using the command line utility chronyc in interactive mode, enter the following command as root:
# chronycchronyc must run as root if some of the restricted commands are to be used.
The chronyc command prompt will be displayed as follows:
chronyc> To list all of the commands, type help.Alternatively, the utility can also be invoked in non-interactive command mode if called together with a command as follows:
chronyc commandChanges made using chronyc are not permanent, they will be lost after a chronyd restart. For permanent changes, modify /etc/chrony.conf.
29.3. Migrating to chrony
In Red Hat Enterprise Linux 7, users could choose between ntp and chrony to ensure accurate timekeeping. For differences between ntp and chrony, ntpd and chronyd, see Differences between ntpd and chronyd.
Starting with Red Hat Enterprise Linux 8, ntp is no longer supported. chrony is enabled by default. For this reason, you might need to migrate from ntp to chrony.
Migrating from ntp to chrony is straightforward in most cases. The corresponding names of the programs, configuration files and services are:
Table 29.1. Corresponding names of the programs, configuration files and services when migrating from ntp to chrony
ntp namechrony name
/etc/ntp.conf
/etc/chrony.conf
/etc/ntp/keys
/etc/chrony.keys
ntpd
chronyd
ntpq
chronyc
ntpd.service
chronyd.service
ntp-wait.service
chrony-wait.service
The ntpdate and sntp utilities, which are included in the ntp distribution, can be replaced with chronyd using the -q option or the -t option. The configuration can be specified on the command line to avoid reading /etc/chrony.conf. For example, instead of running ntpdate ntp.example.com, chronyd could be started as:
# chronyd -q 'server ntp.example.com iburst' 2022-05-18T12:37:43Z chronyd version 3.3 starting (+CMDMON +NTP +REFCLOCK +RTC +PRIVDROP +SCFILTER +SIGND +ASYNCDNS +SECHASH +IPV6 +DEBUG) 2022-05-18T12:37:43Z Initial frequency -2.630 ppm 2022-05-18T12:37:48Z System clock wrong by 0.003159 seconds (step) 2022-05-18T12:37:48Z chronyd exitingThe ntpstat utility, which was previously included in the ntp package and supported only ntpd, now supports both ntpd and chronyd. It is available in the ntpstat package.
29.3.1. Migration script
A Python script called ntp2chrony.py is included in the documentation of the chrony package (/usr/share/doc/chrony). The script automatically converts an existing ntp configuration to chrony. It supports the most common directives and options in the ntp.conf file. Any lines that are ignored in the conversion are included as comments in the generated chrony.conf file for review. Keys that are specified in the ntp key file, but are not marked as trusted keys in ntp.conf are included in the generated chrony.keys file as comments.
By default, the script does not overwrite any files. If /etc/chrony.conf or /etc/chrony.keys already exist, the -b option can be used to rename the file as a backup. The script supports other options. The --help option prints all supported options.
An example of an invocation of the script with the default ntp.conf provided in the ntp package is:
# python3 /usr/share/doc/chrony/ntp2chrony.py -b -v Reading /etc/ntp.conf Reading /etc/ntp/crypto/pw Reading /etc/ntp/keys Writing /etc/chrony.conf Writing /etc/chrony.keysThe only directive ignored in this case is disable monitor, which has a chrony equivalent in the noclientlog directive, but it was included in the default ntp.conf only to mitigate an amplification attack.
The generated chrony.conf file typically includes a number of allow directives corresponding to the restrict lines in ntp.conf. If you do not want to run chronyd as an NTP server, remove all allow directives from chrony.conf.
Chapter 30. Using Chrony
The following sections describe how to install, start, and stop chronyd, and how to check if chrony is synchronized. Sections also describe how to manually adjust System Clock.
30.1. Managing chrony
The following procedure describes how to install, start, stop, and check the status of chronyd.
Procedure
The chrony suite is installed by default on Red Hat Enterprise Linux. To ensure that it is, run the following command as root:
# yum install chronyThe default location for the chrony daemon is /usr/sbin/chronyd. The command line utility will be installed to /usr/bin/chronyc.
To check the status of chronyd, issue the following command:
$ systemctl status chronyd chronyd.service - NTP client/server Loaded: loaded (/usr/lib/systemd/system/chronyd.service; enabled) Active: active (running) since Wed 2013-06-12 22:23:16 CEST; 11h agoTo start chronyd, issue the following command as root:
# systemctl start chronydTo ensure chronyd starts automatically system start, issue the following command as root:
# systemctl enable chronydTo stop chronyd, issue the following command as root:
# systemctl stop chronydTo prevent chronyd from starting automatically system start, issue the following command as root:
# systemctl disable chronyd30.2. Checking if chrony is synchronized
The following procedure describes how to check if chrony is synchronized with the use of the tracking, sources, and sourcestats commands.
Procedure
To check chrony tracking, issue the following command:
$ chronyc tracking Reference ID : CB00710F (foo.example) Stratum : 3 Ref time (UTC) : Fri Jan 27 09:49:17 2022 System time : 0.000006523 seconds slow of NTP time Last offset : -0.000006747 seconds RMS offset : 0.000035822 seconds Frequency : 3.225 ppm slow Residual freq : 0.000 ppm Skew : 0.129 ppm Root delay : 0.013639022 seconds Root dispersion : 0.001100737 seconds Update interval : 64.2 seconds Leap status : NormalThe sources command displays information about the current time sources that chronyd is accessing. To check chrony sources, issue the following command:
$ chronyc sources 210 Number of sources = 3 MS Name/IP address Stratum Poll Reach LastRx Last sample =============================================================================== #* GPS0 0 4 377 11 -479ns[ -621ns] /- 134ns ^? a.b.c 2 6 377 23 -923us[ -924us] +/- 43ms ^ d.e.f 1 6 377 21 -2629us[-2619us] +/- 86msThe optional argument -v can be specified, meaning verbose. In this case, extra caption lines are shown as a reminder of the meanings of the columns.
The sourcestats command displays information about the drift rate and offset estimation process for each of the sources currently being examined by chronyd. To check chrony source statistics, issue the following command:
$ chronyc sourcestats 210 Number of sources = 1 Name/IP Address NP NR Span Frequency Freq Skew Offset Std Dev =============================================================================== abc.def.ghi 11 5 46m -0.001 0.045 1us 25usThe optional argument -v can be specified, meaning verbose. In this case, extra caption lines are shown as a reminder of the meanings of the columns.
Additional resources
- chronyc(1) man page
30.3. Manually adjusting the System Clock
The following procedure describes how to manually adjust the System Clock.
Procedure
To step the system clock immediately, bypassing any adjustments in progress by slewing, issue the following command as root:
# chronyc makestepIf the rtcfile directive is used, the real-time clock should not be manually adjusted. Random adjustments would interfere with chrony's need to measure the rate which the real-time clock drifts.
30.4. Setting up chrony for a system in an isolated network
For a network that is never connected to the Internet, one computer is selected to be the master timeserver. The other computers are either direct clients of the master, or clients of clients. On the master, the drift file must be manually set with the average rate of drift of the system clock. If the master is rebooted, it will obtain the time from surrounding systems and calculate an average to set its system clock. Thereafter it resumes applying adjustments based on the drift file. The drift file will be updated automatically when the settime command is used.
The following procedure describes how to set up chrony for asystem in an isolated network.
Procedure
On the system selected to be the master, using a text editor running as root, edit /etc/chrony.conf as follows:
driftfile /var/lib/chrony/drift commandkey 1 keyfile /etc/chrony.keys initstepslew 10 client1 client3 client6 local stratum 8 manual allow 192.0.2.0Where 192.0.2.0 is the network or subnet address from which the clients are allowed to connect.
On the systems selected to be direct clients of the master, using a text editor running as root, edit the /etc/chrony.conf as follows:
server master driftfile /var/lib/chrony/drift logdir /var/log/chrony log measurements statistics tracking keyfile /etc/chrony.keys commandkey 24 local stratum 10 initstepslew 20 master allow 192.0.2.123Where 192.0.2.123 is the address of the master, and master is the host name of the master. Clients with this configuration will resynchronize the master if it restarts.
On the client systems which are not to be direct clients of the master, the /etc/chrony.conf file should be the same except that the local and allow directives should be omitted.
In an isolated network, you can also use the local directive that enables a local reference mode, which allows chronyd operating as an NTP server to appear synchronized to real time, even when it was never synchronized or the last update of the clock happened a long time ago.
To allow multiple servers in the network to use the same local configuration and to be synchronized to one another, without confusing clients that poll more than one server, use the orphan option of the local directive which enables the orphan mode. Each server needs to be configured to poll all other servers with local. This ensures that only the server with the smallest reference ID has the local reference active and other servers are synchronized to it. When the server fails, another one will take over.
30.5. Configuring remote monitoring access
chronyc can access chronyd in two ways:
- Internet Protocol, IPv4 or IPv6. Unix domain socket, which is accessible locally by the root or chrony user.
By default, chronyc connects to the Unix domain socket. The default path is /var/run/chrony/chronyd.sock. If this connection fails, which can happen for example when chronyc is running under a non-root user, chronyc tries to connect to 127.0.0.1 and then ::1.
Only the following monitoring commands, which do not affect the behavior of chronyd, are allowed from the network:
- activity manual list rtcdata smoothing sources sourcestats tracking waitsync
The set of hosts from which chronyd accepts these commands can be configured with the cmdallow directive in the configuration file of chronyd, or the cmdallow command in chronyc. By default, the commands are accepted only from localhost (127.0.0.1 or ::1).
All other commands are allowed only through the Unix domain socket. When sent over the network, chronyd responds with a Not authorised error, even if it is from localhost.
The following procedure describes how to access chronyd remotely with chronyc.
Procedure
Allow access from both IPv4 and IPv6 addresses by adding the following to the /etc/chrony.conf file:
bindcmdaddress 0.0.0.0or
bindcmdaddress ::Allow commands from the remote IP address, network, or subnet by using the cmdallow directive.
Add the following content to the /etc/chrony.conf file:
cmdallow 192.168.1.0/24Open port 323 in the firewall to connect from a remote system:
# firewall-cmd --zone=public --add-port=323/udpOptionally, you can open port 323 permanently using the --permanent option:
# firewall-cmd --permanent --zone=public --add-port=323/udpIf you opened port 323 permanently, reload the firewall configuration:
firewall-cmd --reloadAdditional resources
- chrony.conf(5) man page
30.6. Managing time synchronization using RHEL System Roles
You can manage time synchronization on multiple target machines using the timesync role. The timesync role installs and configures an NTP or PTP implementation to operate as an NTP client or PTP slave in order to synchronize the system clock with NTP servers or grandmasters in PTP domains.
Note that using the timesync role also facilitates migration to chrony, because you can use the same playbook on all versions of Red Hat Enterprise Linux starting with RHEL 6 regardless of whether the system uses ntp or chrony to implement the NTP protocol.
The timesync role replaces the configuration of the given or detected provider service on the managed host. Previous settings are lost, even if they are not specified in the role variables. The only preserved setting is the choice of provider if the timesync_ntp_provider variable is not defined.
The following example shows how to apply the timesync role in a situation with just one pool of servers.
Example 30.1. An example playbook applying the timesync role for a single pool of servers
--- - hosts: timesync-test vars: timesync_ntp_servers: - hostname: 2.rhel.pool.ntp.org pool: yes iburst: yes roles: - rhel-system-roles.timesync
For a detailed reference on timesync role variables, install the rhel-system-roles package, and see the README.md or README.html files in the /usr/share/doc/rhel-system-roles/timesync directory.
30.7. Additional resources
- chronyc(1) man page
chronyd(8) man page Frequently Asked Questions
Chapter 31. Chrony with HW timestamping
Hardware timestamping is a feature supported in some Network Interface Controller (NICs) which provides accurate timestamping of incoming and outgoing packets. NTP timestamps are usually created by the kernel and chronyd with the use of the system clock. However, when HW timestamping is enabled, the NIC uses its own clock to generate the timestamps when packets are entering or leaving the link layer or the physical layer. When used with NTP, hardware timestamping can significantly improve the accuracy of synchronization. For best accuracy, both NTP servers and NTP clients need to use hardware timestamping. Under ideal conditions, a sub-microsecond accuracy may be possible.
Another protocol for time synchronization that uses hardware timestamping is PTP.
Unlike NTP, PTP relies on assistance in network switches and routers. If you want to reach the best accuracy of synchronization, use PTP on networks that have switches and routers with PTP support, and prefer NTP on networks that do not have such switches and routers.
The following sections describe how to:
- Verify support for hardware timestamping Enable hardware timestamping Configure client polling interval Enable interleaved mode Configure server for large number of clients Verify hardware timestamping Configure PTP-NTP bridge
31.1. Verifying support for hardware timestamping
To verify that hardware timestamping with NTP is supported by an interface, use the ethtool -T command. An interface can be used for hardware timestamping with NTP if ethtool lists the SOF_TIMESTAMPING_TX_HARDWARE and SOF_TIMESTAMPING_TX_SOFTWARE capabilities and also the HWTSTAMP_FILTER_ALL filter mode.
Example 31.1. Verifying support for hardware timestamping on a specific interface
# ethtool -T eth0
Output:
Timestamping parameters for eth0: Capabilities: hardware-transmit (SOF_TIMESTAMPING_TX_HARDWARE) software-transmit (SOF_TIMESTAMPING_TX_SOFTWARE) hardware-receive (SOF_TIMESTAMPING_RX_HARDWARE) software-receive (SOF_TIMESTAMPING_RX_SOFTWARE) software-system-clock (SOF_TIMESTAMPING_SOFTWARE) hardware-raw-clock (SOF_TIMESTAMPING_RAW_HARDWARE) PTP Hardware Clock: 0 Hardware Transmit Timestamp Modes: off (HWTSTAMP_TX_OFF) on (HWTSTAMP_TX_ON) Hardware Receive Filter Modes: none (HWTSTAMP_FILTER_NONE) all (HWTSTAMP_FILTER_ALL) ptpv1-l4-sync (HWTSTAMP_FILTER_PTP_V1_L4_SYNC) ptpv1-l4-delay-req (HWTSTAMP_FILTER_PTP_V1_L4_DELAY_REQ) ptpv2-l4-sync (HWTSTAMP_FILTER_PTP_V2_L4_SYNC) ptpv2-l4-delay-req (HWTSTAMP_FILTER_PTP_V2_L4_DELAY_REQ) ptpv2-l2-sync (HWTSTAMP_FILTER_PTP_V2_L2_SYNC) ptpv2-l2-delay-req (HWTSTAMP_FILTER_PTP_V2_L2_DELAY_REQ) ptpv2-sự kiện (HWTSTAMP_FILTER_PTP_V2_EVENT) ptpv2-sync (HWTSTAMP_FILTER_PTP_V2_SYNC) ptpv2-delay-req (HWTSTAMP_FILTER_PTP_V2_DELAY_REQ)31.2. Enabling hardware timestamping
To enable hardware timestamping, use the hwtimestamp directive in the /etc/chrony.conf file. The directive can either specify a single interface, or a wildcard character can be used to enable hardware timestamping on all interfaces that support it. Use the wildcard specification in case that no other application, like ptp4l from the linuxptp package, is using hardware timestamping on an interface. Multiple hwtimestamp directives are allowed in the chrony configuration file.
Example 31.2. Enabling hardware timestamping by using the hwtimestamp directive
hwtimestamp eth0 hwtimestamp eth2 hwtimestamp *
31.3. Configuring client polling interval
The default range of a polling interval (64-1024 seconds) is recommended for servers on the Internet. For local servers and hardware timestamping, a shorter polling interval needs to be configured in order to minimize offset of the system clock.
The following directive in /etc/chrony.conf specifies a local NTP server using one second polling interval:
server ntp.local minpoll 0 maxpoll 0
31.4. Enabling interleaved mode
NTP servers that are not hardware NTP appliances, but rather general purpose computers running a software NTP implementation, like chrony, will get a hardware transmit timestamp only after sending a packet. This behavior prevents the server from saving the timestamp in the packet to which it corresponds. In order to enable NTP clients receiving transmit timestamps that were generated after the transmission, configure the clients to use the NTP interleaved mode by adding the xleave option to the server directive in /etc/chrony.conf:
server ntp.local minpoll 0 maxpoll 0 xleave31.5. Configuring server for large number of clients
The default server configuration allows a few thousands of clients most to use the interleaved mode concurrently. To configure the server for a larger number of clients, increase the clientloglimit directive in /etc/chrony.conf. This directive specifies the maximum size of memory allocated for logging of clients' access on the server:
clientloglimit 10000000031.6. Verifying hardware timestamping
To verify that the interface has successfully enabled hardware timestamping, check the system log. The log should contain a message from chronyd for each interface with successfully enabled hardware timestamping.
Example 31.3. Log messages for interfaces with enabled hardware timestamping
chronyd[4081]: Enabled HW timestamping on eth0 chronyd[4081]: Enabled HW timestamping on eth2
When chronyd is configured as an NTP client or peer, you can have the transmit and receive timestamping modes and the interleaved mode reported for each NTP source by the chronyc ntpdata command:
Example 31.4. Reporting the transmit, receive timestamping and interleaved mode for each NTP source
# chronyc ntpdata
Output:
Remote address : 203.0.113.15 (CB00710F) Remote port : 123 Local address : 203.0.113.74 (CB00714A) Leap status : Normal Version : 4 Mode : Server Stratum : 1 Poll interval : 0 (1 seconds) Precision : -24 (0.000000060 seconds) Root delay : 0.000015 seconds Root dispersion : 0.000015 seconds Reference ID : 47505300 (GPS) Reference time : Wed May 03 13:47:45 2022 Offset : -0.000000134 seconds Peer delay : 0.000005396 seconds Peer dispersion : 0.000002329 seconds Response time : 0.000152073 seconds Jitter asymmetry: +0.00 NTP tests : 111 111 1111 Interleaved : Yes Authenticated : No TX timestamping : Hardware RX timestamping : Hardware Total TX : 27 Total RX : 27 Total valid RX : 27Example 31.5. Reporting the stability of NTP measurements
# chronyc sourcestats
With hardware timestamping enabled, stability of NTP measurements should be in tens or hundreds of nanoseconds, under normal load. This stability is reported in the Std Dev column of the output of the chronyc sourcestats command:
Output:
210 Number of sources = 1 Name/IP Address NP NR Span Frequency Freq Skew Offset Std Dev ntp.local 12 7 11 +0.000 0.019 +0ns 49ns31.7. Configuring PTP-NTP bridge
If a highly accurate Precision Time Protocol (PTP) grandmaster is available in a network that does not have switches or routers with PTP support, a computer may be dedicated to operate as a PTP slave and a stratum-1 NTP server. Such a computer needs to have two or more network interfaces, and be close to the grandmaster or have a direct connection to it. This will ensure highly accurate synchronization in the network.
Configure the ptp4l and phc2sys programs from the linuxptp packages to use one interface to synchronize the system clock using PTP.
Configure chronyd to provide the system time using the other interface:
Example 31.6. Configuring chronyd to provide the system time using the other interface
bindaddress 203.0.113.74 hwtimestamp eth2 local stratum 1
Chapter 32. Achieving some settings previously supported by NTP in chrony
Some settings that were in previous major version of Red Hat Enterprise Linux supported by ntp, are not supported by chrony. The following sections list such settings, and describe ways to achieve them on a system with chrony.
32.1. Monitoring by ntpq and ntpdc
chronyd cannot be monitored by the ntpq and ntpdc utilities from the ntp distribution, because chrony does not support the NTP modes 6 and 7. It supports a different protocol and chronyc is the client implementation. For more information, see the chronyc(1) man page.
To monitor the status of the system clock sychronized by chronyd, you can:
- Use the tracking command Use the ntpstat utility, which supports chrony and provides a similar output as it used to with ntpd
Example 32.1. Using the tracking command
$ chronyc -n tracking Reference ID : 0A051B0A (10.5.27.10) Stratum : 2 Ref time (UTC) : Thu Mar 08 15:46:20 2022 System time : 0.000000338 seconds slow of NTP time Last offset : +0.000339408 seconds RMS offset : 0.000339408 seconds Frequency : 2.968 ppm slow Residual freq : +0.001 ppm Skew : 3.336 ppm Root delay : 0.157559142 seconds Root dispersion : 0.001339232 seconds Update interval : 64.5 seconds Leap status : Normal
Example 32.2. Using the ntpstat utility
$ ntpstat synchronised to NTP server (10.5.27.10) stratum 2 time correct to within 80 ms polling server every 64 s
32.2. Using authentication mechanism based on public key cryptography
In Red Hat Enterprise Linux 7, ntp supported Autokey, which is an authentication mechanism based on public key cryptography.
In Red Hat Enterprise Linux 8, chronyd supports Network Time Security (NTS), a modern secure authentication mechanism, instead of Autokey. For more information, see Overview of Network Time Security (NTS) in chrony.
32.3. Using ephemeral symmetric associations
In Red Hat Enterprise Linux 7, ntpd supported ephemeral symmetric associations, which can be mobilized by packets from peers which are not specified in the ntp.conf configuration file. In Red Hat Enterprise Linux 8, chronyd needs all peers to be specified in chrony.conf. Ephemeral symmetric associations are not supported.
Note that using the client/server mode enabled by the server or pool directive is more secure compared to the symmetric mode enabled by the peer directive.
32.4. multicast/broadcast client
Red Hat Enterprise Linux 7 supported the broadcast/multicast NTP mode, which simplifies configuration of clients. With this mode, clients can be configured to just listen for packets sent to a multicast/broadcast address instead of listening for specific names or addresses of individual servers, which may change over time.
In Red Hat Enterprise Linux 8, chronyd does not support the broadcast/multicast mode. The main reason is that it is less accurate and less secure than the ordinary client/server and symmetric modes.
There are several options of migration from an NTP broadcast/multicast setup:
Configure DNS to translate a single name, such as ntp.example.com, to multiple addresses of different servers
Clients can have a static configuration using only a single pool directive to synchronize with multiple servers. If a server from the pool becomes unreacheable, or otherwise unsuitable for synchronization, the clients automatically replace it with another server from the pool.
Distribute the list of NTP servers over DHCP
When NetworkManager gets a list of NTP servers from the DHCP server, chronyd is automatically configured to use them. This feature can be disabled by adding PEERNTP=no to the /etc/sysconfig/network file.
Use the Precision Time Protocol (PTP)
This option is suitable mainly for environments where servers change frequently, or if a larger group of clients needs to be able to synchronize to each other without having a designated server.
PTP was designed for multicast messaging and works similarly to the NTP broadcast mode. A PTP implementation is available in the linuxptp package.
PTP normally requires hardware timestamping and support in network switches to perform well. However, PTP is expected to work better than NTP in the broadcast mode even with software timestamping and no support in network switches.
In networks with very large number of PTP slaves in one communication path, it is recommended to configure the PTP slaves with the hybrid_e2e option in order to reduce the amount of network traffic generated by the slaves. You can configure a computer running chronyd as an NTP client, and possibly NTP server, to operate also as a PTP grandmaster to distribute synchronized time to a large number of computers using multicast messaging.
Chapter 33. Overview of Network Time Security (NTS) in chrony
Network Time Security (NTS) is an authentication mechanism for Network Time Protocol (NTP), designed to scale substantial clients. It verifies that the packets received from the server machines are unaltered while moving to the client machine. Network Time Security (NTS) includes a Key Establishment (NTS-KE) protocol that automatically creates the encryption keys used between the server and its clients.
33.1. Enabling Network Time Security (NTS) in the client configuration file
By default, Network Time Security (NTS) is not enabled. You can enable NTS in the /etc/chrony.conf. For that, perform the following steps:
Prerequisites
- Server with the NTS support
Procedure
In the client configuration file:
Specify the server with the nts option in addition to the recommended iburst option.
For example: server time.example.com iburst nts server nts.netnod.se iburst nts server ptbtime1.ptb.de iburst ntsTo avoid repeating the Network Time Security-Key Establishment (NTS-KE) session during system boot, add the following line to chrony.conf, if it is not present:
ntsdumpdir /var/lib/chronyAdd the following line to /etc/sysconfig/network to disable synchronization with Network Time Protocol (NTP) servers provided by DHCP:
PEERNTP=no Save your changes.Restart the chronyd service:
systemctl restart chronydVerification
Verify if the NTS keys were successfully established:
# chronyc -N authdata Name/IP address Mode KeyID Type KLen Last Atmp NAK Cook CLen ================================================================ time.example.com NTS 1 15 256 33m 0 0 8 100 nts.sth2.ntp.se NTS 1 15 256 33m 0 0 8 100 nts.sth2.ntp.se NTS 1 15 256 33m 0 0 8 100The KeyID, Type, and KLen should have non-zero values. If the value is zero, check the system log for error messages from chronyd.
Verify the client is making NTP measurements:
# chronyc -N sources MS Name/IP address Stratum Poll Reach LastRx Last sample ========================================================= time.example.com 3 6 377 45 +355us[ +375us] +/- 11ms nts.sth2.ntp.se 1 6 377 44 +237us[ +237us] +/- 23ms nts.sth2.ntp.se 1 6 377 44 -170us[ -170us] +/- 22msThe Reach column should have a non-zero value; ideally 377. If the value rarely gets 377 or never gets to 377, it indicates that NTP requests or responses are getting lost in the network.
Additional resources
- chrony.conf(5) man page
33.2. Enabling Network Time Security (NTS) on the server
If you run your own Network Time Protocol (NTP) server, you can enable the server Network Time Security (NTS) support to facilitate its clients to synchronize securely.
If the NTP server is a client of other servers, that is, it is not a Stratum 1 server, it should use NTS or symmetric key for its synchronization.
Prerequisites
- Server private key in PEM format Server certificate with required intermediate certificates in
PEM format
Procedure
Specify the private key and the certificate file in chrony.conf
For example: ntsserverkey /etc/pki/tls/private/foo.example.key ntsservercert /etc/pki/tls/certs/foo.example.crtEnsure that both the key and certificate files are readable by the chrony system user, by setting the group ownership.
For example: chown :chrony /etc/pki/tls/*/foo.example.* Ensure the ntsdumpdir /var/lib/chrony directive is present in the chrony.conf.Restart the chronyd service:
systemctl restart chronydIf the server has a firewall, it needs to allow both the UDP 123 and TCP 4460 ports for NTP and Network Time Security-Key Establishment (NTS-KE).
Verification
Perform a quick test from a client machine with the following command:
$ chronyd -Q. -t 3 'server foo.example iburst nts maxsamples 1' 2022-09-15T13:45:26Z chronyd version 4.1 starting (+CMDMON +NTP +REFCLOCK +RTC +PRIVDROP +SCFILTER +SIGND +ASYNCDNS +NTS +SECHASH +IPV6 +DEBUG) 2022-09-15T13:45:26Z Disabled control of system clock 2022-09-15T13:45:28Z System clock wrong by 0.002205 seconds (ignored) 2022-09-15T13:45:28Z chronyd exitingThe System clock wrong message indicates the NTP server is accepting NTS-KE connections and responding with NTS-protected NTP messages.
Verify the NTS-KE connections and authenticated NTP packets observed on the server:
# chronyc serverstats NTP packets received : 7 NTP packets dropped : 0 Command packets received : 22 Command packets dropped : 0 Client log records dropped : 0 NTS-KE connections accepted: 1 NTS-KE connections dropped : 0 Authenticated NTP packets: 7If the value of the NTS-KE connections accepted and Authenticated NTP packets field is a non-zero value, it means that least one client was able to connect to the NTS-KE port and send an authenticated NTP request.
Chapter 34. Using secure communications between two systems with OpenSSH
SSH (Secure Shell) is a protocol which provides secure communications between two systems using a client-server architecture and allows users to log in to server host systems remotely. Unlike other remote communication protocols, such as FTP or Telnet, SSH encrypts the login session, which prevents intruders to collect unencrypted passwords from the connection.
Red Hat Enterprise Linux includes the basic OpenSSH packages: the general openssh package, the openssh-server package and the openssh-clients package. Note that the OpenSSH packages require the OpenSSL package openssl-libs, which installs several important cryptographic libraries that enable OpenSSH to provide encrypted communications.
34.1. SSH and OpenSSH
SSH (Secure Shell) is a program for logging into a remote machine and executing commands on that machine. The SSH protocol provides secure encrypted communications between two untrusted hosts over an insecure network. You can also forward X11 connections and arbitrary TCP/IP ports over the secure channel.
The SSH protocol mitigates security threats, such as interception of communication between two systems and impersonation of a particular host, when you use it for remote shell login or file copying. This is because the SSH client and server use digital signatures to verify their identities. Additionally, all communication between the client and server systems is encrypted.
A host key authenticates hosts in the SSH protocol. Host keys are cryptographic keys that are generated automatically when OpenSSH is first installed, or when the host boots for the first time.
OpenSSH is an implementation of the SSH protocol supported by Linux, UNIX, and similar operating systems. It includes the core files necessary for both the OpenSSH client and server. The OpenSSH suite consists of the following user-space tools:
- ssh is a remote login program (SSH client). sshd is an OpenSSH SSH daemon. scp is a secure remote file copy program. sftp is a secure file transfer program. ssh-agent is an authentication agent for caching private keys. ssh-add adds private key identities to ssh-agent. ssh-keygen generates, manages, and converts authentication keys for ssh. ssh-copy-id is a script that adds local
public keys to the authorized_keys file on a remote SSH server. ssh-keyscan gathers SSH public host keys.
Two versions of SSH currently exist: version 1, and the newer version 2. The OpenSSH suite in RHEL supports only SSH version 2. It has an enhanced key-exchange algorithm that is not vulnerable to exploits known in version 1.
OpenSSH, as one of core cryptographic subsystems of RHEL, uses system-wide crypto policies. This ensures that weak cipher suites and cryptographic algorithms are disabled in the default configuration. To modify the policy, the administrator must either use the update-crypto-policies command to adjust the settings or manually opt out of the system-wide crypto policies.
The OpenSSH suite uses two sets of configuration files: one for client programs (that is, ssh, scp, and sftp), and another for the server (the sshd daemon).
System-wide SSH configuration information is stored in the /etc/ssh/ directory. User-specific SSH configuration information is stored in ~/.ssh/ in the user’s home directory. For a detailed list of OpenSSH configuration files, see the FILES section in the sshd(8) man page.
34.2. Configuring and starting an OpenSSH server
Use the following procedure for a basic configuration that might be required for your environment and for starting an OpenSSH server. Note that after the default RHEL installation, the sshd daemon is already started and server host keys are automatically created.
Prerequisites
- The openssh-server package is installed.
Procedure
Start the sshd daemon in the current session and set it to start automatically boot time:
# systemctl start sshd # systemctl enable sshdTo specify different addresses than the default 0.0.0.0 (IPv4) or :: (IPv6) for the ListenAddress directive in the /etc/ssh/sshd_config configuration file and to use a slower dynamic network configuration, add the dependency on the network-online.target target unit to the sshd.service unit file. To achieve this, create the /etc/systemd/system/sshd.service.d/local.conf file with the following content:
[Unit] Wants=network-online.target After=network-online.target Review if OpenSSH server settings in the /etc/ssh/sshd_config configuration file meet the requirements of your scenario.Optionally, change the welcome message that your OpenSSH server displays before a client authenticates by editing the /etc/issue file, for example:
Welcome to ssh-server.example.com Warning: By accessing this server, you agree to the referenced terms and conditions.Ensure that the Banner option is not commented out in /etc/ssh/sshd_config and its value contains /etc/issue:
# less /etc/ssh/sshd_config | grep Banner Banner /etc/issueNote that to change the message displayed after a successful login you have to edit the /etc/motd file on the server. See the pam_motd man page for more information.
Reload the systemd configuration and restart sshd to apply the changes:
# systemctl daemon-reload # systemctl restart sshdVerification
Check that the sshd daemon is running:
# systemctl status sshd ● sshd.service - OpenSSH server daemon Loaded: loaded (/usr/lib/systemd/system/sshd.service; enabled; vendor preset: enabled) Active: active (running) since Mon 2022-11-18 14:59:58 CET; 6min ago Docs: man:sshd(8) man:sshd_config(5) Main PID: 1149 (sshd) Tasks: 1 (limit: 11491) Memory: 1.9M CGroup: /system.slice/sshd.service └─1149 /usr/sbin/sshd -D -oCiphers=aes128-ctr,aes256-ctr,aes128-cbc,aes256-cbc -oMACs=hmac-sha2-256,> Nov 18 14:59:58 ssh-server-example.com systemd[1]: Starting OpenSSH server daemon... Nov 18 14:59:58 ssh-server-example.com sshd[1149]: Server listening on 0.0.0.0 port 22. Nov 18 14:59:58 ssh-server-example.com sshd[1149]: Server listening on :: port 22. Nov 18 14:59:58 ssh-server-example.com systemd[1]: Started OpenSSH server daemon.Connect to the SSH server with an SSH client.
# ssh user@ssh-server-example.com ECDSA key fingerprint is SHA256:dXbaS0RG/UzlTTku8GtXSz0S1++lPegSy31v3L/FAEc. Are you sure you want to continue connecting (yes/no/[fingerprint])? yes Warning: Permanently added 'ssh-server-example.com' (ECDSA) to the list of known hosts. 's password:Additional resources
- sshd(8) and sshd_config(5) man pages.
34.3. Setting an OpenSSH server for key-based authentication
To improve system security, enforce key-based authentication by disabling password authentication on your OpenSSH server.
Prerequisites
- The openssh-server package is installed. The sshd daemon is running on
the server.
Procedure
Open the /etc/ssh/sshd_config configuration in a text editor, for example:
# vi /etc/ssh/sshd_configChange the PasswordAuthentication option to no:
PasswordAuthentication noOn a system other than a new default installation, check that PubkeyAuthentication no has not been set and the ChallengeResponseAuthentication directive is set to no. If you are connected remotely, not using console or out-of-band access, test the key-based login process before disabling password authentication.
To use key-based authentication with NFS-mounted home directories, enable the use_nfs_home_dirs SELinux boolean:
# setsebool -P use_nfs_home_dirs 1Reload the sshd daemon to apply the changes:
# systemctl reload sshdAdditional resources
- sshd(8), sshd_config(5), and setsebool(8) man pages.
34.4. Generating SSH key pairs
Use this procedure to generate an SSH key pair on a local system and to copy the generated public key to an OpenSSH server. If the server is configured accordingly, you can log in to the OpenSSH server without providing any password.
If you complete the following steps as root, only root is able to use the keys.
Procedure
To generate an ECDSA key pair for version 2 of the SSH protocol:
$ ssh-keygen -t ecdsa Generating public/private ecdsa key pair. Enter file in which to save the key (/home/joesec/.ssh/id_ecdsa): Enter passphrase (empty for no passphrase): Enter same passphrase again: Your identification has been saved in /home/joesec/.ssh/id_ecdsa. Your public key has been saved in /home/joesec/.ssh/id_ecdsa.pub. The key fingerprint is: SHA256:Q./x+qms4j7PCQ0qFd09iZEFHA+SqwBKRNaU72oZfaCI The key's randomart image is: +---[ECDSA 256]---+ |.oo..o=++ | |.. o .oo . | |. .. o. o | |....o.+... | |o.oo.o +S . | |.=.+. .o | |E.*+. . . . | |.=..+ +.. o | | . oo*+o. | +----[SHA256]-----+You can also generate an RSA key pair by using the -t rsa option with the ssh-keygen command or an Ed25519 key pair by entering the ssh-keygen -t ed25519 command.
To copy the public key to a remote machine:
$ ssh-copy-id joesec@ssh-server-example.com /usr/bin/ssh-copy-id: INFO: attempting to log in with the new key(s), to filter out any that are already installed 's password: ... Number of key(s) added: 1 Now try logging into the machine, with: "ssh ''" and check to make sure that only the key(s) you wanted were added.If you do not use the ssh-agent program in your session, the previous command copies the most recently modified ~/.ssh/id*.pub public key if it is not yet installed. To specify another public-key file or to prioritize keys in files over keys cached in memory by ssh-agent, use the ssh-copy-id command with the -i option.
If you reinstall your system and want to keep previously generated key pairs, back up the ~/.ssh/ directory. After reinstalling, copy it back to your home directory. You can do this for all users on your system, including root.
Verification
Log in to the OpenSSH server without providing any password:
$ ssh joesec@ssh-server-example.com Welcome message. ... Last login: Mon Nov 18 18:28:42 2022 from ::1Additional resources
- ssh-keygen(1) and ssh-copy-id(1) man pages.
34.5. Using SSH keys stored on a smart card
Red Hat Enterprise Linux enables you to use RSA and ECDSA keys stored on a smart card on OpenSSH clients. Use this procedure to enable authentication using a smart card instead of using a password.
Prerequisites
- On the client side, the opensc package is installed and the pcscd service is running.
Procedure
List all keys provided by the OpenSC PKCS #11 module including their PKCS #11 URIs and save the output to the keys.pub file:
$ ssh-keygen -D pkcs11: > keys.pub $ ssh-keygen -D pkcs11: ssh-rsa AAAAB3NzaC1yc2E...KKZMzcQZzx pkcs11:id=%02;object=SIGN%20pubkey;token=SSH%20key;manufacturer=piv_II?module-path=/usr/lib64/pkcs11/opensc-pkcs11.so ecdsa-sha2-nistp256 AAA...J0hkYnnsM= pkcs11:id=%01;object=PIV%20AUTH%20pubkey;token=SSH%20key;manufacturer=piv_II?module-path=/usr/lib64/pkcs11/opensc-pkcs11.soTo enable authentication using a smart card on a remote server (example.com), transfer the public key to the remote server. Use the ssh-copy-id command with keys.pub created in the previous step:
$ ssh-copy-id -f -i keys.pubTo connect to example.com using the ECDSA key from the output of the ssh-keygen -D command in step 1, you can use just a subset of the URI, which uniquely references your key, for example:
$ ssh -i "pkcs11:id=%01?module-path=/usr/lib64/pkcs11/opensc-pkcs11.so" example.com Enter PIN for 'SSH key': [example.com] $You can use the same URI string in the ~/.ssh/config file to make the configuration permanent:
$ cat ~/.ssh/config IdentityFile "pkcs11:id=%01?module-path=/usr/lib64/pkcs11/opensc-pkcs11.so" $ ssh example.com Enter PIN for 'SSH key': [example.com] $Because OpenSSH uses the p11-kit-proxy wrapper and the OpenSC PKCS #11 module is registered to PKCS#11 Kit, you can simplify the previous commands:
$ ssh -i "pkcs11:id=%01" example.com Enter PIN for 'SSH key': [example.com] $If you skip the id= part of a PKCS #11 URI, OpenSSH loads all keys that are available in the proxy module. This can reduce the amount of typing required:
$ ssh -i pkcs11: example.com Enter PIN for 'SSH key': [example.com] $34.6. Making OpenSSH more secure
The following tips help you to increase security when using OpenSSH. Note that changes in the /etc/ssh/sshd_config OpenSSH configuration file require reloading the sshd daemon to take effect:
# systemctl reload sshdThe majority of security hardening configuration changes reduce compatibility with clients that do not support up-to-date algorithms or cipher suites.
Disabling insecure connection protocols
- To make SSH truly effective, prevent the use of insecure connection protocols that are replaced by the OpenSSH suite. Otherwise, a user’s password might be protected using SSH for one session only to be captured later when logging in using Telnet. For this reason, consider disabling insecure protocols, such as telnet, rsh, rlogin, and ftp.
Enabling key-based authentication and disabling password-based authentication
Disabling passwords for authentication and allowing only key pairs reduces the attack surface and it also might save users’ time. On clients, generate key pairs using the ssh-keygen tool and use the ssh-copy-id utility to copy public keys from clients on the OpenSSH server. To disable password-based authentication on your OpenSSH server, edit /etc/ssh/sshd_config and change the PasswordAuthentication option to no:
PasswordAuthentication noKey types
Although the ssh-keygen command generates a pair of RSA keys by default, you can instruct it to generate ECDSA or Ed25519 keys by using the -t option. The ECDSA (Elliptic Curve Digital Signature Algorithm) offers better performance than RSA the equivalent symmetric key strength. It also generates shorter keys. The Ed25519 public-key algorithm is an implementation of twisted Edwards curves that is more secure and also faster than RSA, DSA, and ECDSA.
OpenSSH creates RSA, ECDSA, and Ed25519 server host keys automatically if they are missing. To configure the host key creation in RHEL, use the [email protected] instantiated service. For example, to disable the automatic creation of the RSA key type:
# systemctl mask [email protected]rsa.serviceTo exclude particular key types for SSH connections, comment out the relevant lines in /etc/ssh/sshd_config, and reload the sshd service. For example, to allow only Ed25519 host keys:
# HostKey /etc/ssh/ssh_host_rsa_key # HostKey /etc/ssh/ssh_host_ecdsa_key HostKey /etc/ssh/ssh_host_ed25519_keyNon-default port
By default, the sshd daemon listens on TCP port 22. Changing the port reduces the exposure of the system to attacks based on automated network scanning and thus increase security through obscurity. You can specify the port using the Port directive in the /etc/ssh/sshd_config configuration file.
You also have to update the default SELinux policy to allow the use of a non-default port. To do so, use the semanage tool from the policycoreutils-python-utils package:
# semanage port -a -t ssh_port_t -p tcp port_numberFurthermore, update firewalld configuration:
# firewall-cmd --add-port port_number/tcp # firewall-cmd --runtime-to-permanentIn the previous commands, replace port_number with the new port number specified using the Port directive.
No root login
If your particular use case does not require the possibility of logging in as the root user, you should consider setting the PermitRootLogin configuration directive to no in the /etc/ssh/sshd_config file. By disabling the possibility of logging in as the root user, the administrator can audit which users run what privileged commands after they log in as regular users and then gain root rights.
Alternatively, set PermitRootLogin to prohibit-password:
PermitRootLogin prohibit-passwordThis enforces the use of key-based authentication instead of the use of passwords for logging in as root and reduces risks by preventing brute-force attacks.
Using the X Security extension
The X server in Red Hat Enterprise Linux clients does not provide the X Security extension. Therefore, clients cannot request another security layer when connecting to untrusted SSH servers with X11 forwarding. Most applications are not able to run with this extension enabled anyway.
By default, the ForwardX11Trusted option in the /etc/ssh/ssh_config.d/05-redhat.conf file is set to yes, and there is no difference between the ssh -X remote_machine (untrusted host) and ssh -Y remote_machine (trusted host) command.
If your scenario does not require the X11 forwarding feature all, set the X11Forwarding directive in the /etc/ssh/sshd_config configuration file to no.
Restricting access to specific users, groups, or domains
The AllowUsers and AllowGroups directives in the /etc/ssh/sshd_config configuration file server enable you to permit only certain users, domains, or groups to connect to your OpenSSH server. You can combine AllowUsers and AllowGroups to restrict access more precisely, for example:
AllowUsers *@192.168.1.*,*@10.0.0.*,!*@192.168.1.2 AllowGroups example-groupThe previous configuration lines accept connections from all users from systems in 192.168.1.* and 10.0.0.* subnets except from the system with the 192.168.1.2 address. All users must be in the example-group group. The OpenSSH server denies all other connections.
Note that using allowlists (directives starting with Allow) is more secure than using blocklists (options starting with Deny) because allowlists block also new unauthorized users or groups.
Changing system-wide cryptographic policies
OpenSSH uses RHEL system-wide cryptographic policies, and the default system-wide cryptographic policy level offers secure settings for current threat models. To make your cryptographic settings more strict, change the current policy level:
# update-crypto-policies --set FUTURE Setting system policy to FUTURE To opt-out of the system-wide crypto policies for your OpenSSH server, uncomment the line with the CRYPTO_POLICY= variable in the /etc/sysconfig/sshd file. After this change, values that you specify in the Ciphers, MACs, KexAlgoritms, and GSSAPIKexAlgorithms sections in the /etc/ssh/sshd_config file are not overridden. Note that this task requires deep expertise in configuring cryptographic options. See Using system-wide cryptographic policies in the Security hardening title for more information.Additional resources
-
sshd_config(5), ssh-keygen(1), crypto-policies(7), and update-crypto-policies(8) man pages.
34.7. Connecting to a remote server using an SSH jump host
Use this procedure for connecting your local system to a remote server through an intermediary server, also called jump host.
Prerequisites
- A jump host accepts SSH connections from your local system. A remote server accepts SSH connections only from the jump host.
Procedure
Define the jump host by editing the ~/.ssh/config file on your local system, for example:
Host jump-server1 HostName jump1.example.com- The Host parameter defines a name or alias for the host you can use in ssh commands. The value can match the real host name, but can also be
any string. The HostName parameter sets the actual host name or IP address of the jump host.
Add the remote server jump configuration with the ProxyJump directive to ~/.ssh/config file on your local system, for example:
Host remote-server HostName remote1.example.com ProxyJump jump-server1Use your local system to connect to the remote server through the jump server:
$ ssh remote-serverThe previous command is equivalent to the ssh -J jump-server1 remote-server command if you omit the configuration steps 1 and 2.
You can specify more jump servers and you can also skip adding host definitions to the configurations file when you provide their complete host names, for example:
$ ssh -J jump1.example.com,jump2.example.com,jump3.example.com remote1.example.comChange the host name-only notation in the previous command if the user names or SSH ports on the jump servers differ from the names and ports on the remote server, for example:
$ ssh -J johndoe@jump1.example.com:75,johndoe@jump2.example.com:75,:75 :220Additional resources
- ssh_config(5) and ssh(1) man pages.
34.8. Connecting to remote machines with SSH keys using ssh-agent
To avoid entering a passphrase each time you initiate an SSH connection, you can use the ssh-agent utility to cache the private SSH key. The private key and the passphrase remain secure.
Prerequisites
- You have a remote host with SSH daemon running and reachable through the network. You know the IP address or hostname and credentials to log in to the remote host. You have generated an SSH key pair with a passphrase and transferred the public key to the remote machine.
For more information, see Generating SSH key pairs.
Procedure
Optional: Verify you can use the key to authenticate to the remote host:
Connect to the remote host using SSH:
$ ssh example.user1@198.51.100.1 hostnameEnter the passphrase you set while creating the key to grant access to the private key.
$ ssh example.user1@198.51.100.1 hostname host.example.comStart the ssh-agent.
$ eval $(ssh-agent) Agent pid 20062Add the key to ssh-agent.
$ ssh-add ~/.ssh/id_rsa Enter passphrase for ~/.ssh/id_rsa: Identity added: ~/.ssh/id_rsa (example.user0@198.51.100.12)Verification
Optional: Log in to the host machine using SSH.
$ ssh example.user1@198.51.100.1 Last login: Mon Sep 14 12:56:37 2022Note that you did not have to enter the passphrase.
34.9. Additional resources
- sshd(8), ssh(1), scp(1), sftp(1), ssh-keygen(1), ssh-copy-id(1), ssh_config(5), sshd_config(5), update-crypto-policies(8), and crypto-policies(7) man pages. OpenSSH trang chủ Page
Configuring SELinux for applications and services with non-standard configurations
Controlling network traffic using firewalld
Chapter 35. Configuring a remote logging solution
To ensure that logs from various machines in your environment are recorded centrally on a logging server, you can configure the Rsyslog application to record logs that fit specific criteria from the client system to the server.
35.1. The Rsyslog logging service
The Rsyslog application, in combination with the systemd-journald service, provides local and remote logging support in Red Hat Enterprise Linux. The rsyslogd daemon continuously reads syslog messages received by the systemd-journald service from the Journal. rsyslogd then filters and processes these syslog events and records them to rsyslog log files or forwards them to other services according to its configuration.
The rsyslogd daemon also provides extended filtering, encryption protected relaying of messages, input and output modules, and support for transportation using the TCP and UDP protocols.
In /etc/rsyslog.conf, which is the main configuration file for rsyslog, you can specify the rules according to which rsyslogd handles the messages. Generally, you can classify messages by their source and topic (facility) and urgency (priority), and then assign an action that should be performed when a message fits these criteria.
In /etc/rsyslog.conf, you can also see a list of log files maintained by rsyslogd. Most log files are located in the /var/log/ directory. Some applications, such as httpd and samba, store their log files in a subdirectory within /var/log/.
Additional resources
- The rsyslogd(8) and rsyslog.conf(5) man pages. Documentation installed with the rsyslog-doc package in the /usr/share/doc/rsyslog/html/index.html file.
35.2. Installing Rsyslog documentation
The Rsyslog application has extensive online documentation that is available https://www.rsyslog.com/doc/, but you can also install the rsyslog-doc documentation package locally.
Prerequisites
- You have activated the AppStream repository on your system. You are authorized to install new packages using sudo.
Procedure
Install the rsyslog-doc package:
# yum install rsyslog-docVerification
Open the /usr/share/doc/rsyslog/html/index.html file in a browser of your choice, for example:
$ firefox /usr/share/doc/rsyslog/html/index.html &35.3. Configuring a server for remote logging over TCP
The Rsyslog application enables you to both run a logging server and configure individual systems to send their log files to the logging server. To use remote logging through TCP, configure both the server and the client. The server collects and analyzes the logs sent by one or more client systems.
With the Rsyslog application, you can maintain a centralized logging system where log messages are forwarded to a server over the network. To avoid message loss when the server is not available, you can configure an action queue for the forwarding action. This way, messages that failed to be sent are stored locally until the server is reachable again. Note that such queues cannot be configured for connections using the UDP protocol.
The omfwd plug-in provides forwarding over UDP or TCP. The default protocol is UDP. Because the plug-in is built in, it does not have to be loaded.
By default, rsyslog uses TCP on port 514.
Prerequisites
- Rsyslog is
installed on the server system. You are logged in as root on the server. The policycoreutils-python-utils package is installed for the optional step using the semanage command. The firewalld service is running.
Procedure
Optional: To use a different port for rsyslog traffic, add the syslogd_port_t SELinux type to port. For example, enable port 30514:
# semanage port -a -t syslogd_port_t -p tcp 30514Optional: To use a different port for rsyslog traffic, configure firewalld to allow incoming rsyslog traffic on that port. For example, allow TCP traffic on port 30514:
# firewall-cmd --zone=Create a new file in the /etc/rsyslog.d/ directory named, for example, remotelog.conf, and insert the following content:
# Define templates before the rules that use them # Per-Host templates for remote systems template(name="TmplAuthpriv" type="list") constant(value="/var/log/remote/auth/") property(name="hostname") constant(value="https://cunghoidap.com/") property(name="programname" SecurePath="replace") constant(value=".log") template(name="TmplMsg" type="list") constant(value="/var/log/remote/msg/") property(name="hostname") constant(value="https://cunghoidap.com/") property(name="programname" SecurePath="replace") constant(value=".log") # Provides TCP syslog reception module(load="imtcp") # Adding this ruleset to process remote messages ruleset(name="remote1") authpriv.* action(type="omfile" DynaFile="TmplAuthpriv") *.info;mail.none;authpriv.none;cron.none action(type="omfile" DynaFile="TmplMsg") input(type="imtcp" port="30514" ruleset="remote1") Save the changes to the /etc/rsyslog.d/remotelog.conf file.Test the syntax of the /etc/rsyslog.conf file:
# rsyslogd -N 1 rsyslogd: version 8.1911.0-2.el8, config validation run (level 1), master config /etc/rsyslog.conf rsyslogd: End of config validation run. Bye.Make sure the rsyslog service is running and enabled on the logging server:
# systemctl status rsyslogRestart the rsyslog service.
# systemctl restart rsyslogOptional: If rsyslog is not enabled, ensure the rsyslog service starts automatically after reboot:
# systemctl enable rsyslogYour log server is now configured to receive and store log files from the other systems in your environment.
Additional resources
- rsyslogd(8), rsyslog.conf(5), semanage(8), and firewall-cmd(1) man pages. Documentation installed with the rsyslog-doc package in the /usr/share/doc/rsyslog/html/index.html
file.
35.4. Configuring remote logging to a server over TCP
Follow this procedure to configure a system for forwarding log messages to a server over the TCP protocol. The omfwd plug-in provides forwarding over UDP or TCP. The default protocol is UDP. Because the plug-in is built in, you do not have to load it.
Prerequisites
- The rsyslog package is installed on the client systems that should report to the server. You have configured the server for remote logging. The specified port is permitted in SELinux and open in firewall. The system contains the policycoreutils-python-utils package, which provides the semanage command for adding a non-standard port to the SELinux configuration.
Procedure
Create a new file in the /etc/rsyslog.d/ directory named, for example, 10-remotelog.conf, and insert the following content:
*.* action(type="omfwd" queue.type="linkedlist" queue.filename="example_fwd" action.resumeRetryCount="-1" queue.saveOnShutdown="on" target="example.com" port="30514" protocol="tcp" )Where:
- queue.type="linkedlist" enables a LinkedList in-memory queue, queue.filename defines a disk storage. The backup files are created with the example_fwd prefix in the working directory specified by the preceding global workDirectory directive, the action.resumeRetryCount -1 setting prevents rsyslog from dropping messages when retrying to connect if
server is not responding, enabled queue.saveOnShutdown="on" saves in-memory data if rsyslog shuts down,
the last line forwards all received messages to the logging server, port specification is optional.
With this configuration, rsyslog sends messages to the server but keeps messages in memory if the remote server is not reachable. A file on disk is created only if rsyslog runs out of the configured memory queue space or needs to shut down, which benefits the system performance.
Rsyslog processes configuration files /etc/rsyslog.d/ in the lexical order.
Restart the rsyslog service.
# systemctl restart rsyslogVerification
To verify that the client system sends messages to the server, follow these steps:
On the client system, send a test message:
# logger testOn the server system, view the /var/log/messages log, for example:
# cat /var/log/remote/msg/hostname/root.log Feb 25 03:53:17 hostname root[6064]: testWhere hostname is the host name of the client system. Note that the log contains the user name of the user that entered the logger command, in this case root.
Additional resources
- rsyslogd(8) and rsyslog.conf(5) man pages. Documentation installed with the rsyslog-doc package in the /usr/share/doc/rsyslog/html/index.html file.
35.5. Configuring TLS-encrypted remote logging
By default, Rsyslog sends remote-logging communication in the plain text format. If your scenario requires to secure this communication channel, you can encrypt it using TLS.
To use encrypted transport through TLS, configure both the server and the client. The server collects and analyzes the logs sent by one or more client systems.
You can use either the ossl network stream driver (OpenSSL) or the gtls stream driver (GnuTLS).
If you have a separate system with higher security, for example, a system that is not connected to any network or has stricter authorizations, use the separate system as the certifying authority (CA).
Prerequisites
- You have root access to both the client and server systems.
The rsyslog and rsyslog-openssl packages are installed on the server and the client systems. If you use the gtls network stream driver, install the rsyslog-gnutls package instead of rsyslog-openssl. If you generate certificates using the certtool command, install the gnutls-utils package.
On your logging server, the following certificates are in the /etc/pki/ca-trust/source/anchors/ directory and your system configuration is updated by using the update-ca-trust command:
-
ca-cert.pem - a CA certificate that can verify keys and certificates on logging servers and clients. server-cert.pem - a public key of the logging server. server-key.pem - a private key of the logging server.
On your logging clients, the following certificates are in the /etc/pki/ca-trust/source/anchors/ directory and your system configuration is updated by using update-ca-trust:
- ca-cert.pem - a CA certificate that can verify keys and certificates on
logging servers and clients. client-cert.pem - a public key of a client. client-key.pem - a private key of a client.
Procedure
Configure the server for receiving encrypted logs from your client systems:
Create a new file in the /etc/rsyslog.d/ directory named, for example, securelogser.conf.To encrypt the communication, the configuration file must contain paths to certificate files on your server, a selected authentication method, and a stream driver that supports TLS encryption. Add the following lines to the /etc/rsyslog.d/securelogser.conf file:
# Set certificate files global( DefaultNetstreamDriverCAFile="/etc/pki/ca-trust/source/anchors/ca-cert.pem" DefaultNetstreamDriverCertFile="/etc/pki/ca-trust/source/anchors/server-cert.pem" DefaultNetstreamDriverKeyFile="/etc/pki/ca-trust/source/anchors/server-key.pem" ) # TCP listener module( load="imtcp" PermittedPeer=["client1.example.com", "client2.example.com"] StreamDriver.AuthMode="x509/name" StreamDriver.Mode="1" StreamDriver.Name="ossl" ) # Start up listener port 514 input( type="imtcp" port="514" )If you prefer the GnuTLS driver, use the StreamDriver.Name="gtls" configuration option. See the documentation installed with the rsyslog-doc package for more information about less strict authentication modes than x509/name.
Save the changes to the /etc/rsyslog.d/securelogser.conf file.Verify the syntax of the /etc/rsyslog.conf file and any files in the /etc/rsyslog.d/ directory:
# rsyslogd -N 1 rsyslogd: version 8.1911.0-2.el8, config validation run (level 1), master config /etc/rsyslog.conf rsyslogd: End of config validation run. Bye.Make sure the rsyslog service is running and enabled on the logging server:
# systemctl status rsyslogRestart the rsyslog service:
# systemctl restart rsyslogOptional: If Rsyslog is not enabled, ensure the rsyslog service starts automatically after reboot:
# systemctl enable rsyslogConfigure clients for sending encrypted logs to the server:
On a client system, create a new file in the /etc/rsyslog.d/ directory named, for example, securelogcli.conf.Add the following lines to the /etc/rsyslog.d/securelogcli.conf file:
# Set certificate files global( DefaultNetstreamDriverCAFile="/etc/pki/ca-trust/source/anchors/ca-cert.pem" DefaultNetstreamDriverCertFile="/etc/pki/ca-trust/source/anchors/client-cert.pem" DefaultNetstreamDriverKeyFile="/etc/pki/ca-trust/source/anchors/client-key.pem" ) # Set up the action for all messages *.* action( type="omfwd" StreamDriver="ossl" StreamDriverMode="1" StreamDriverPermittedPeers="server.example.com" StreamDriverAuthMode="x509/name" target="server.example.com" port="514" protocol="tcp" )If you prefer the GnuTLS driver, use the StreamDriver.Name="gtls" configuration option.
Save the changes to the /etc/rsyslog.d/securelogser.conf file.Verify the syntax of the `/etc/rsyslog.conf file and other files in the /etc/rsyslog.d/ directory:
# rsyslogd -N 1 rsyslogd: version 8.1911.0-2.el8, config validation run (level 1), master config /etc/rsyslog.conf rsyslogd: End of config validation run. Bye.Make sure the rsyslog service is running and enabled on the logging server:
# systemctl status rsyslogRestart the rsyslog service:
# systemctl restart rsyslogOptional: If Rsyslog is not enabled, ensure the rsyslog service starts automatically after reboot:
# systemctl enable rsyslogVerification
To verify that the client system sends messages to the server, follow these steps:
On the client system, send a test message:
# logger testOn the server system, view the /var/log/messages log, for example:
# cat /var/log/remote/msg/hostname/root.log Feb 25 03:53:17 hostname root[6064]: testWhere hostname is the host name of the client system. Note that the log contains the user name of the user that entered the logger command, in this case root.
Additional resources
- The certtool(1), openssl(1), update-ca-trust(8), rsyslogd(8), and rsyslog.conf(5) man pages. Documentation installed with the rsyslog-doc package /usr/share/doc/rsyslog/html/index.html. The
Using the Logging System Role article.
35.6. Configuring a server for receiving remote logging information over UDP
The Rsyslog application enables you to configure a system to receive logging information from remote systems. To use remote logging through UDP, configure both the server and the client. The receiving server collects and analyzes the logs sent by one or more client systems. By default, rsyslog uses UDP on port 514 to receive log information from remote systems.
Follow this procedure to configure a server for collecting and analyzing logs sent by one or more client systems over the UDP protocol.
Prerequisites
- Rsyslog is installed on the server system. You are logged in as root on the server. The policycoreutils-python-utils package is installed for the optional step using the semanage command. The firewalld service is running.
Procedure
Optional: To use a different port for rsyslog traffic than the default port 514:
Add the syslogd_port_t SELinux type to the SELinux policy configuration, replacing portno with the port number you want rsyslog to use:
# semanage port -a -t syslogd_port_t -p udp portnoConfigure firewalld to allow incoming rsyslog traffic, replacing portno with the port number and zone with the zone you want rsyslog to use:
# firewall-cmd --zone=zone --permanent --add-port=portno/udp success # firewall-cmd --reloadReload the firewall rules:
# firewall-cmd --reloadCreate a new .conf file in the /etc/rsyslog.d/ directory, for example, remotelogserv.conf, and insert the following content:
# Define templates before the rules that use them # Per-Host templates for remote systems template(name="TmplAuthpriv" type="list") constant(value="/var/log/remote/auth/") property(name="hostname") constant(value="https://cunghoidap.com/") property(name="programname" SecurePath="replace") constant(value=".log") template(name="TmplMsg" type="list") constant(value="/var/log/remote/msg/") property(name="hostname") constant(value="https://cunghoidap.com/") property(name="programname" SecurePath="replace") constant(value=".log") # Provides UDP syslog reception module(load="imudp") # This ruleset processes remote messages ruleset(name="remote1") authpriv.* action(type="omfile" DynaFile="TmplAuthpriv") *.info;mail.none;authpriv.none;cron.none action(type="omfile" DynaFile="TmplMsg") input(type="imudp" port="514" ruleset="remote1")Where 514 is the port number rsyslog uses by default. You can specify a different port instead.
Verify the syntax of the /etc/rsyslog.conf file and all .conf files in the /etc/rsyslog.d/ directory:
# rsyslogd -N 1 rsyslogd: version 8.1911.0-2.el8, config validation run (level 1), master config /etc/rsyslog.conf rsyslogd: End of config validation run. Bye.Restart the rsyslog service.
# systemctl restart rsyslogOptional: If rsyslog is not enabled, ensure the rsyslog service starts automatically after reboot:
# systemctl enable rsyslogAdditional resources
- rsyslogd(8) , rsyslog.conf(5), semanage(8), and firewall-cmd(1) man pages. Documentation installed with the rsyslog-doc package in the /usr/share/doc/rsyslog/html/index.html file.
35.7. Configuring remote logging to a server over UDP
Follow this procedure to configure a system for forwarding log messages to a server over the UDP protocol. The omfwd plug-in provides forwarding over UDP or TCP. The default protocol is UDP. Because the plug-in is built in, you do not have to load it.
Prerequisites
- The rsyslog package is installed on the client systems that should report to the server. You have configured the server for remote logging as described in Configuring a server for receiving remote logging information over UDP.
Procedure
Create a new .conf file in the /etc/rsyslog.d/ directory, for example, 10-remotelogcli.conf, and insert the following content:
*.* action(type="omfwd" queue.type="linkedlist" queue.filename="example_fwd" action.resumeRetryCount="-1" queue.saveOnShutdown="on" target="example.com" port="portno" protocol="udp" )Where:
- queue.type="linkedlist" enables a LinkedList in-memory queue. queue.filename defines a disk storage. The backup files are created with the example_fwd prefix in the working directory specified by the preceding global workDirectory directive. The action.resumeRetryCount -1 setting prevents rsyslog from dropping messages when retrying to connect if the server is not
responding. enabled queue.saveOnShutdown="on" saves in-memory data if rsyslog shuts down. portno is the port number you want rsyslog to use. The default value is 514.
The last line forwards all received messages to the logging server, port specification is optional.
With this configuration, rsyslog sends messages to the server but keeps messages in memory if the remote server is not reachable. A file on disk is created only if rsyslog runs out of the configured memory queue space or needs to shut down, which benefits the system performance.
Rsyslog processes configuration files /etc/rsyslog.d/ in the lexical order.
Restart the rsyslog service.
# systemctl restart rsyslogOptional: If rsyslog is not enabled, ensure the rsyslog service starts automatically after reboot:
# systemctl enable rsyslogVerification
To verify that the client system sends messages to the server, follow these steps:
On the client system, send a test message:
# logger testOn the server system, view the /var/log/remote/msg/hostname/root.log log, for example:
# cat /var/log/remote/msg/hostname/root.log Feb 25 03:53:17 hostname root[6064]: testWhere hostname is the host name of the client system. Note that the log contains the user name of the user that entered the logger command, in this case root.
Additional resources
- rsyslogd(8) and rsyslog.conf(5) man pages. Documentation
installed with the rsyslog-doc package /usr/share/doc/rsyslog/html/index.html.
35.8. Load balancing helper in Rsyslog
The RebindInterval setting specifies an interval which the current connection is broken and is re-established. This setting applies to TCP, UDP, and RELP traffic. The load balancers perceive it as a new connection and forward the messages to another physical target system.
The RebindInterval setting proves to be helpful in scenarios when a target system has changed its IP address. The Rsyslog application caches the IP address when the connection establishes, therefore, the messages are sent to the same server. If the IP address changes, the UDP packets will be lost until the Rsyslog service restarts. Re-establishing the connection will ensure the IP to be resolved by DNS again.
action(type=”omfwd” protocol=”tcp” RebindInterval=”250” target=”example.com” port=”514” …) action(type=”omfwd” protocol=”udp” RebindInterval=”250” target=”example.com” port=”514” …) action(type=”omrelp” RebindInterval=”250” target=”example.com” port=”6514” …)35.9. Configuring reliable remote logging
With the Reliable Event Logging Protocol (RELP), you can send and receive syslog messages over TCP with a much reduced risk of message loss. RELP provides reliable delivery of sự kiện messages, which makes it useful in environments where message loss is not acceptable. To use RELP, configure the imrelp input module, which runs on the server and receives the logs, and the omrelp output module, which runs on the client and sends logs to the logging server.
Prerequisites
- You have installed the rsyslog, librelp, and rsyslog-relp packages on the server and the client systems. The specified port is permitted in SELinux and open in the firewall.
Procedure
Configure the client system for reliable remote logging:
On the client system, create a new .conf file in the /etc/rsyslog.d/ directory named, for example, relpclient.conf, and insert the following content:
module(load="omrelp") *.* action(type="omrelp" target="_target_IP_" port="_target_port_")Where:
- target_IP is the IP address of the logging server. target_port is the port of the logging server.
Restart the rsyslog service.
# systemctl restart rsyslogOptional: If rsyslog is not enabled, ensure the rsyslog service starts automatically after reboot:
# systemctl enable rsyslogConfigure the server system for reliable remote logging:
On the server system, create a new .conf file in the /etc/rsyslog.d/ directory named, for example, relpserv.conf, and insert the following content:
ruleset(name="relp") *.* action(type="omfile" file="_log_path_") module(load="imrelp") input(type="imrelp" port="_target_port_" ruleset="relp")Where:
- log_path specifies the path for storing messages. target_port is the port
of the logging server. Use the same value as in the client configuration file.
Restart the rsyslog service.
# systemctl restart rsyslogOptional: If rsyslog is not enabled, ensure the rsyslog service starts automatically after reboot:
# systemctl enable rsyslogVerification
To verify that the client system sends messages to the server, follow these steps:
On the client system, send a test message:
# logger testOn the server system, view the log the specified log_path, for example:
# cat /var/log/remote/msg/hostname/root.log Feb 25 03:53:17 hostname root[6064]: testWhere hostname is the host name of the client system. Note that the log contains the user name of the user that entered the logger command, in this case root.
Additional resources
- rsyslogd(8) and rsyslog.conf(5) man pages. Documentation installed
with the rsyslog-doc package in the /usr/share/doc/rsyslog/html/index.html file.
35.10. Supported Rsyslog modules
To expand the functionality of the Rsyslog application, you can use specific modules. Modules provide additional inputs (Input Modules), outputs (Output Modules), and other functionalities. A module can also provide additional configuration directives that become available after you load the module.
You can list the input and output modules installed on your system by entering the following command:
# ls /usr/lib64/rsyslog/i,om*You can view the list of all available rsyslog modules in the /usr/share/doc/rsyslog/html/configuration/modules/idx_output.html file after you install the rsyslog-doc package.
35.11. Additional resources
- Documentation installed with the rsyslog-doc package file:///usr/share/doc/rsyslog/html/index.html. The
rsyslog.conf(5) and rsyslogd(8) man pages. The Configuring system logging without journald or with minimized journald usage Knowledgebase article. The Negative effects of the RHEL default logging setup on performance and their mitigations article. The
Using the Logging System Role article.
Chapter 36. Using the Logging System Role
As a system administrator, you can use the Logging System Role to configure a RHEL host as a logging server to collect logs from many client systems.
36.1. The Logging System Role
With the Logging System Role, you can deploy logging configurations on local and remote hosts.
To apply a Logging System Role on one or more systems, you define the logging configuration in a playbook. A playbook is a list of one or more plays. Playbooks are human-readable, and they are written in the YAML format. For more information about playbooks, see Working with playbooks in Ansible documentation.
The set of systems that you want to configure according to the playbook is defined in an inventory file. For more information on creating and using inventories, see How to build your inventory in Ansible documentation.
Logging solutions provide multiple ways of reading logs and multiple logging outputs.
For example, a logging system can receive the following inputs:
- local files, systemd/journal, another logging system over
the network.
In addition, a logging system can have the following outputs:
- logs stored in the local files in the /var/log directory, logs sent to Elasticsearch, logs forwarded to another logging system.
With the Logging System Role, you can combine the inputs and outputs to fit your scenario. For example, you can configure a logging solution that stores inputs from journal in a local file, whereas inputs read from files are both forwarded to another logging system and stored in the local log files.
36.2. Logging System Role parameters
In a Logging System Role playbook, you define the inputs in the logging_inputs parameter, outputs in the logging_outputs parameter, and the relationships between the inputs and outputs in the logging_flows parameter. The Logging System Role processes these variables with additional options to configure the logging system. You can also enable encryption.
Currently, the only available logging system in the Logging System Role is Rsyslog.
logging_inputs: List of inputs for the logging solution.
- name: Unique name of the input. Used in the logging_flows: inputs list and a part of the generated config file name.
type: Type of the input element. The type specifies a task type which corresponds to a directory name in roles/rsyslog/tasks,vars/inputs/.
basics: Inputs configuring inputs from systemd journal or unix socket.
- kernel_message: Load imklog if set to true. Default to false. use_imuxsock: Use imuxsock instead of imjournal. Default to false. ratelimit_burst: Maximum number of messages that can be emitted within ratelimit_interval.
Default to 20000 if use_imuxsock is false. Default to 200 if use_imuxsock is true. ratelimit_interval: Interval to evaluate ratelimit_burst. Default to 600 seconds if use_imuxsock is false. Default to 0 if use_imuxsock is true. 0 indicates rate limiting is turned off. persist_state_interval: Journal state is persisted every value messages. Default to 10. Effective only when use_imuxsock is false.
logging_outputs: List of outputs for the logging solution.
- files: Outputs configuring outputs to local files. forwards: Outputs configuring outputs to another logging system. remote_files: Outputs configuring outputs from another logging system to
local files.
logging_flows: List of flows that define relationships between logging_inputs and logging_outputs. The logging_flows variable has the following keys:
- name: Unique name of the flow inputs: List of logging_inputs name values outputs: List of logging_outputs name values.
Additional resources
- Documentation installed with the rhel-system-roles package in /usr/share/ansible/roles/rhel-system-roles.logging/README.html
36.3. Applying a local Logging System Role
Follow these steps to prepare and apply an Ansible playbook to configure a logging solution on a set of separate machines. Each machine will record logs locally.
Prerequisites
- Access and permissions to one or more managed
nodes, which are systems you want to configure with the Logging System Role.
Access and permissions to a control node, which is a system from which Red Hat Ansible Core configures other systems.
On the control node:
- The ansible-core and rhel-system-roles packages are installed.
RHEL 8.0-8.5 provided access to a separate Ansible repository that contains Ansible Engine 2.9 for automation based on Ansible. Ansible Engine contains command-line utilities such as ansible, ansible-playbook, connectors such as docker and podman, and many plugins and modules. For information on how to obtain and install Ansible Engine, see the How to tải về and install Red Hat Ansible Engine Knowledgebase article.
RHEL 8.6 and 9.0 have introduced Ansible Core (provided as the ansible-core package), which contains the Ansible command-line utilities, commands, and a small set of built-in Ansible plugins. RHEL provides this package through the AppStream repository, and it has a limited scope of support. For more information, see the Scope of support for the Ansible Core package included in the RHEL 9 and RHEL 8.6 and later AppStream repositories Knowledgebase article.
- An inventory file which lists the
managed nodes.
You do not have to have the rsyslog package installed, because the system role installs rsyslog when deployed.
Procedure
Create a playbook that defines the required role:
Create a new YAML file and open it in a text editor, for example:
# vi logging-playbook.ymlInsert the following content:
--- - name: Deploying basics input and implicit files output hosts: all roles: - rhel-system-roles.logging vars: logging_inputs: - name: system_input type: basics logging_outputs: - name: files_output type: files logging_flows: - name: flow1 inputs: [system_input] outputs: [files_output]Run the playbook on a specific inventory:
# ansible-playbook -i inventory-file /path/to/file/logging-playbook.ymlWhere:
- inventory-file is the inventory file. logging-playbook.yml is the playbook you use.
Verification
Test the syntax of the /etc/rsyslog.conf file:
# rsyslogd -N 1 rsyslogd: version 8.1911.0-6.el8, config validation run (level 1), master config /etc/rsyslog.conf rsyslogd: End of config validation run. Bye.Verify that the system sends messages to the log:
Send a test message:
# logger testView the /var/log/messages log, for example:
# cat /var/log/messages Aug 5 13:48:31 hostname root[6778]: testWhere `hostname` is the host name of the client system. Note that the log contains the user name of the user that entered the logger command, in this case root.
36.4. Filtering logs in a local Logging System Role
You can deploy a logging solution which filters the logs based on the rsyslog property-based filter.
Prerequisites
- Access and permissions to one or more managed nodes, which are systems you want to configure with the Logging System Role.
Access and permissions to a control node, which is a system from which Red Hat Ansible Core configures other systems.
On the control node:
- Red Hat Ansible Core is
installed The rhel-system-roles package is installed An inventory file which lists the managed nodes.
You do not have to have the rsyslog package installed, because the System Role installs rsyslog when deployed.
Procedure
Create a new playbook.yml file with the following content:
--- - name: Deploying files input and configured files output hosts: all roles: - linux-system-roles.logging vars: logging_inputs: - name: files_input type: basics logging_outputs: - name: files_output0 type: files property: msg property_op: contains property_value: error path: /var/log/errors.log - name: files_output1 type: files property: msg property_op: "!contains" property_value: error path: /var/log/others.log logging_flows: - name: flow0 inputs: [files_input] outputs: [files_output0, files_output1]Using this configuration, all messages that contain the error string are logged in /var/log/errors.log, and all other messages are logged in /var/log/others.log.
You can replace the error property value with the string by which you want to filter.
You can modify the variables according to your preferences.
Optional: Verify playbook syntax.
# ansible-playbook --syntax-check playbook.ymlRun the playbook on your inventory file:
# ansible-playbook -i inventory_file /path/to/file/playbook.ymlVerification
Test the syntax of the /etc/rsyslog.conf file:
# rsyslogd -N 1 rsyslogd: version 8.1911.0-6.el8, config validation run (level 1), master config /etc/rsyslog.conf rsyslogd: End of config validation run. Bye.Verify that the system sends messages that contain the error string to the log:
Send a test message:
# logger errorView the /var/log/errors.log log, for example:
# cat /var/log/errors.log Aug 5 13:48:31 hostname root[6778]: errorWhere hostname is the host name of the client system. Note that the log contains the user name of the user that entered the logger command, in this case root.
Additional resources
-
Documentation installed with the rhel-system-roles package in /usr/share/ansible/roles/rhel-system-roles.logging/README.html
36.5. Applying a remote logging solution using the Logging System Role
Follow these steps to prepare and apply a Red Hat Ansible Core playbook to configure a remote logging solution. In this playbook, one or more clients take logs from systemd-journal and forward them to a remote server. The server receives remote input from remote_rsyslog and remote_files and outputs the logs to local files in directories named by remote host names.
Prerequisites
- Access and permissions to one or more managed nodes, which are systems you want to configure with the Logging System Role.
Access and permissions to a control node, which is a system from which Red Hat Ansible Core configures other systems.
On the control node:
- The ansible-core and rhel-system-roles packages are installed. An inventory file which lists the managed nodes.
You do not have to have the rsyslog package installed, because the System Role installs rsyslog when deployed.
Procedure
Create a playbook that defines the required role:
Create a new YAML file and open it in a text editor, for example:
# vi logging-playbook.ymlInsert the following content into the file:
--- - name: Deploying remote input and remote_files output hosts: server roles: - rhel-system-roles.logging vars: logging_inputs: - name: remote_udp_input type: remote udp_ports: [ 601 ] - name: remote_tcp_input type: remote tcp_ports: [ 601 ] logging_outputs: - name: remote_files_output type: remote_files logging_flows: - name: flow_0 inputs: [remote_udp_input, remote_tcp_input] outputs: [remote_files_output] - name: Deploying basics input and forwards output hosts: clients roles: - rhel-system-roles.logging vars: logging_inputs: - name: basic_input type: basics logging_outputs: - name: forward_output0 type: forwards severity: info target: _host1.example.com_ udp_port: 601 - name: forward_output1 type: forwards facility: mail target: _host1.example.com_ tcp_port: 601 logging_flows: - name: flows0 inputs: [basic_input] outputs: [forward_output0, forward_output1] [basic_input] [forward_output0, forward_output1]Where host1.example.com is the logging server.
You can modify the parameters in the playbook to fit your needs.
The logging solution works only with the ports defined in the SELinux policy of the server or client system and open in the firewall. The default SELinux policy includes ports 601, 514, 6514, 10514, and 20514. To use a different port, modify the SELinux policy on the client and server systems. Configuring the firewall through System Roles is not yet supported.
Create an inventory file that lists your servers and clients:
Create a new file and open it in a text editor, for example:
# vi inventory.iniInsert the following content into the inventory file:
[servers] server ansible_host=host1.example.com [clients] client ansible_host=host2.example.comWhere:
- host1.example.com is the logging server. host2.example.com is the logging client.
Run the playbook on your inventory.
# ansible-playbook -i /path/to/file/inventory.ini /path/to/file/_logging-playbook.ymlWhere:
- inventory.ini is the inventory file. logging-playbook.yml is the playbook you created.
Verification
On both the client and the server system, test the syntax of the /etc/rsyslog.conf file:
# rsyslogd -N 1 rsyslogd: version 8.1911.0-6.el8, config validation run (level 1), master config /etc/rsyslog.conf rsyslogd: End of config validation run. Bye.Verify that the client system sends messages to the server:
On the client system, send a test message:
# logger testOn the server system, view the /var/log/messages log, for example:
# cat /var/log/messages Aug 5 13:48:31 host2.example.com root[6778]: testWhere host2.example.com is the host name of the client system. Note that the log contains the user name of the user that entered the logger command, in this case root.
Additional resources
-
Getting started with RHEL System Roles Documentation installed with the rhel-system-roles package in /usr/share/ansible/roles/rhel-system-roles.logging/README.html RHEL System Roles KB article
36.6. Using the Logging System Role with TLS
Transport Layer Security (TLS) is a cryptographic protocol designed to securely communicate over the computer network.
As an administrator, you can use the Logging RHEL System Role to configure secure transfer of logs using Red Hat Ansible Automation Platform.
36.6.1. Configuring client logging with TLS
You can use the Logging System Role to configure logging in RHEL systems that are logged on a local machine and can transfer logs to the remote logging system with TLS by running an Ansible playbook.
This procedure configures TLS on all hosts in the clients group in the Ansible inventory. The TLS protocol encrypts the message transmission for secure transfer of logs over the network.
Prerequisites
- You have permissions to run playbooks on managed nodes on which you want to configure TLS. The managed nodes are listed in the inventory file on the control node. The ansible and rhel-system-roles packages are installed on the control node.
Procedure
Create a playbook.yml file with the following content:
--- - name: Deploying files input and forwards output with certs hosts: clients roles: - rhel-system-roles.logging vars: logging_pki_files: - ca_cert_src: /local/path/to/ca_cert.pem cert_src: /local/path/to/cert.pem private_key_src: /local/path/to/key.pem logging_inputs: - name: input_name type: files input_log_path: /var/log/containers/*.log logging_outputs: - name: output_name type: forwards target: your_target_host tcp_port: 514 tls: true pki_authmode: x509/name permitted_server: 'server.example.com' logging_flows: - name: flow_name inputs: [input_name] outputs: [output_name]The playbook uses the following parameters:
logging_pki_files Using this parameter you can configure TLS and has to pass ca_cert_src, cert_src, and private_key_src parameters. ca_cert Represents the path to CA certificate. Default path is /etc/pki/tls/certs/ca.pem and the file name is set by the user. cert Represents the path to cert. Default path is /etc/pki/tls/certs/server-cert.pem and the file name is set by the user. private_key Represents the path to private key. Default path is /etc/pki/tls/private/server-key.pem and the file name is set by the user. ca_cert_src Represents local CA cert file path which is copied to the target host. If ca_cert is specified, it is copied to the location. cert_src Represents the local cert file path which is copied to the target host. If cert is specified, it is copied to the location. private_key_src Represents the local key file path which is copied to the target host. If private_key is specified, it is copied to the location. tls Using this parameter ensures secure transfer of logs over the network. If you do not want a secure wrapper, you can set tls: true.
Verify playbook syntax:
# ansible-playbook --syntax-check playbook.ymlRun the playbook on your inventory file:
# ansible-playbook -i inventory_file playbook.yml36.6.2. Configuring server logging with TLS
You can use the Logging System Role to configure logging in RHEL systems as a server and can receive logs from the remote logging system with TLS by running an Ansible playbook.
This procedure configures TLS on all hosts in the server group in the Ansible inventory.
Prerequisites
- You have permissions to run playbooks on managed nodes on which you want to configure TLS. The managed nodes are listed in the inventory file on the control node. The ansible and rhel-system-roles packages are installed on the control node.
Procedure
Create a playbook.yml file with the following content:
--- - name: Deploying remote input and remote_files output with certs hosts: server roles: - rhel-system-roles.logging vars: logging_pki_files: - ca_cert_src: /local/path/to/ca_cert.pem cert_src: /local/path/to/cert.pem private_key_src: /local/path/to/key.pem logging_inputs: - name: input_name type: remote tcp_ports: 514 tls: true permitted_clients: ['clients.example.com'] logging_outputs: - name: output_name type: remote_files remote_log_path: /var/log/remote/%FROMHOST%/%PROGRAMNAME:::secpath-replace%.log async_writing: true client_count: 20 io_buffer_size: 8192 logging_flows: - name: flow_name inputs: [input_name] outputs: [output_name]The playbook uses the following parameters:
logging_pki_files Using this parameter you can configure TLS and has to pass ca_cert_src, cert_src, and private_key_src parameters. ca_cert Represents the path to CA certificate. Default path is /etc/pki/tls/certs/ca.pem and the file name is set by the user. cert Represents the path to cert. Default path is /etc/pki/tls/certs/server-cert.pem and the file name is set by the user. private_key Represents the path to private key. Default path is /etc/pki/tls/private/server-key.pem and the file name is set by the user. ca_cert_src Represents local CA cert file path which is copied to the target host. If ca_cert is specified, it is copied to the location. cert_src Represents the local cert file path which is copied to the target host. If cert is specified, it is copied to the location. private_key_src Represents the local key file path which is copied to the target host. If private_key is specified, it is copied to the location. tls Using this parameter ensures secure transfer of logs over the network. If you do not want a secure wrapper, you can set tls: true.
Verify playbook syntax:
# ansible-playbook --syntax-check playbook.ymlRun the playbook on your inventory file:
# ansible-playbook -i inventory_file playbook.yml36.7. Using the Logging System Roles with RELP
Reliable Event Logging Protocol (RELP) is a networking protocol for data and message logging over the TCP network. It ensures reliable delivery of sự kiện messages and you can use it in environments that do not tolerate any message loss.
The RELP sender transfers log entries in form of commands and the receiver acknowledges them once they are processed. To ensure consistency, RELP stores the transaction number to each transferred command for any kind of message recovery.
You can consider a remote logging system in between the RELP Client and RELP Server. The RELP Client transfers the logs to the remote logging system and the RELP Server receives all the logs sent by the remote logging system.
Administrators can use the Logging System Role to configure the logging system to reliably send and receive log entries.
36.7.1. Configuring client logging with RELP
You can use the Logging System Role to configure logging in RHEL systems that are logged on a local machine and can transfer logs to the remote logging system with RELP by running an Ansible playbook.
This procedure configures RELP on all hosts in the clients group in the Ansible inventory. The RELP configuration uses Transport Layer Security (TLS) to encrypt the message transmission for secure transfer of logs over the network.
Prerequisites
- You have permissions to run playbooks on managed nodes on which you want to configure RELP. The managed nodes are listed in the inventory file on the control node. The ansible and rhel-system-roles packages are installed on the control node.
Procedure
Create a playbook.yml file with the following content:
--- - name: Deploying basic input and relp output hosts: clients roles: - rhel-system-roles.logging vars: logging_inputs: - name: basic_input type: basics logging_outputs: - name: relp_client type: relp target: _logging.server.com_ port: 20514 tls: true ca_cert: _/etc/pki/tls/certs/ca.pem_ cert: _/etc/pki/tls/certs/client-cert.pem_ private_key: _/etc/pki/tls/private/client-key.pem_ pki_authmode: name permitted_servers: - '*.server.example.com' logging_flows: - name: _example_flow_ inputs: [basic_input] outputs: [relp_client]The playbooks uses following settings:
- target:
This is a required parameter that specifies the host name where the remote logging system is running. port: Port number the remote logging system is listening.
tls: Ensures secure transfer of logs over the network. If you do not want a secure wrapper you can set the tls variable to false. By default tls parameter is set to true while working with RELP and requires key/certificates and triplets ca_cert, cert, private_key and/or ca_cert_src, cert_src, private_key_src.
- If ca_cert_src, cert_src, private_key_src triplet is set, the default locations /etc/pki/tls/certs and /etc/pki/tls/private are used as the destination on the managed node to transfer files from control node. In this case, the file names are identical to the original ones in the triplet If ca_cert, cert, private_key triplet is set, files are expected to be on the default path before the logging configuration. If both the triplets are set, files are
transferred from local path from control node to specific path of the managed node.
Optional: Verify playbook syntax.
# ansible-playbook --syntax-check playbook.ymlRun the playbook:
# ansible-playbook -i inventory_file playbook.yml36.7.2. Configuring server logging with RELP
You can use the Logging System Role to configure logging in RHEL systems as a server and can receive logs from the remote logging system with RELP by running an Ansible playbook.
This procedure configures RELP on all hosts in the server group in the Ansible inventory. The RELP configuration uses TLS to encrypt the message transmission for secure transfer of logs over the network.
Prerequisites
- You have
permissions to run playbooks on managed nodes on which you want to configure RELP. The managed nodes are listed in the inventory file on the control node. The ansible and rhel-system-roles packages are installed on the control node.
Procedure
Create a playbook.yml file with the following content:
--- - name: Deploying remote input and remote_files output hosts: server roles: - rhel-system-roles.logging vars: logging_inputs: - name: relp_server type: relp port: 20514 tls: true ca_cert: _/etc/pki/tls/certs/ca.pem_ cert: _/etc/pki/tls/certs/server-cert.pem_ private_key: _/etc/pki/tls/private/server-key.pem_ pki_authmode: name permitted_clients: - '_*example.client.com_' logging_outputs: - name: _remote_files_output_ type: _remote_files_ logging_flows: - name: _example_flow_ inputs: _relp_server_ outputs: _remote_files_output_The playbooks uses following settings:
- port: Port number the remote logging
system is listening.
tls: Ensures secure transfer of logs over the network. If you do not want a secure wrapper you can set the tls variable to false. By default tls parameter is set to true while working with RELP and requires key/certificates and triplets ca_cert, cert, private_key and/or ca_cert_src, cert_src, private_key_src.
- If ca_cert_src, cert_src, private_key_src triplet is set, the default locations /etc/pki/tls/certs and /etc/pki/tls/private are used as the
destination on the managed node to transfer files from control node. In this case, the file names are identical to the original ones in the triplet If ca_cert, cert, private_key triplet is set, files are expected to be on the default path before the logging configuration. If both the triplets are set, files are transferred from local path from control node to specific path of the managed node.
Optional: Verify playbook syntax.
# ansible-playbook --syntax-check playbook.ymlRun the playbook:
# ansible-playbook -i inventory_file playbook.yml36.8. Additional resources
-
Getting started with RHEL System Roles Documentation installed with the rhel-system-roles package in /usr/share/ansible/roles/rhel-system-roles.logging/README.html. RHEL System Roles ansible-playbook(1) man page.
Chapter 37. Introduction to Python
Python is a high-level programming language that supports multiple programming paradigms, such as object-oriented, imperative, functional, and procedural paradigms. Python has dynamic semantics and can be used for general-purpose programming.
With Red Hat Enterprise Linux, many packages that are installed on the system, such as packages providing system tools, tools for data analysis, or web applications, are written in Python. To use these packages, you must have the python* packages installed.
37.1. Python versions
Two incompatible versions of Python are widely used, Python 2.x and Python 3.x. RHEL 8 provides the following versions of Python.
Table 37.1. Python versions in RHEL 8
VersionPackage to installCommand examplesAvailable sinceLife cycle
Python 3.6
python3
python3, pip3
RHEL 8.0
full RHEL 8
Python 2.7
python2
python2, pip2
RHEL 8.0
shorter
Python 3.8
python38
python3.8, pip3.8
RHEL 8.2
shorter
Python 3.9
python39
python3.9, pip3.9
RHEL 8.4
shorter
For details about the length of support, see Red Hat Enterprise Linux Life Cycle and Red Hat Enterprise Linux 8 Application Streams Life Cycle.
Each of the Python versions is distributed in a separate module and by design you can install multiple modules in parallel on the same system.
The python38 and python39 modules do not include the same bindings to system tools (RPM, DNF, SELinux, and others) that are provided for the python36 module. Therefore, use python36 in instances where the greatest compatibility with the base operating system or binary compatibility is necessary. In unique instances where system bindings are necessary together with later versions of various Python modules, use the python36 module in combination with third-party upstream Python modules installed through pip into Python’s venv or virtualenv environments.
Always specify the version of Python when installing it, invoking it, or otherwise interacting with it. For example, use python3 instead of python in package and command names. All Python-related commands should also include the version, for example, pip3, pip2, pip3.8, or pip3.9.
The unversioned python command (/usr/bin/python) is not available by default in RHEL 8. You can configure it using the alternatives command; for instructions, see Configuring the unversioned Python. Any manual changes to /usr/bin/python, except changes made using the alternatives command, might be overwritten upon an update.
As a system administrator, use Python 3 for the following reasons:
- Python 3 represents the main development direction of the Python project. Support for Python 2 in the upstream community ended in 2022. Popular Python libraries are discontinuing Python 2 support in upstream. Python 2 in Red Hat Enterprise Linux 8 will have a shorter life cycle and aims to facilitate a smoother transition to Python 3 for customers.
For developers, Python 3 has the following advantages over Python 2:
- Python 3 enables you to write expressive, maintainable, and correct code more easily. Code written in Python 3 will have greater longevity. Python 3 has new features, including asyncio, f-strings, advanced unpacking, keyword-only arguments, and chained exceptions.
However, legacy software might require /usr/bin/python to be configured to Python 2. For this reason, no default python package is distributed with Red Hat Enterprise Linux 8, and you can choose between using Python 2 and 3 as /usr/bin/python, as described in Configuring the unversioned Python.
System tools in Red Hat Enterprise Linux 8 use Python version 3.6 provided by the internal platform-python package. Red Hat advises customers to use the python36 package instead.
Chapter 38. Installing and using Python
In Red Hat Enterprise Linux 8, Python 3 is distributed in versions 3.6, 3.8, and 3.9, provided by the python36, python38, and python39 modules in the AppStream repository.
Using the unversioned python command to install or run Python does not work by default due to ambiguity. Always specify the version of Python, or configure the system default version by using the alternatives command.
38.1. Installing Python 3
By design, you can install RHEL 8 modules in parallel, including the python27, python36, python38, and python39 modules. Note that parallel installation is not supported for multiple streams within a single module.
You can install Python 3.8 and Python 3.9, including packages built for either version, in parallel with Python 3.6 on the same system, with the exception of the mod_wsgi module. Due to a limitation of the Apache HTTP Server, only one of the python3-mod_wsgi, python38-mod_wsgi, or python39-mod_wsgi packages can be installed on a system.
Procedure
To install Python 3.6 from the python36 module, use:
# yum install python3The python36:3.6 module stream is enabled automatically.
To install Python 3.8 from the python38 module, use:
# yum install python38The python38:3.8 module stream is enabled automatically.
To install Python 3.9 from the python39 module, use:
# yum install python39The python39:3.9 module stream is enabled automatically.
Verification steps
To verify the Python version installed on your system, use the --version option with the python command specific for your required version of Python.
For Python 3.6:
$ python3 --versionFor Python 3.8:
$ python3.8 --versionFor Python 3.9:
$ python3.9 --version38.2. Installing additional Python 3 packages
Packages with add-on modules for Python 3.6 generally use the python3- prefix, packages for Python 3.8 include the python38- prefix, and packages for Python 3.9 include the python39- prefix. Always include the prefix when installing additional Python packages, as shown in the examples below.
Procedure
To install the Requests module for Python 3.6, use:
# yum install python3-requestsTo install the Cython extension to Python 3.8, use:
# yum install python38-CythonTo install the pip package installer from Python 3.9, use:
# yum install python39-pip38.3. Installing additional Python 3 tools for developers
Additional Python tools for developers are distributed through the CodeReady Linux Builder repository in the respective python3x-devel module.
The python38-devel module contains the python38-pytest package and its dependencies: the pyparsing, atomicwrites, attrs, packaging, py, more-itertools, pluggy, and wcwidth packages.
The python39-devel module contains the python39-pytest package and its dependencies: the pyparsing, attrs, packaging, py, more-itertools, pluggy, wcwidth, iniconfig, and pybind11 packages. The python39-devel module also contains the python39-debug and python39-Cython packages.
The CodeReady Linux Builder repository and its content is unsupported by Red Hat.
To install packages from the python39-devel module, use the following the procedure.
Procedure
Enable the CodeReady Linux Builder repository:
# subscription-manager repos --enable codeready-builder-for-rhel-8-x86_64-rpmsEnable the python39-devel module:
# yum module enable python39-develInstall the python39-pytest package:
# yum install python39-pytestTo install packages from the python38-devel module, replace python39- with python38- in the commands above.
38.4. Installing Python 2
Some applications and scripts have not yet been fully ported to Python 3 and require Python 2 to run. Red Hat Enterprise Linux 8 allows parallel installation of Python 3 and Python 2. If you need the Python 2 functionality, install the python27 module, which is available in the AppStream repository.
Note that Python 3 is the main development direction of the Python project. Support for Python 2 is being phased out. The python27 module has a shorter support period than Red Hat Enterprise Linux 8.
Procedure
To install Python 2.7 from the python27 module, use:
# yum install python2The python27:2.7 module stream is enabled automatically.
Packages with add-on modules for Python 2 generally use the python2- prefix. Always include the prefix when installing additional Python packages, as shown in the examples below.
To install the Requests module for Python 2, use:
# yum install python2-requestsTo install the Cython extension to Python 2, use:
# yum install python2-CythonVerification steps
To verify the Python version installed on your system, use:
$ python2 --versionBy design, you can install RHEL 8 modules in parallel, including the python27, python36, python38, and python39 modules.
38.5. Migrating from Python 2 to Python 3
As a developer, you may want to migrate your former code that is written in Python 2 to Python 3.
For more information on how to migrate large code bases to Python 3, see The Conservative Python 3 Porting Guide.
Note that after this migration, the original Python 2 code becomes interpretable by the Python 3 interpreter and stays interpretable for the Python 2 interpreter as well.
38.6. Using Python
When running the Python interpreter or Python-related commands, always specify the version.
Prerequisites
- Ensure that the required version of Python is installed.
Procedure
To run the Python 3.6 interpreter or related commands, use, for example:
$ python3 $ python3 -m cython --help $ pip3 install packageTo run the Python 3.8 interpreter or related commands, use, for example:
$ python3.8 $ python3.8 -m cython --help $ pip3.8 install packageTo run the Python 3.9 interpreter or related commands, use, for example:
$ python3.9 $ python3.9 -m pip --help $ pip3.9 install packageTo run the Python 2 interpreter or related commands, use, for example:
$ python2 $ python2 -m cython --help $ pip2 install packageChapter 39. Configuring the unversioned Python
System administrators can configure the unversioned python command, located /usr/bin/python, using the alternatives command. Note that the required package, python3, python38, python39, or python2, must be installed before configuring the unversioned command to the respective version.
The /usr/bin/python executable is controlled by the alternatives system. Any manual changes may be overwritten upon an update.
Additional Python-related commands, such as pip3, do not have configurable unversioned variants.
39.1. Configuring the unversioned python command directly
You can configure the unversioned python command directly to a selected version of Python.
Prerequisites
- Ensure that the required version of Python is installed.
Procedure
To configure the unversioned python command to Python 3.6, use:
# alternatives --set python /usr/bin/python3To configure the unversioned python command to Python 3.8, use:
# alternatives --set python /usr/bin/python3.8To configure the unversioned python command to Python 3.9, use:
# alternatives --set python /usr/bin/python3.9To configure the unversioned python command to Python 2, use:
# alternatives --set python /usr/bin/python2
39.2. Configuring the unversioned python command to the required Python version interactively
You can configure the unversioned python command to the required Python version interactively.
Prerequisites
- Ensure that the required version of Python is installed.
Procedure
To configure the unversioned python command interactively, use:
# alternatives --config python Select the required version from the provided list.To reset this configuration and remove the unversioned python command, use:
# alternatives --auto python39.3. Additional resources
- alternatives(8) and unversioned-python(1) man pages
Chapter 40. Packaging Python 3 RPMs
Most Python projects use Setuptools for packaging, and define package information in the setup.py file. For more information about Setuptools packaging, see the Setuptools documentation.
You can also package your Python project into an RPM package, which provides the following advantages compared to Setuptools packaging:
- Specification of dependencies
of a package on other RPMs (even non-Python)
Cryptographic signing
With cryptographic signing, content of RPM packages can be verified, integrated, and tested with the rest of the operating system.
40.1. SPEC file description for a Python package
A SPEC file contains instructions that the rpmbuild utility uses to build an RPM. The instructions are included in a series of sections. A SPEC file has two main parts in which the sections are defined:
- Preamble (contains a series of metadata items that are used in the Body) Body (contains the main part of the instructions)
An RPM SPEC file for Python projects has some specifics compared to non-Python RPM SPEC files. Most notably, a name of any RPM package of a Python library must always include the prefix determining the version, for example, python3 for Python 3.6, python38 for Python 3.8, or python39 for Python 3.9.
Other specifics are shown in the following SPEC file example for the python3-detox package. For description of such specifics, see the notes below the example.
%global modname detox 1 Name: python3-detox 2 Version: 0.12 Release: 4%?dist Summary: Distributing activities of the tox tool License: MIT URL: https://pypi.io/project/detox Source0: https://pypi.io/packages/source/d/%modname/%modname-%version.tar.gz BuildArch: noarch BuildRequires: python36-devel 3 BuildRequires: python3-setuptools BuildRequires: python36-rpm-macros BuildRequires: python3-six BuildRequires: python3-tox BuildRequires: python3-py BuildRequires: python3-eventlet %?python_enable_dependency_generator 4 %description Detox is the distributed version of the tox python testing tool. It makes efficient use of multiple CPUs by running all possible activities in parallel. Detox has the same options and configuration that tox has, so after installation you can run it in the same way and with the same options that you use for tox. $ detox %prep %autosetup -n %modname-%version %build %py3_build 5 %install %py3_install %check %__python3 setup.py test 6 %files -n python3-%modname %doc CHANGELOG %license LICENSE %_bindir/detox %python3_sitelib/%modname/ %python3_sitelib/%modname-%version* %changelog ...1
The modname macro contains the name of the Python project. In this example it is detox.
2When packaging a Python project into RPM, the python3 prefix always needs to be added to the original name of the project. The original name here is detox and the name of the RPM is python3-detox.
3BuildRequires specifies what packages are required to build and test this package. In BuildRequires, always include items providing tools necessary for building Python packages: python36-devel and python3-setuptools. The python36-rpm-macros package is required so that files with /usr/bin/python3 interpreter directives are automatically changed to /usr/bin/python3.6.
4Every Python package requires some other packages to work correctly. Such packages need to be specified in the SPEC file as well. To specify the dependencies, you can use the %python_enable_dependency_generator macro to automatically use dependencies defined in the setup.py file. If a package has dependencies that are not specified using Setuptools, specify them within additional Requires directives.
5The %py3_build and %py3_install macros run the setup.py build and setup.py install commands, respectively, with additional arguments to specify installation locations, the interpreter to use, and other details.
6The check section provides a macro that runs the correct version of Python. The %__python3 macro contains a path for the Python 3 interpreter, for example /usr/bin/python3. We recommend to always use the macro rather than a literal path.
40.2. Common macros for Python 3 RPMs
In a SPEC file, always use the macros that are described in the following Macros for Python 3 RPMs table rather than hardcoding their values.
In macro names, always use python3 or python2 instead of unversioned python. Configure the particular Python 3 version in the BuildRequires of the SPEC file to python36-rpm-macros, python38-rpm-macros, or python39-rpm-macros.
Table 40.1. Macros for Python 3 RPMs
MacroNormal DefinitionDescription
%__python3
/usr/bin/python3
Python 3 interpreter
%python3_version
3.6
The full version of the Python 3 interpreter.
%python3_sitelib
/usr/lib/python3.6/site-packages
Where pure-Python modules are installed.
%python3_sitearch
/usr/lib64/python3.6/site-packages
Where modules containing architecture-specific extensions are installed.
%py3_build
Runs the setup.py build command with arguments suitable for a system package.
%py3_install
Runs the setup.py install command with arguments suitable for a system package.
40.3. Automatic provides for Python RPMs
When packaging a Python project, make sure that the following directories are included in the resulting RPM if these directories are present:
- .dist-info .egg-info .egg-link
From these directories, the RPM build process automatically generates virtual pythonX.Ydist provides, for example, python3.6dist(detox). These virtual provides are used by packages that are specified by the %python_enable_dependency_generator macro.
Chapter 41. Handling interpreter directives in Python scripts
In Red Hat Enterprise Linux 8, executable Python scripts are expected to use interpreter directives (also known as hashbangs or shebangs) that explicitly specify a minimum the major Python version. For example:
#!/usr/bin/python3 #!/usr/bin/python3.6 #!/usr/bin/python2The /usr/lib/rpm/redhat/brp-mangle-shebangs buildroot policy (BRP) script is run automatically when building any RPM package, and attempts to correct interpreter directives in all executable files.
The BRP script generates errors when encountering a Python script with an ambiguous interpreter directive, such as:
#!/usr/bin/pythonor
#!/usr/bin/env python41.1. Modifying interpreter directives in Python scripts
Modify interpreter directives in the Python scripts that cause the build errors RPM build time.
Prerequisites
- Some of the interpreter directives in your Python scripts cause a build error.
Procedure
To modify interpreter directives, complete one of the following tasks:
Apply the pathfix.py script from the platform-python-devel package:
# pathfix.py -pn -i %__python3 PATH …Note that multiple PATHs can be specified. If a PATH is a directory, pathfix.py recursively scans for any Python scripts matching the pattern ^[a-zA-Z0-9_]+.py$, not only those with an ambiguous interpreter directive. Add this command to the %prep section or the end of the %install section.
Modify the packaged Python scripts so that they conform to the expected format. For this purpose, pathfix.py can be used outside the RPM build process, too. When running pathfix.py outside an RPM build, replace %__python3 from the example above with a path for the interpreter directive, such as /usr/bin/python3.If the packaged Python scripts require a version other than Python 3.6, adjust the preceding commands to include the required version.
41.2. Changing /usr/bin/python3 interpreter directives in your custom packages
By default, interpreter directives in the form of /usr/bin/python3 are replaced with interpreter directives pointing to Python from the platform-python package, which is used for system tools with Red Hat Enterprise Linux. You can change the /usr/bin/python3 interpreter directives in your custom packages to point to a specific version of Python that you have installed from the AppStream repository.
Procedure
To build your package for a specific version of Python, add the python*-rpm-macros subpackage of the respective python package to the BuildRequires section of the SPEC file. For example, for Python 3.6, include the following line:
BuildRequires: python36-rpm-macrosAs a result, the /usr/bin/python3 interpreter directives in your custom package are automatically converted to /usr/bin/python3.6.
To prevent the BRP script from checking and modifying interpreter directives, use the following RPM directive:
%undefine __brp_mangle_shebangsChapter 42. Using the PHP scripting language
Hypertext Preprocessor (PHP) is a general-purpose scripting language mainly used for server-side scripting, which enables you to run the PHP code using a web server.
In RHEL 8, the PHP scripting language is provided by the php module, which is available in multiple streams (versions).
Depending on your use case, you can install a specific profile of the selected module stream:
- common - The default profile for server-side scripting using a web server. It includes several widely used
extensions. minimal - This profile installs only the command-line interface for scripting with PHP without using a web server. devel - This profile includes packages from the common profile and additional packages for development purposes.
42.1. Installing the PHP scripting language
This section describes how to install a selected version of the php module.
Procedure
To install a php module stream with the default profile, use:
# yum module install php:streamReplace stream with the version of PHP you wish to install.
For example, to install PHP 8.0:
# yum module install php:8.0The default common profile installs also the php-fpm package, and preconfigures PHP for use with the Apache HTTP Server or nginx.
To install a specific profile of a php module stream, use:
# yum module install php:stream/profileReplace stream with the desired version and profile with the name of the profile you wish to install.
For example, to install PHP 8.0 for use without a web server:
# yum module install php:8.0/minimalAdditional resources
- If you want to upgrade from an earlier version of PHP available in RHEL 8, see
Switching to a later stream. For more information on managing RHEL 8 modules and streams, see
Installing, managing, and removing user-space components.
42.2. Using the PHP scripting language with a web server
42.2.1. Using PHP with the Apache HTTP Server
In Red Hat Enterprise Linux 8, the Apache HTTP Server enables you to run PHP as a FastCGI process server. FastCGI Process Manager (FPM) is an alternative PHP FastCGI daemon that allows a website to manage high loads. PHP uses FastCGI Process Manager by default in RHEL 8.
This section describes how to run the PHP code using the FastCGI process server.
Procedure
Install the httpd module:
# yum module install httpd:2.4Start the Apache HTTP Server:
# systemctl start httpdOr, if the Apache HTTP Server is already running on your system, restart the httpd service after installing PHP:
# systemctl restart httpdStart the php-fpm service:
# systemctl start php-fpmOptional: Enable both services to start boot time:
# systemctl enable php-fpm httpdTo obtain information about your PHP settings, create the index.php file with the following content in the /var/www/html/ directory:
echo '' > /var/www/html/index.phpTo run the index.php file, point the browser to:
://Optional: Adjust configuration if you have specific requirements:
- /etc/httpd/conf/httpd.conf - generic httpd configuration /etc/httpd/conf.d/php.conf - PHP-specific configuration for httpd /usr/lib/systemd/system/httpd.service.d/php-fpm.conf - by default, the php-fpm service is started with httpd /etc/php-fpm.conf - FPM main configuration
/etc/php-fpm.d/www.conf - default www pool configuration
Example 42.1. Running a "Hello, World!" PHP script using the Apache HTTP Server
Create a hello directory for your project in the /var/www/html/ directory:
# mkdir helloCreate a hello.php file in the /var/www/html/hello/ directory with the following content:
#Start the Apache HTTP Server:
# systemctl start httpdTo run the hello.php file, point the browser to:
://As a result, a web page with the “Hello, World!” text is displayed.
42.2.2. Using PHP with the nginx web server
This section describes how to run PHP code through the nginx web server.
Procedure
Install an nginx module stream:
# yum module install nginx:streamReplace stream with the version of nginx you wish to install.
For example, to install nginx version 1.18:
# yum module install nginx:1.18Start the nginx server:
# systemctl start nginxOr, if the nginx server is already running on your system, restart the nginx service after installing PHP:
# systemctl restart nginxStart the php-fpm service:
# systemctl start php-fpmOptional: Enable both services to start boot time:
# systemctl enable php-fpm nginxTo obtain information about your PHP settings, create the index.php file with the following content in the /usr/share/nginx/html/ directory:
echo '' > /usr/share/nginx/html/index.phpTo run the index.php file, point the browser to:
://Optional: Adjust configuration if you have specific requirements:
- /etc/nginx/nginx.conf - nginx main configuration /etc/nginx/conf.d/php-fpm.conf - FPM configuration for nginx /etc/php-fpm.conf - FPM main
configuration /etc/php-fpm.d/www.conf - default www pool configuration
Example 42.2. Running a "Hello, World!" PHP script using the nginx server
Create a hello directory for your project in the /usr/share/nginx/html/ directory:
# mkdir helloCreate a hello.php file in the /usr/share/nginx/html/hello/ directory with the following content:
#Start the nginx server:
# systemctl start nginxTo run the hello.php file, point the browser to:
://As a result, a web page with the “Hello, World!” text is displayed.
42.3. Running a PHP script using the command-line interface
A PHP script is usually run using a web server, but also can be run using the command-line interface.
If you want to run php scripts using only command-line, install the minimal profile of a php module stream.
See Installing the PHP scripting language.
Procedure
In a text editor, create a filename.php file
Replace filename with the name of your file.
Execute the created filename.php file from the command line:
# php filename.phpExample 42.3. Running a "Hello, World!" PHP script using the command-line interface
Create a hello.php file with the following content using a text editor:
Execute the hello.php file from the command line:
# php hello.phpAs a result, “Hello, World!” is printed.
42.4. Additional resources
- httpd(8) — The manual page for the httpd service containing the complete list of its
command-line options. httpd.conf(5) — The manual page for httpd configuration, describing the structure and location of the httpd configuration files. nginx(8) — The manual page for the nginx web server containing the complete list of its command-line options and list of signals. php-fpm(8) — The manual page for PHP FPM describing the complete list of its command-line options and configuration files.
Chapter 43. Using langpacks
Langpacks are meta-packages which install extra add-on packages containing translations, dictionaries and locales for every package installed on the system.
On a Red Hat Enterprise Linux 8 system, langpacks installation is based on the langpacks-
There are two prerequisites to be able to use langpacks for a selected language. If these prerequisites are fulfilled, the language meta-packages pull their langpack for the selected language automatically in the transaction set.
Prerequisites
The langpacks-
On Red Hat Enterprise Linux 8, the langpacks meta packages are installed automatically with the initial installation of the operating system using the Anaconda installer, because these packages are available in the in Application Stream repository.
For more information, see Checking languages that provide langpacks.
The base package, for which you want to search the locale packages, has already been installed on the system.43.1. Checking languages that provide langpacks
Folow this procedure to check which languages provide langpacks.
Procedure
Execute the following command:
# yum list langpacks-*43.2. Working with RPM weak dependency-based langpacks
This section describes multiple actions that you may want to perform when querying RPM weak dependency-based langpacks, installing or removing language support.
43.2.1. Listing already installed language support
To list the already installed language support, use this procedure.
Procedure
Execute the following command:
# yum list installed langpacks*43.2.2. Checking the availability of language support
To check if language support is available for any language, use the following procedure.
Procedure
- Execute the following command:
43.2.3. Listing packages installed for a language
To list what packages get installed for any language, use the following procedure:
Procedure
Execute the following command:
# yum repoquery --whatsupplements langpacks-43.2.4. Installing language support
To add new a language support, use the following procedure.
Procedure
Execute the following command:
# yum install langpacks-43.2.5. Removing language support
To remove any installed language support, use the following procedure.
Procedure
Execute the following command:
# yum remove langpacks-43.3. Saving disk space by using glibc-langpack-
Currently, all locales are stored in the /usr/lib/locale/locale-archive file, which requires a lot of disk space.
On systems where disk space is a critical issue, such as containers and cloud images, or only a few locales are needed, you can use the glibc
locale langpack packages (glibc-langpack-
To install locales individually, and thus gain a smaller package installation footprint, use the following procedure.
Procedure
Execute the following command:
# yum install glibc-langpack- When installing the operating system with Anaconda, glibc-langpack-
Note that installing only selected glibc-langpack-
If disk space is not an issue, keep all locales installed by using the glibc-all-langpacks package.
Chapter 44. Getting started with Tcl/Tk
44.1. Introduction to Tcl/Tk
Tool command language (Tcl) is a dynamic programming language. The interpreter for this language, together with the C library, is provided by the tcl package.
Using Tcl paired with Tk (Tcl/Tk) enables creating cross-platform GUI applications. Tk is provided by the tk package.
Note that Tk can refer to any of the the following:
- A programming toolkit for multiple languages A Tk C library bindings available
for multiple languages, such as C, Ruby, Perl and Python A wish interpreter that instantiates a Tk console A Tk extension that adds a number of new commands to a particular Tcl interpreter
For more information about Tcl/Tk, see the Tcl/Tk manual or Tcl/Tk documentation web page.
44.2. Notable changes in Tcl/Tk 8.6
Red Hat Enterprise Linux 7 used Tcl/Tk 8.5. With Red Hat Enterprise Linux 8, Tcl/Tk version 8.6 is provided in the Base OS repository.
Major changes in Tcl/Tk 8.6 compared to Tcl/Tk 8.5 are:
- Object-oriented programming support Stackless evaluation implementation Enhanced exceptions handling Collection of third-party packages built and installed with Tcl Multi-thread operations enabled SQL database-powered scripts support IPv6 networking support Built-in Zlib compression
List processing
Two new commands, lmap and dict map are available, which allow the expression of transformations over Tcl containers.
Stacked channels by script
Two new commands, chan push and chan pop are available, which allow to add or remove transformations to or from I/O channels.
Major changes in Tk include:
- Built-in PNG image support
Busy windows
A new command, tk busy is available, which disables user interaction for a window or a widget and shows the busy cursor.
New font selection dialog interface Angled text support Moving things on a canvas supportFor the detailed list of changes between Tcl 8.5 and Tcl 8.6, see Changes in Tcl/Tk 8.6.
44.3. Migrating to Tcl/Tk 8.6
Red Hat Enterprise Linux 7 used Tcl/Tk 8.5. With Red Hat Enterprise Linux 8, Tcl/Tk version 8.6 is provided in the Base OS repository.
This section describes migration path to Tcl/Tk 8.6 for:
-
Developers writing Tcl extensions or embedding Tcl interpreter into their applications Users scripting tasks with Tcl/Tk
44.3.1. Migration path for developers of Tcl extensions
To make your code compatible with Tcl 8.6, use the following procedure.
Procedure
Rewrite the code to use the interp structure. For example, if your code reads interp→errorLine, rewrite it to use the following function:
Tcl_GetErrorLine(interp)This is necessary because Tcl 8.6 limits direct access to members of the interp structure.
To make your code compatible with both Tcl 8.5 and Tcl 8.6, use the following code snippet in a header file of your C or C++ application or extension that includes the Tcl library:
# include44.3.2. Migration path for users scripting their tasks with Tcl/Tk
In Tcl 8.6, most scripts work the same way as with the previous version of Tcl.
To migrate you code into Tcl 8.6, use this procedure.
Procedure
When writing a portable code, make sure to not use the commands that are no longer supported in Tk 8.6:
tkIconList_Arrange tkIconList_AutoScan tkIconList_Btn1 tkIconList_Config tkIconList_Create tkIconList_CtrlBtn1 tkIconList_Curselection tkIconList_DeleteAll tkIconList_Double1 tkIconList_DrawSelection tkIconList_FocusIn tkIconList_FocusOut tkIconList_Get tkIconList_Goto tkIconList_Index tkIconList_Invoke tkIconList_KeyPress tkIconList_Leave1 tkIconList_LeftRight tkIconList_Motion1 tkIconList_Reset tkIconList_ReturnKey tkIconList_See tkIconList_Select tkIconList_Selection tkIconList_ShiftBtn1 tkIconList_UpDownNote that you can check the list of unsupported commands also in the /usr/share/tk8.6/unsupported.tcl file.
Legal Notice
Copyright © 2022 Red Hat, Inc.
The text of and illustrations in this document are licensed by Red Hat under a Creative Commons Attribution–Share Alike 3.0 Unported license ("CC-BY-SA"). An explanation of CC-BY-SA is available ://creativecommons.org/licenses/by-sa/3.0/. In accordance with CC-BY-SA, if you distribute this document or an adaptation of it, you must provide the URL for the original version.
Red Hat, as the licensor of this document, waives the right to enforce, and agrees not to assert, Section 4d of CC-BY-SA to the fullest extent permitted by applicable law.
Red Hat, Red Hat Enterprise Linux, the Shadowman logo, the Red Hat logo, JBoss, OpenShift, Fedora, the Infinity logo, and RHCE are trademarks of Red Hat, Inc., registered in the United States and other countries.
Linux® is the registered trademark of Linus Torvalds in the United States and other countries.
Java® is a registered trademark of Oracle and/or its affiliates.
XFS® is a trademark of Silicon Graphics International Corp. or its subsidiaries in the United States and/or other countries.
MySQL® is a registered trademark of MySQL AB in the United States, the European Union and other countries.
Node.js® is an official trademark of Joyent. Red Hat is not formally related to or endorsed by the official Joyent Node.js open source or commercial project.
The OpenStack® Word Mark and OpenStack logo are either registered trademarks/service marks or trademarks/service marks of the OpenStack Foundation, in the United States and other countries and are used with the OpenStack Foundation's permission. We are not affiliated with, endorsed or sponsored by the OpenStack Foundation, or the OpenStack community.
All other trademarks are the property of their respective owners.
What Windows 10 feature is a user specific data protection mechanism that protects local resources?
Data Execution Prevention (DEP) is a processor feature in Windows 10 that monitors processes to ensure that they do not access unauthorized memory spaces. Data Collector Sets organize multiple counters into a single unit.Which utility allows you to visually display the data generated by counters and allows you to select the individual counters you want to review?
What utility allows you to visually display the data generated by counters, and allows you to select the individual counters you want to view? Data Collector Sets organize multiple counters into a single unit.Which of the following best describes a set of performance indicators captured when system performance is acceptable effectively defining normal performance?
Which of the following best describes a set of performance indicators captured when system performance is acceptable, effectively defining normal performance? Correct. A baseline is a set of performance indicators captured when system performance is acceptable, effectively defining normal performance.Which Active Directory component has a central security database that is used by all computers that are members of it?
Which Active Directory component has a central security database that is used by all computers that are members of it? Domain controllers tải về Group Policy settings every five minutes. Tải thêm tài liệu liên quan đến nội dung bài viết Which Windows 10 feature provides an automated diagnosis and repair of boot problems plus a centralized platform for advanced recovery tool?
Post a Comment