Review How often should a phlebotomy technician run quality control test on point of care testing instruments?
Thủ Thuật Hướng dẫn How often should a phlebotomy technician run quality control test on point of care testing instruments? 2022
Bùi Minh Chính đang tìm kiếm từ khóa How often should a phlebotomy technician run quality control test on point of care testing instruments? được Cập Nhật vào lúc : 2022-09-25 00:14:05 . Với phương châm chia sẻ Mẹo Hướng dẫn trong nội dung bài viết một cách Chi Tiết 2022. Nếu sau khi đọc tài liệu vẫn ko hiểu thì hoàn toàn có thể lại phản hồi ở cuối bài để Ad lý giải và hướng dẫn lại nha.This chapter covers all the steps recommended for safe phlebotomy and reiterates the accepted principles for blood drawing and blood collection (31). The chapter includes background information (Section 2.1), practical guidance (Section 2.2) and illustrations (Section 2.3) relevant to best practices in phlebotomy.
Nội dung chính- 2.1. Background information on best practices in phlebotomy2.1.1. Planning ahead2.1.2. Using an appropriate location2.1.3. Quality control2.1.4. Quality care for patients and health workers2.1.5. Quality of laboratory sampling2.2. Practical guidance on best practices in phlebotomy2.2.1. Provision of an appropriate location2.2.2. Provision of clear instructions2.2.3. Procedure for drawing blood2.3. Illustrations for best practices in
phlebotomyFigure 2.2Filling tubesWhat is QC measure in phlebotomy?Which of the following actions should a phlebotomy technician take to verify the quality?When should a phlebotomy technician perform external liquid controls?Which of the following actions should a phlebotomy technician take when performing a venipuncture using an evacuated tube?
The information given in this section underpins that given in the remainder of Part II for specific situations. Chapter 4 also provides information relevant to the procedure for drawing blood given below in Section 2.2, but focuses on blood collection from donors.
Institutions can use these guidelines to establish standard operating procedures. Such procedures should clearly state the risks to patients and health workers, as well as the means to reduce those risks – discussed below in Sections 2.1.4 and 2.2.
2.1. Background information on best practices in phlebotomy
Best practices in phlebotomy involve the following factors:
planning ahead;
using an appropriate location;
standards for quality care for patients and health workers, including
–availability of appropriate supplies and protective equipment;
–availability of post-exposure prophylaxis (PEP);
–avoidance of contaminated phlebotomy equipment;
–appropriate training in phlebotomy;
–cooperation on the part of patients;
quality of laboratory sampling.
2.1.1. Planning ahead
This is the most important part of carrying out any procedure, and is usually done the start of a phlebotomy session.
2.1.2. Using an appropriate location
The phlebotomist should work in a quiet, clean, well-lit area, whether working with outpatients or inpatients.
2.1.3. Quality control
Quality assurance is an essential part of best practice in infection prevention and control (1). In phlebotomy, it helps to minimize the chance of a mishap. Table 2.1 lists the main components of quality assurance, and explains why they are important.
Table 2.1Elements of quality assurance in phlebotomy.
2.1.4. Quality care for patients and health workers
Several factors can improve safety standards and quality of care for both patients and health workers, and laboratory tests. These factors, discussed below, include:
Availability of appropriate supplies and protective equipmentProcurement of supplies is the direct responsibility of the administrative (management) structures responsible for setting up phlebotomy services. Management should:
provide hand-hygiene materials (soap and water or alcohol rub), well-fitting non-sterile gloves, single-use disposable needles, and syringes or lancing devices in sufficient numbers to ensure that each patient has a sterile needle and syringe or equivalent for each blood sampling;
make available sufficient laboratory sample tubes to prevent dangerous practices (e.g. decanting blood to recycle laboratory tubes).
Several safety-engineered devices are available on the market; such devices reduce exposure to blood and injuries. However, the use of such devices should be accompanied by other infection prevention and control practices, and training in their use. Not all safety devices are applicable to phlebotomy. Before selecting a safety-engineered device, users should thoroughly investigate available devices to determine their appropriate use, compatibility with existing phlebotomy practices, and efficacy in protecting staff and patients (12, 33). Annex B provides further information on infection prevention and control, safety equipment and best practice; Annex C provides a comprehensive guide to devices available for drawing blood, including safety-engineered equipment.
For settings with low resources, cost is a driving factor in procurement of safety-engineered devices.
Where safety-engineered devices are not available, skilled use of a needle and syringe is acceptable.
Availability of post-exposure prophylaxisAccidental exposure and specific information about an incident should be recorded in a register.
Support services should be promoted for those who undergo accidental exposure. PEP can help to avert HIV and hepatitis B infections (13, 27). Hepatitis B immunization should be provided to all health workers (including cleaners and waste handlers), either upon entry into health-care services or as part of PEP (34). Annex D has details of PEP for hepatitis B and HIV.
Avoidance of contaminated phlebotomy equipmentTourniquets are a potential source of methicillin-resistant Staphylococcus aureus (MRSA), with up to 25% of tourniquets contaminated through lack of hand hygiene on the part of the phlebotomist or reuse of contaminated tourniquets (35). In addition, reusable finger-prick devices and related point-of-care testing devices (e.g. glucometers) contaminated with blood have been implicated in outbreaks of hepatitis B (4, 5, 36).
To avoid contamination, any common-use items, such as glucometers, should be visibly clean before use on a patient, and single-use items should not be reused.
Training in phlebotomyAll staff should be trained in phlebotomy, to prevent unnecessary risk of exposure to blood and to reduce adverse events for patients.
Groups of health workers who historically are not formally trained in phlebotomy should be encouraged to take up such training; lax infection prevention and control practices result in poor safety for staff and risk to patients (20, 37).
The length and depth of training will depend on local conditions; however, the training should least cover the essentials (see Annex E) (38).
Supervision by experienced staff and structured training is necessary for all health workers, including physicians, who undertake blood sampling.
One of the essential markers of quality of care in phlebotomy is the involvement and cooperation of the patient; this is mutually beneficial to both the health worker and the patient.
Clear information – either written or verbal – should be available to each patient who undergoes phlebotomy. Annex F provides sample text for explaining the blood-sampling procedure to a patient.
2.1.5. Quality of laboratory sampling
Factors that influence the outcome of laboratory results during collection and transportation include:
knowledge of staff involved in blood collection;
use of the correct gauge of hypodermic needle (see Table 3.1 in Chapter 3) to prevent haemolysis or abnormal results;
the anatomical insertion site for venepuncture;
the use of recommended laboratory collection tubes;
patient–sample matching (i.e. labelling);
transportation conditions;
interpretation of results for clinical management.
2.2. Practical guidance on best practices in phlebotomy
2.2.1. Provision of an appropriate location
In an outpatient department or clinic, provide a dedicated phlebotomy cubicle containing:
–a clean surface with two chairs (one for the phlebotomist and the other for the patient);
–a hand wash basin with soap, running water and paper towels;
–alcohol hand rub.
In the blood-sampling room for an outpatient department or clinic, provide a comfortable reclining couch with an arm rest.
In inpatient areas and wards:
–the patient's bedside, close the bed curtain to offer privacy
–ensure that blood sampling is done in a private and clean manner.
2.2.2. Provision of clear instructions
Ensure that the indications for blood sampling are clearly defined, either in a written protocol or in documented instructions (e.g. in a laboratory form).
2.2.3. Procedure for drawing blood
At all times, follow the strategies for infection prevention and control listed in Table 2.2.
Table 2.2Infection prevention and control practices.
Step 1. Assemble equipmentCollect all the equipment needed for the procedure and place it within safe and easy reach on a tray or trolley, ensuring that all the items are clearly visible. The equipment required includes:
a supply of laboratory sample tubes, which should be stored dry and upright in a rack; blood can be collected in
–sterile glass or plastic tubes with rubber caps (the choice of tube will depend on what is agreed with the laboratory);
–vacuum-extraction blood tubes; or
–glass tubes with screw caps;
a sterile glass or bleeding pack (collapsible) if large quantities of blood are to be collected;
well-fitting, non-sterile gloves;
an assortment of blood-sampling devices (safety-engineered devices or needles and syringes, see below), of different sizes;
a tourniquet;
alcohol hand rub;
gauze or cotton-wool ball to be applied over puncture site;
laboratory specimen labels;
writing equipment;
laboratory forms;
leak-proof transportation bags and containers;
Ensure that the rack containing the sample tubes is close to you, the health worker, but away from the patient, to avoid it being accidentally tipped over.
Step 2. Identify and prepare the patientWhere the patient is adult and conscious, follow the steps outlined below.
Introduce yourself to the patient, and ask the patient to state their full name.
Check that the laboratory form matches the patient's identity (i.e. match the patient's details with the laboratory form, to ensure accurate identification).
Ask whether the patent has allergies, phobias or has ever fainted during previous injections or blood draws.
If the patient is anxious or afraid, reassure the person and ask what would make them more comfortable.
Make the patient comfortable in a supine position (if possible).
Place a clean paper or towel under the patient's arm.
Discuss the test to be performed (see Annex F) and obtain verbal consent. The patient has a right to refuse a test any time before the blood sampling, so it is important to ensure that the patient has understood the procedure.
For paediatric or neonatal patients, see Chapter 6.
Step 3. Select the siteGeneralExtend the patient's arm and inspect the antecubital fossa or forearm.
Locate a vein of a good size that is visible, straight and clear. The diagram in Section 2.3, shows common positions of the vessels, but many variations are possible. The median cubital vein lies between muscles and is usually the most easy to puncture. Under the basilic vein runs an artery and a nerve, so puncturing here runs the risk of damaging the nerve or artery and is usually more painful. DO NOT insert the needle where veins are diverting, because this increases the chance of a haematoma.
The vein should be visible without applying the tourniquet. Locating the vein will help in determining the correct size of needle.
Apply the tourniquet about 4–5 finger widths above the venepuncture site and re-examine the vein.
In hospitalized patients, do not take blood from an existing peripheral venous access site because this may give false results. Haemolysis, contamination and presence of intravenous fluid and medication can all alter the results (39). Nursing staff and physicians may access central venous lines for specimens following protocols. However, specimens from central lines carry a risk of contamination or erroneous laboratory test results.
It is acceptable, but not ideal, to draw blood specimens when first introducing an in-dwelling venous device, before connecting the cannula to the intravenous fluids.
Step 4. Perform hand hygiene and put on gloves- –
wash hands with soap and water, and dry with single-use towels; or
–if hands are not visibly contaminated, clean with alcohol rub – use 3 ml of alcohol rub on the palm of the hand, and rub it into fingertips, back of hands and all over the hands until dry.
Unless drawing blood cultures, or prepping for a blood collection, clean the site with a 70% alcohol swab for 30 seconds and allow to dry completely (30 seconds) (40–42).
Note: alcohol is preferable to povidone iodine, because blood contaminated with povidone iodine may falsely increase levels of potassium, phosphorus or uric acid in laboratory test results (6, 7).
Apply firm but gentle pressure. Start from the centre of the venepuncture site and work downward and outwards to cover an area of 2 cm or more.
Allow the area to dry. Failure to allow enough contact time increases the risk of contamination.
DO NOT touch the cleaned site; in particular, DO NOT place a finger over the vein to guide the shaft of the exposed needle. It the site is touched, repeat the disinfection.
Perform venepuncture as follows.
Anchor the vein by holding the patient's arm and placing a thumb BELOW the venepuncture site.
Ask the patient to form a fist so the veins are more prominent.
Enter the vein swiftly a 30 degree angle or less, and continue to introduce the needle along the vein the easiest angle of entry.
Once sufficient blood has been collected, release the tourniquet BEFORE withdrawing the needle. Some guidelines suggest removing the tourniquet as soon as blood flow is established, and always before it has been in place for two minutes or more.
Withdraw the needle gently and apply gentle pressure to the site with a clean gauze or dry cotton-wool ball. Ask the patient to hold the gauze or cotton wool in place, with the arm extended and raised. Ask the patient NOT to bend the arm, because doing so causes a haematoma.
When obtaining multiple tubes of blood, use evacuated tubes with a needle and tube holder. This system allows the tubes to be filled directly. If this system is not available, use a syringe or winged needle set instead.
If a syringe or winged needle set is used, best practice is to place the tube into a rack before filling the tube. To prevent needle-sticks, use one hand to fill the tube or use a needle shield between the needle and the hand holding the tube.
Pierce the stopper on the tube with the needle directly above the tube using slow, steady pressure. Do not press the syringe plunger because additional pressure increases the risk of haemolysis.
Where possible, keep the tubes in a rack and move the rack towards you. Inject downwards into the appropriate coloured stopper. DO NOT remove the stopper because it will release the vacuum.
If the sample tube does not have a rubber stopper, inject extremely slowly into the tube as minimizing the pressure and velocity used to transfer the specimen reduces the risk of haemolysis. DO NOT recap and remove the needle.
Before dispatch, invert the tubes containing additives for the required number of times (as specified by the local laboratory).
Draw blood collection tubes in the correct order, to avoid cross-contamination of additives between tubes. As colour coding and tube additives may vary, verify recommendations with local laboratories. For illustration purposes, Table 2.3 shows the revised, simplified recommended order of draw for vacuum tubes or syringe and needle, based on United States National Committee Clinical Laboratory Standards consensus in 2003 (43).
Table 2.3Recommended order of draw for plastic vacuum tubes.
Step 9. Clean contaminated surfaces and complete patient procedureDiscard the used needle and syringe or blood sampling device into a puncture-resistant sharps container.
Check the label and forms for accuracy. The label should be clearly written with the information required by the laboratory, which is typically the patient's first and last names, file number, date of birth, and the date and time when the blood was taken.
Discard used items into the appropriate category of waste. Items used for phlebotomy that would not release a drop of blood if squeezed (e.g. gloves) may be discarded in the general waste, unless local regulations state otherwise.
Recheck the labels on the tubes and the forms before dispatch.
Inform the patient when the procedure is over.
Ask the patient or donor how they are feeling. Check the insertion site to verify that it is not bleeding, then thank the patient and say something reassuring and encouraging before the person leaves.
Pack laboratory samples safely in a plastic leak-proof bag with an outside compartment for the laboratory request form. Placing the requisition on the outside helps avoid contamination.
If there are multiple tubes, place them in a rack or padded holder to avoid breakage during transportation.
If blood spillage has occurred (e.g. because of a laboratory sample breaking in the phlebotomy area or during transportation, or excessive bleeding during the procedure), clean it up. An example of a safe procedure is given below.
Put on gloves and a gown or apron if contamination or bleaching of a uniform is likely in a large spill.
Mop up liquid from large spills using paper towels, and place them into the infectious waste.
Remove as much blood as possible with wet cloths before disinfecting.
Assess the surface to see whether it will be damaged by a bleach and water solution.
For cement, metal and other surfaces that can tolerate a stronger bleach solution, food the area with an approximately 5000 parts per million (ppm) solution of sodium hypochlorite (1:10 dilution of a 5.25% chlorine bleach to water). This is the preferred concentration for large spills (44). Leave the area wet for 10 minutes.
For surfaces that may be corroded or discoloured by a strong bleach, clean carefully to remove all visible stains. Make a weaker solution and leave it in contact for a longer period of time. For example, an approximately 525 ppm solution (1:100 dilution of 5.25% bleach) is effective.
Prepare bleach solution fresh daily and keep it in a closed container because it degrades over time and in contact with the sun.
If a person was exposed to blood through nonintact skin, mucous membranes or a puncture wound, complete an incident report, as described in WHO best practices for injections and related procedures toolkit. For transportation of blood samples outside a hospital, equip the transportation vehicle with a blood spillage kit. Annex H has further information on dealing with a blood spillage.
2.3. Illustrations for best practices in phlebotomy
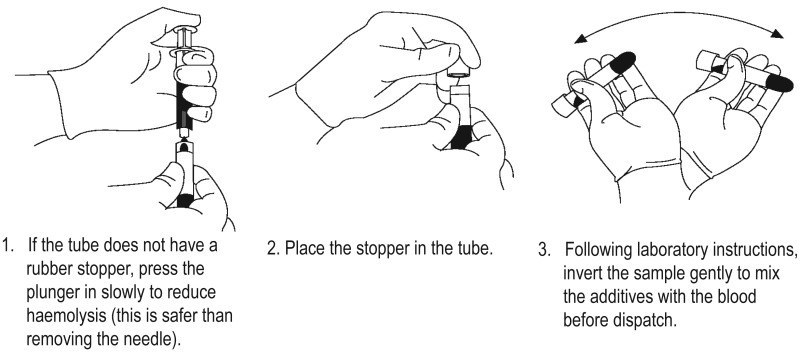
Figure 2.2Filling tubes
What is QC measure in phlebotomy?
Quality Control/Quality Assurance In a medical laboratory, the quality can be defined as accuracy, reliability, and timeliness of the reported test results (1). QC refers to those measures that must be included in each assay to verify that the test is working properly.Which of the following actions should a phlebotomy technician take to verify the quality?
Which of the following actions should a phlebotomy technician take to verify the quality of venipuncture supplies before beginning a blood draw on an adult patient? Inspect the integrity of the needle's seal. A phlebotomy technician is verifying a patient's identity before performing a venipuncture procedure.When should a phlebotomy technician perform external liquid controls?
nha pretest.Which of the following actions should a phlebotomy technician take when performing a venipuncture using an evacuated tube?
Which of the following actions should a phlebotomy technician take when performing a venipuncture using an evacuated tube system? The technician should position the needle in the same direction as the vein and a 30 degree angle with the bevel up. Tải thêm tài liệu liên quan đến nội dung bài viết How often should a phlebotomy technician run quality control test on point of care testing instruments?
Post a Comment